Buzzings from a quilter who bumbles her way through life!
Showing posts with label organization. Show all posts

Monday, September 10, 2012

Hanger Covers for Easier Mornings!


When I was a little girl, "panties of the week" were all the rage. You could have a pair for each day and the day was embroidered right there on them! I guess this was a way to be sure little girls didn't wear the same panties every day or something!  I used this same idea for hangers. I had planned (before my last minute trip to California) to make one for each school day of the week. The idea is that you can help your kids pick out their school clothes for the week and have them already coordinated and hanging for each day! I'm really into anything that helps make school day mornings easier! (When my boys were school age, I was teaching. That meant that I was getting ready the same time they were. Anything I could do ahead of time made the mornings flow more easily!) The little clothespins hanging down are for the pants, shorts, or skirts that go with the top. Well, I just got back from my trip and I am going to go ahead and post this without Tuesday, Wednesday, Thursday, and Friday! Of course, they don't have to have days of the week on them. How about cute embroidery? OR just use your favorite fabrics!
1. Trace around the hanger you plan to use. Hangers can be a little different in size. If your hanger is really thick, add a little to the pattern to account for the thickness. Cut out your pattern.

2. Layer two layers of your fabric, right sides together, and beneath that put two layers of batting. Yes, batting on the bottom, fabric on top! Trace your pattern onto the top layer of fabric.
3. At the top, where the hook of the hanger goes, square up the end. You will be turning this under and topstitching it. I found later that if I had made the one above just a little wider, it would have been easier to turn under, but I made it work!
4. At the side bottom of the hanger, make a line straight down about an inch past the bottom of the hanger. You will be leaving the bottom of the cover open.
5. Before cutting out, sew your cover together.
6. Trim the seam to 1/8" and snip the corners at the top of the hanger.
7. Turn the TOP fabric right side out. You should end up with the batting on the inside and the fabric with right sides showing.
8. Trim the bottom so that it is even.
9.Turn under and top stitch the top and bottom of the cover.
10. Slip over the hanger to be sure it fits.
11. If you are adding embroidery, this is time to do that.
12. To add the clothespins, put a ribbon through the eye in the top of the spring and tie it to the top of the hanger. If your hanger does not have a little inset at the top, you might need to attach it to the inside of the cover instead.

 So here it is! Ready to hang in the closet and provide a chance for a little more calm on school mornings. I can see how a set of these could be a fun gift and could be made of really cute fabrics. 
So what do you think? Would this help out anyone you know? They don't have to be school children. I know some grown-ups who might benefit from a little organization like this! 
Until next time.......

post signature

Thursday, July 28, 2011

My New Quilting Studio


Well, this is my new space so far. It's not really green! It is turquoise! Getting a picture pointed toward this window was challenging for me, so the lighting is not quite right.  I can't promise I won't make changes and additions in the next few weeks as I learn how to work in this room. I have reused the shelves and cabinets from my old room, but because it is more visible from the main living area, I put most of my fabric in plastic tubs for a neater look. (It wouldn't all fit, and since I couldn't find tubs to fit between the narrower shelf above the other tubs, I have some folded fabric there. 
 
I've put my vintage button cards above the window along with my Great-Grandmother's and Grandmother's aprons. The little stool is also a vintage item. The wooden ironing board was handed down to me and was from the 1940's. 


I mounted my hardware drawers  on the wall to get them off my cabinets. They hold all my embroidery floss.The space left at the end of the cabinets was perfect for this because it didn't interfere with opening the closet doors. The little step stool is a necessity because I am only 5'2". 


      Here is a view of the room taken from the window side. The opposite side of the room is not finished yet. I have my sewing machine cabinet there, but still need a cutting table and a place for some of my office equipment. Hopefully, that will happen soon! 
So, that's my room as it is today! I can't wait to start working in it, but I have a mess now in the rest of the house that I have to clean up.  (yuck!)
post signature


Monday, May 9, 2011

Tutorial:Travel Roll-Up with Removable Pouches

     
I have a great makeup bag designed for travel. It has several pouches (attached with hook and loop tape) that can be removed and replaced easily. I decided that I needed a similar bag for sewing and quilting notions. I could fill the pouches with thread, scissors, rotary cutter, fat quarters, embroidery floss, etc. I could then roll it up, place it securely in my tote bag, and take it along to workshops and retreats. Everything would be easily accessible and in one place. I could also use it on trips, filling it with socks, underwear, jewelry, or how about toothpaste, toothbrush, makeup (if you don't already have one of those makeup bags) and other toiletries. 
Make one for a child and fill it with crayons, pencils, a small notebook, stencils, snacks, etc. You can use one pouch, two, three, four, or even more.
You'll need the following materials:
1.cloth for the front and back of the Roll-Up 
2.batting 
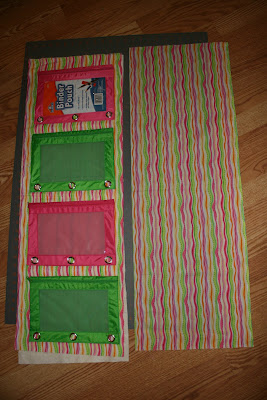
3.Binder pouches (these are made for pencils and crayons and have grommets to allow them to be put in a notebook binder. The ones I found were made by Elmer's and cost me 97 cents each.
4.Hook and loop tape - You will need both the adhesive type and the sew in type. You will use the adhesive type on the pouches and the sew in type on the cloth
5.ribbon, about 1 yard
6.binding for top of roll-up
Note: I didn't give amounts because this can be made any size and the width depends on the width of the binder pouches you get. 
1. Lay the pouches out about 1 1/2" to 2" apart and determine the length and width you want. You can use any number of binder pouches. 
2. Cut front, back and batting  this length and width and layer with front and back right sides together and batting on the back (Not sandwiched between!)
3. Sew 1/4" around the edge of three sides, leaving one end open. Turn it right side out. This will leave the batting inside.  Machine quilt the roll-up at this point. (I did simple quilting about 1" apart by following the lines of my fabric.)
4. Trim the open end  after quilting to make it straight.
 
5. Put the "bristle" side (or hook side) of the adhesive hook and loop tape on the pouches and the soft side of the sew on tape on the cloth roll-up. (I tried the adhesive type on the cloth and it didn't work! I also tried sewing it and it ruined a needle. SO.....I recommend using the two types. Yes, you are wasting half of each, but maybe you could combine them for something else?) I also took this picture using the adhesive type on the cloth. When that didn't work, I switched to a sew on type that was 2" wide because that is what I had. I put two rows of adhesive tape at the tops only of each pouch to match up to this wider tape.
Match up the tape on the pouch and the roll-up so that they meet. Sew the soft side (the loop side) of the hook and loop tape to the cloth roll-up, loop side up of course. NOTE: Try to place the tape in the same place on each pouch so that any pouch will fit on any space.
6. Fold the ribbon in half and sew to the open end of the roll-up. (I have sewn across the open end of the roll-up  1/4" to stabilize it, but that is not really necessary because you will be sewing a binding on.
7. Cut a piece of binding 1" longer than the end you will sew it to. Turn the edges of the binding in 1/2" so that you do not have raw edges. Fold the binding in half, place the raw edges of the binding against the raw edges of the roll up and sew using a 1/4" seam. (Just as you would sew on a quilt binding.)
8. Turn the folded edge of the binding over the raw edge and  sew down by hand. You  will catch the sewn end of the ribbon in the binding. 
9. Place your pouches on the roll up. If you lined up your hook and loop tape correctly, they should all stick in place just right! I bought some binder rings that can be hooked through the grommet holes and used to hang scissors or anything else that has a hole it can go through. I didn't find that I needed it. Keep that in mind, though. It might be that you could use it. The holes might also be handy for keeping embroidery floss separate for a project.
10.Roll it up (you are actually almost folding it over and over. Pull the ribbon around in opposite directions and tie to close.
 That's it. It's a very simple idea. Everything is contained in a neat little packet. You can place it in a tote or a suitcase. You can tuck your project in among the pouches and roll it up with them.

Monday, August 30, 2010

Easy Tip for Folding Your Fabric


If you have been quilting for a while, you may already know this little tip, but if not, you might really benefit from it. Your fabric stash will look neater and will be easier to use if you will fold each piece uniformly.

Use your quilt ruler as a folding guide. Mine is 5" wide, but wider is fine. If your ruler is not long enough to span the folded width of the fabric, fold the fabric again lengthwise.
Lay the ruler along one edge of the fabric. 
Leaving the ruler in place, start rolling the fabric around the ruler. 
Pull the ruler out some, leaving it in to the length you want the finished fold to be. I leave 12" in because of  the depth of my shelves.
Fold the "tail" over and pull the remainder of the ruler out. If you place the folded end where it is the end showing when placed on the shelf, it will look neater.
Smaller pieces can be wound on the cardboard inserts from fat quarters and stored with other fat quarters. I store my fat quarters in plastic shoe boxes by color and "texture". Fabrics that I will use for applique to suggest fur, hair, brick, etc. are stored in boxes labeled "Textures for Applique".
Here you see the pile of fabrics in the first photo reduced to small, neatly folded stacks.

As you can see, I have used two different sized rulers here and the fabric is not quite as neat as it will be when I go through and make them all uniform, but even now it is manageable and neat. (Next time I will put a label on the ruler I use for folding so that I can easily recognize it.) 


This is such a simple little tip, but I know that it was really helpful to me as a new quilter. I'm hoping maybe it will help some of you, too! I find it inspiring to see my fabrics all lined up on the shelves by color.
Related Posts Plugin for WordPress, Blogger...