Buzzings from a quilter who bumbles her way through life!
Showing posts with label gift ideas. Show all posts

Sunday, March 3, 2013

Snack Tray or Basket Tutorial

These little snack trays are simple to make, fast to make, and best of all, they save on paper plates for snacks and sandwiches. You can coordinate your trays to your tablecloth or picnic spread, or use them for popcorn for movie night at home. (One has an iron-on laminate, so it can be wiped out and reused easily!)


You don't need a pattern and you can make these as small or large as you want. You control the depth of the sides, so you can have a tray or a basket. (Easter basket anyone?) Large scraps or fat quarters are perfect for these!


 I've filled the basket with 6 little mini-trays - just right for a serving of chips, popcorn, apple slices, baby carrots, .....use your imagination! Even cookies will work in these! Of course, they don't have to be for food. You can use these little trays to hold jewelry, mail, make-up, sewing notions, socks in a drawer, fat quarters, Legos, dry cereal snacks for toddlers, etc. etc.
 Here's how they're made:
 First decide on a size. If you want a tray that is 7" x 9" with 1 1/2" sides, you will cut your fabric and batting 10" x 12" (7 + 1.5 + 1.5 = 10), (9 + 1.5 + 1.5 =12) You will need a fabric for the inside, one for the outside, and a batting for the inside to give it body. (Yes, you could use interfacing, but most of us have scraps of batting around and it works well.) NOTE: If you want a laminate inside, you can buy an iron-on type that is very easy to use. You just press it on, using the paper it comes on, and treat it as a piece of fabric. Be sure and follow the directions on the brand that you buy!
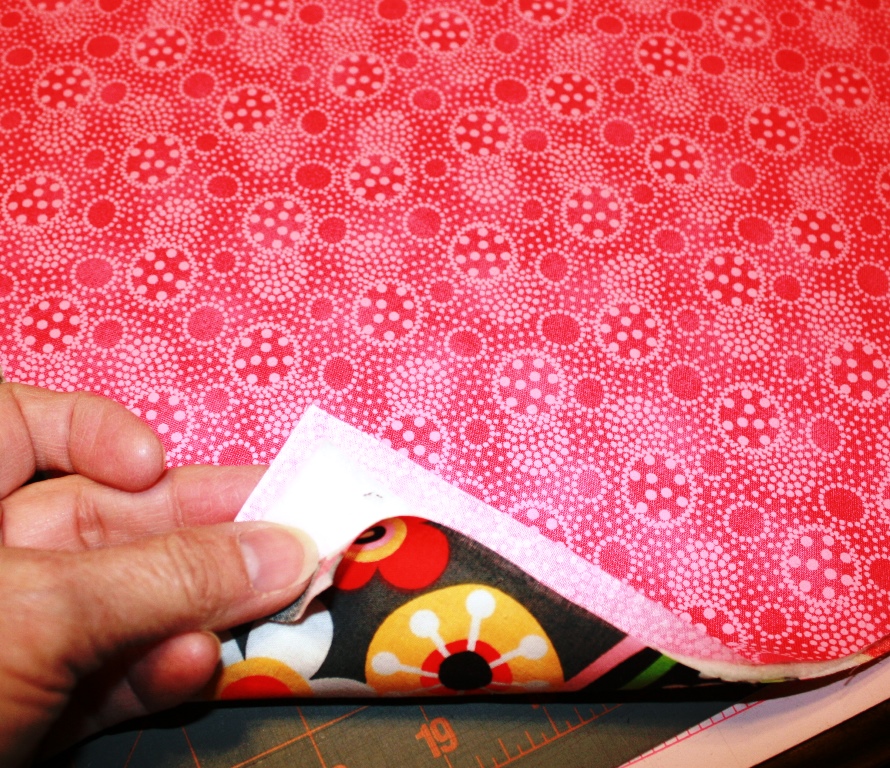
 Layer the batting between the inside and outside fabrics, right sides showing! Using a glue stick or a little spray basting will help it all stay together while you work. Even spray starching will help
Different set here, but you can see on this piece that you will then mark 1 1/2" (or whatever depth you want for your sides) around the sides and sew along the mark. I use a Frixion pen that disappears when I iron the piece. I also zig-zag along the edge. 
Use your ruler to make a mark that is a continuation of the stitch line you made. Do this at both ends. (It doesn't matter which two sides you choose.) This will give you a guide for the next step. At this point, you may want to make some simple quilting lines in the area that will be the bottom of your tray. I made an X on the small ones, and parallel lines on the larger ones.
 Fold on the diagonal at each corner and sew across the line you have just made. You will be stitching from the corner of the stitches in the middle to the edge.
 You will have a box now with sides that poke out!
 Fold the sides in as shown (I chose to fold them in on the shorter sides, but that is up to you.) Sew across the top to hold them in place. If you have laminate on the inside be careful to not touch the laminate with an iron, but press these in place. (You can sew the flap down along the diagonal fold if you wish. It is a little hard to do on the small ones with laminate, but easy on the larger ones.)
Cut a strip to use for binding. 2 1/4" wide will work unless you've made your tray really thick! Fold it in half lengthwise and press.
 Before sewing it on, turn one end under 1/4" so that the raw edge is hidden. Leaving the first 1 1/2" free, sew it on as you would a quilt binding - raw edge to raw edge, sew 1/4" from the raw edge, and when you come to the end.....
 ...slip the end inside the end that is turned under. Sew the remainder on. You will be stitching this closed by hand.

 Press the binding open. Remember to use the paper over any piece with laminate!!! Turn the binding to the other side to just cover the stitching and sew down either by hand....

                                         or machine.

Here is a basket (deep sides) and here are the trays (shallower sides).....


If you want sharper corner edges, just topstitch them! You can add a handle, or handles, to make a basket  Simply cut a strip about 3" wide, put a 1" wide strip of batting in the center, turn one edge in about 1/4", overlap the edges with the turned under edge on top, and topstitch. A glue stitck makes all of this much easier!
                                      Give it a try!
Until next time......
                             

Monday, August 13, 2012

Pinata Pillow


 Have you ever had a pinata at a birthday or holiday party? They are very common around here and they come in just about every shape, color, and theme you could imagine.
This little pillow reminds me of a pinata. I made it using scraps and it was very easy to make. 
I have a free pattern download just for you, my loyal readers, at my Craftsy storefront. Just click on the button at the top of my sidebar and it will take you there. You will see the pillow among my quilts. (While you're there, take a look around. I am currently uploading all my patterns to this site. It is taking a while for me to do that, but as I do, I'm making a note of it on my "My Patterns" page at the top of this post.)

This little pillow is easy to make! It might be a nice Christmas gift for someone you know. The colors can be changed. How about one in a gradation from white, to grays, to black? Or maybe stripes of school colors? Use your imagination.   
post signature 


Monday, June 25, 2012

Small Fabric Covered Sketchbook, Tutorial


This little sketch book is easily made and can be put in a bag to carry around. I made some for my grandkids since I will be enjoying them for the next couple of weeks. Although I thought that maybe a good way to encourage them to draw daily would be to decorate a page for each date*, you could sketch out quilt designs, use it as an address book, journal in it, .....whatever you want! *If you make a calendar from it, it will stand on its own when opened up like an easel. You can save it for years since the day of the week is not written on it! (I would love for my grandkids to decorate a calendar for me this way. What a great gift!)
These little sketchbooks are easy to carry, small (pages made with 4" x 6" blank index cards). You can make it as simple or fancy as you choose. You can choose to add a pen/pencil holder and ribbon ties. (You could even choose to add a pocket on the front to hold a box of crayons, but I haven't given instructions for that here.You would need to measure your crayon box and allow for that.)

1. You need a pack of blank index cards (4" x 6") and two corrugated cardboard pieces cut 6 1/2" x 5". You will also need batting scraps, fabric, binder rings (1 3/4"), hole punch, and although it can be optional, it helps to have metal eyelets and an eyelet punch.

2. Cover the cardboard with batting (using a glue stick) and punch holes at the top. (Be sure your holes match up on both pieces.) Punch holes in the index cards to match up with the holes in the cover.
3. Cut two strips of fabric each 5 3/4" x 13 3/4". (You will be sewing 1/4" seams, but the cardboard takes up some space.) To add a pen or pencil holder, see step 12. This should be done at this point. To add a ribbon tie at the bottom to tie the sketchbook closed, see stop 13. Both of these additions are very easy to do.
4. Fold each fabric piece in half as shown. You are going to sew up each side (leave the end open) like a pillowcase. Turn right sides out.
5. Slip each piece over the cardboard cover. If your fabric has a directionality to it, pay attention to where the holes are. They should end up at the top. If the batting gets bent down at the corners, slip a ruler or closed scissors point in the smooth it down.


6. Fold the raw edges under and slip stitch closed on each cover. Yes, you're basically slipcovering the cardboard!


7. With the sharp point of a pair of scissors, punch through the holes. Don't make the hole as large as the "hole punched" hole.

8. With an eyelet punch, put an eyelet over each hole. (If you do not have an eyelet punch, you can hand embroider a buttonhole here. You could also do this by machine earlier, but you will need to measure carefully to find the placement for them.) You might also  make a little felt "flower" or circle and punch a hole in the center. Then glue it over the hole.
9. Line up the holes in the index cards with the holes in the cover and insert the binder rings. This is the most simple version and you can stop here if you wish. BUT, it is pretty simple to add a little handle:
10. Cut a rectangle of fabric about 2 1/2" x 10". Using a glue stick, fold down three sides of the rectangle 1/4". Cut a double thickness of batting about 3/4" x 8".


11. Fold the raw edge in over the batting, then fold the opposite side over and bring to the edge. Topstitch down both sides and across the ends to hold it all together. Put an eyelet in each end. Simply slip each eyelet into the binding ring to form a handle. 
(I also tried a purchased handle, and although it worked just fine, the handle I had was too big to look right. If you could find a smaller handle, you might want to try this.)

12. To add a pen or pencil holder, simply cut a rectangle about 4" x 2 1/2". Fold the ends in 1/4" and sew down. Fold in half (right sides out) and sew across the top.
 Place the tube at the bottom right of the rectangle. You want to to end up inside the cover at the bottom on the back. The pages should fall just above the pencil holder. Keep in mind that you will be sewing a 1/4" seam at the end and the bottom of the rectangle.Turn the top seam under to the back and sew across the top to attach it to the rectangle.


13. To add ribbon ties at the bottom, place a 12" length of ribbon at the center inside each folded rectangle. Sew the ribbon ends in the seam when you sew across the bottom of the folded rectangle.( Be sure you don't sew the opposite end of the ribbon into the other seam!) When you turn it right sides out, there should be a ribbon at the bottom of each piece. If you decide to do this AFTER sewing your cover, you can always just sew it on by hand at the seam.


post signature 


Monday, June 11, 2012

Gift or Storage Basket Tutorial


 Here's an easy little storage container you can make to serve as storage or as a pretty little gift basket. It is just the right size for fat quarters, a pattern, and a few spools of thread. It would make a nice gift for a friend who is learning to quilt or as a nice prize for a quilt guild. Several of these full of fat quarters would look neat and nice on your shelves. At the end of this post, I've listed some other ways you could use this basket.

 This is how I made the basket at the top of the page:
Cut your outer fabric, your lining, and your interfacing (mine is felt, but fleece or even stiff interfacing will work fine) into rectangles  26 1/2" x 24".

 Layer the lining and the interfacing and fold in half lengthwise. Sew the two short ends together.
Also fold the outer fabric and sew in the same way.

Cut a template that is 3 1/8" square. With the fold at the bottom, set the template in each corner (do not include the seam in the measurement!) and cut out. Do this on both pieces. 
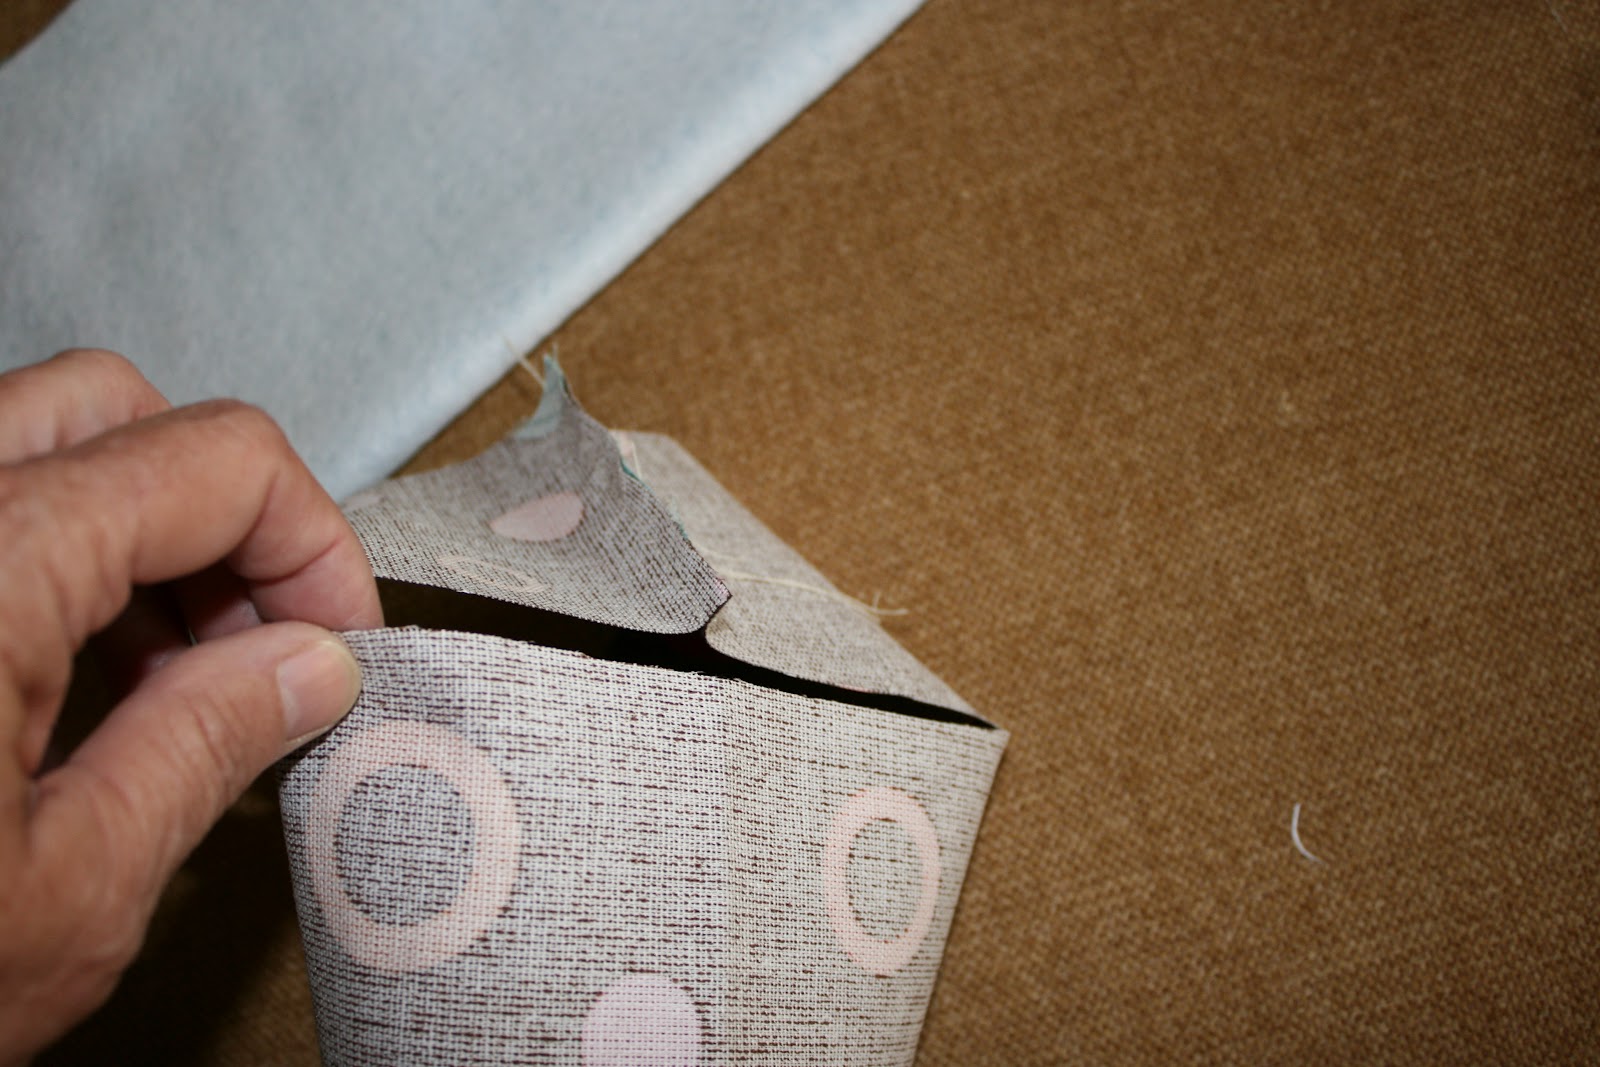
 Now here's the best trick of all! I learned it from Ooh! Pretty Colors several years ago and made a TON (about 50) of "Busy Bags" for the little children at church using this method!  (Thanks, Diane!) Simply open up the corner and bring the middle of the bottom up to meet the side seam (as in the photo above). Pin in place.
 Pin this opening together in both pieces. You will end up with something similar to the picture above.
 Place the bottoms together and re-pin so that the outer fabric, the interfacing, and the lining will be sewn together. Sew across each opening. This will assure your lining and your outer piece will always stay in place! (The "points" in the photo are just the sides of the basket flattened out.)
 Here you see the seams sewn. The outer body fabric is on the underneath, not shown well in this photo. At this point, insert a piece of lightweight cardboard in the bottom, between the outer body fabric and the interfacing. It will be ABOUT 6 1/4" x 8 1/4", but the width of your fabrics can make a difference in this. Measure the bottom to see what yours will be.
Turn inside out so that the outer body is now on the outside.
For handles, cut two strips each 13" x 3". On each, turn under one edge about 1/4". Fold the opposite edge over about 1", then bring the folded edge over this to the side, as shown. I used a glue stick to hold down the folded edges. Now topstitch down each side.
Pin in place on each side of the box, where you want it.
Cut a strip for a binding that is 2 1/2" x about 36". Be sure it is long enough to go all the way around the top of your box. Fold it in half lengthwise, press, and place the raw edges along the top of your outer body (do NOT sew through the lining unless you have used a very stiff interfacing or do not want to add cardboard in the  sides.) Do sew the ends of the handles in place as you sew the binding on. The should be under the binding.
Cut two pieces of cardboard for the ends and two for the sides. Mine were 6 1/2" x 3 1/4" for the ends, and 8 1/2" x 3 1/4" for the sides. (Check yours before cutting. You can always start bigger and trim if needed.)

Insert the cardboard into the sides and the ends between the body and the interfacing. (Although in the photo I do not have the binding sewn on, I ended up having to remove the cardboard after the photo to sew the binding on! Some things you just learn by experience.)
Turn the binding over the top and pin or clip in place. Sew it to the lining, or by sewing through the cardboard back and forth from inside to outside. If you make your cardboard enough shorter than the sides, you may be able to sew by machine by sewing the binding ABOVE the cardboard.
Now fill it with goodies and give it as a gift to yourself or someone else! Here are some other gift ideas using this little basket. Use a fabric that will compliment what you put inside if you want!

1.  candy, bubble solution and wand, small toys, etc. for a child in the hospital. (Check on what is actually allowed for that child first.)
2.  produce from your garden to give to an elderly neighbor. Include some home canned goodies if you have them!
3.  homemade bread for a friend.
4.  apple, pencils, hand lotion, gift card, etc. for a teacher
5. homemade cookies
6.small houseplant, hand lotion, candies for a nursing home resident
7. crayons (the BIG box with LOTS of hues), sketch book, and colored pencils for a child
8. soft, fluffy socks in all colors for an elderly or sick friend
9. tools for a specific need - baby items, kitchen items, toiletries, gardening tools and seeds, off to college, etc.
10. seven little boxes or bags with little treats inside along with scriptures or encouraging notes - one for a depressed or discouraged friend to open each day for a week.

I'm sure I'll think of more things that I will wish I had listed, but you probably have some great ideas of your own. I love the idea of using this to brighten someone's day, but it might be that you need your OWN day brightened.
Until next time.....


post signature 


Related Posts Plugin for WordPress, Blogger...