Buzzings from a quilter who bumbles her way through life!

Thursday, December 15, 2011

My Christmas Elf

As I was attempting to straighten my quilting studio, I opened a box that had this little doll that I made last year. I had forgotten about him. He didn't have clothes yet and I had gotten busy and put him away. I decided that he would be fun to put out for Christmas this year, so I finished him off and placed him under the tree to watch over the gifts until Christmas.  I can see I need to work on the little boots a little more (didn't notice until I put the picture up!). 
Every time I make a doll I remember how much I love doing it! 
My youngest son flies in on Saturday and my oldest on Thursday of next week! The middle son won't make it this year, so I am a little sad about that, but so thankful that I live in a world of cell phones and internet where people all over the world can connect in seconds! What a blessing! 


post signature                     Happy Holidays!

Monday, December 12, 2011

Faster Method for Double Turned Narrow Hems , Tutorial

I had 16 table napkins to hem. UGH! After spending about 30 minutes hemming one, I was trying to find a strategy for getting them all hemmed before Christmas dinner!! I was thinking along the lines of  - "If I hem two a day, I will have them finished in about a week." The problem was that it was tedious turning each side of the hem and pressing, then turning again and pressing, then making sure it stayed turned while I sewed each side. Doesn't sound hard, but it was more time consuming than I wanted to deal with. Then I turned to my trusty glue stick and came up with a method that allowed me to make 15 more in about 40 minutes! Such a simple little trick, but it really made my work easy and fast!!

I cut my fabric 24" x 14". In my mind, this was a nice size for placing across your lap. You can cut them the size you want.

Run a line of glue stick along one side at a time and turn the hem in 1/4". (I was not really exact in turning. After all, these are going to be used to wipe dirty mouths! I just eyeballed the turn under.)
Press the hem down. (Do only one side at a time.)
Run another line of glue stick along the turned under hem and repeat turning and pressing. Now you have a double turned hem ready to sew.
To reduce bulk in the corners, you can trim the corner before the second turn under. Sew your hem down on each side, pivoting at each corner.
 
TA-DAH! You're finished. Give it a try to see if it doesn't make the work of hemming much faster!

 post signature


Friday, December 9, 2011

Boot Napkin Ring Tutorial

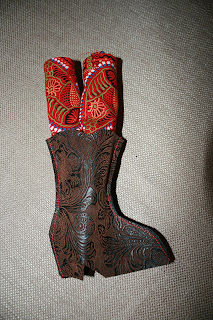
My last post showed a table setting based on my Cowboy Santa Christmas plates. I've been asked how the napkin rings were made. These are so simple, you will be surprised. You could make them in any shape you want, too! There is no reason it has to be a boot.


Draw off the shape you want. Cut it out and place it on a doubled (wrong sides together) piece of your chosen fabric. I used an embossed upholstery fabric that looks like leather.

Cut out the shape.
Sew a very scant seam along the two sides. Leave the top and bottom open. Because this fabric can't ravel, I didn't have to turn any edges. This would also work with felt.
Roll up your napkin, fold in half, and insert into the boot.


My next post will be a method to speed up and simplify hemming table napkins if you don't have a rolled hem foot for your machine.
post signature

Thursday, December 8, 2011

Christmas Lunch Tables

My family is coming to my house for lunch after church on Christmas day. I have two tables set up - one in the breakfast area and one in the dining room. Our local Texas based grocery store (HEB) has Christmas plates this year with a Cowboy Santa and the Alamo in the background. The plates are china, not plastic, and at $2.50 a plate, I couldn't resist. I already had the Alamo from my Christmas village, so I set it up (raised on a box) in the center of a wreath. The cactus candles had been in my closet unused for a couple of years.


The "boot" napkin holders are simply cut from an embossed faux leather and sewn together only on the sides (left open at top and bottom).
I made a simple rope "loop" to slip over the glass.


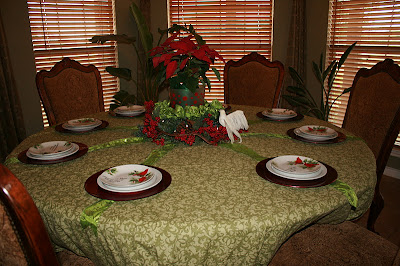
The dining room is set up a little more formally. The round table in there is 75" across, so I can seat 8 people easily. I found these sweet little salad/dessert plates at Walgreens for $1 each! I already had white plates  and red chargers. I made simple little napkin holders of loops of stretchy sequined ribbon ($2.50 for a roll).
The centerpiece is a wreath surrounded by a garland of red berries. I placed a plant stand in the center, scrunched the leftover ribbon around the space between the wreath and the stand, and placed a frosted red-polka dotted trifle bowl on the stand. The poinsettia was set in the bowl. I placed a dove on the side of the wreath. There is a cardinal on the other side. 

The pictures don't show the complete table settings since I still have more napkins to make, but I think you can get the general idea. We will eat "buffet" style since we have to sit at two tables, so I didn't need a lot of room on the table for food. I also didn't put out place cards because I want my family members to sit at the table they like best. 
I still have a lot of time to make little changes and improvements to my tables, but I can enjoy the decorating during the entire holiday season! 
post signature

Tuesday, December 6, 2011

A Gift Idea for Your Quilting Friends!

If you're needing a small holiday gift for quilting friends (or any other friends for that matter!) this might be an easy one for you to try. If you're like me, when you quilt, sew, or embroider, you often end up with pricked, sore fingers. This lotion has vitamin E to help them heal and to give your hands a soothing, smoothing treat on these cold, dry days. (I am having a horrible time getting my post to do what I want it to do! I'm having to write all of this as a comment on the photo since I can't seem to do anything else!!! ) There are recipes all over the internet for making hand lotion at home. The one I chose is from Patchwork Times and uses 16oz. baby lotion, 8 oz. Vitamin E cream, and 8 oz. Vaseline. I chose the Vaseline that contains Cocoa Butter. Mix all of the above in a mixer until it is creamy. I found empty squeeze bottles (3 oz. size) in the travel section at Wal-Mart. I had to fill them by putting the lotion in a plastic bag (the kitchen zipper type) and snipping off one corner. I then squeezed the lotion into each bottle, tapped it to settle the lotion, and filled again until full. I made up a name for it and printed off a free vintage tag (also found by searching the internet). I tied a ribbon around the top of each and they are ready for gift giving.

Here is another site you might want to check out for recipes, suggestions, and even labels! This site has a natural lotion that does not use "pre-existing" lotions.
A Sonoma Garden 
 

Sunday, December 4, 2011

Quilted Christmas Tree Wall hanging


In the hallway between my laundry room and kitchen pantry, I've put a simple quilted tree. I made it in wide horizontal strips using scraps of green. In the horizontal seams, I put ribbon loops that I can hang either ornaments or candy canes on. It would be great for a dorm room or small space. It takes up only as much room as what you hang on it, except for the space on the wall or door.
I didn't use a pattern and I don't have a tutorial since I made this several years ago. I  used large half square triangles at the ends of each row and made each row successively wider than the one above it. (You are viewing this at an angle because the hallway is too narrow for me to get a photo straight on.)  I added the cardinals because I like them. You could leave them off or add something you like more.

In a few days I will post the dining tables I've set up for Christmas. I need to find fabric for table napkins, so I still have that to do.  I can't seem to find any sold commercially that will work for my tables. I'm anxious to show you what I've done with a few inexpensive Christmas plates and what I already had around the house.
Until next time, I hope you find time to relax and do the things you love!
post signature


Related Posts Plugin for WordPress, Blogger...