Buzzings from a quilter who bumbles her way through life!

Sunday, April 10, 2011

I'm Back from the Shop Hop!

Here I am in my corner of the room.
I'm back! The Shop Hop is now over and I've packed up my "stuff" and come home. What fun we had! 
The quilt shop employees all wore their Fiesta best!


I was set up in Seventh Heaven in San Antonio, Texas. Every shop chose a theme and this shop chose Fiesta! That was very fitting since San Antonio is in the midst of Fiesta now.  Next to me was a big lemonade dispenser and the "fixings" for Nachos - chips, melted cheese, jalapenos, and salsa. (And not one person dripped on my quilts!)

This was the "sign-in" station. Shop Hoppers had a "trail pass" stamped to show they had been in the shop. They then signed up for a chance to win a $25 gift certificate from Seventh Heaven. They also picked up a free pattern sheet and chose a free fat quarter (every shop gave one!). Shoppers who completed the entire Shop Hop (12 shops spanning quite a distance) are entered to win huge prizes. 
Seventh Heaven's version of the Shop Hop Quilt


A view from the front room of the shop.
A view into the cutting area. 


There were demos of different tools and techniques in the classroom area.
Many groups dressed in matching hats, shirts, or jackets. These ladies were having a good time in their feathered bonnets!
Dixie, the shop owner, is the lady in pink and white. Pat Gates, the co-owner of Sew Many Visions, is behind the table with her beautiful samples  displayed on the wall and table.
A peek into the "children's room" - a room of junior novelty prints and coordinating fabrics.
Some groups came by chartered bus.
My corner again, but without me to mar the view! I fought the tablecloth the whole time because the quilts were moved around so much and the tablecloth moved with them. I needed it there because my boxes of patterns were underneath the table.
I wish I had taken better photos (the best are the ones of my corner that my husband took with his iPhone!). Next time I will know what to take pictures of. 
I hope you have a chance to participate in a Shop Hop where you live!
 

Wednesday, April 6, 2011

Bluebonnet Shop Hop


If you are in the San Antonio area during the Bluebonnet Shop Hop (April 7 -10) http://www.bluebonnetshophop.com/, stop by and see me at Seventh Heaven Quilt Shop!  Be sure and tell me that you read my blog! It would be so much fun to have a face to put with a name! I will be there  Thursday through Saturday for sure (until about 7:30). This year I have a little giveaway B. Bumble Pincushion pattern for anyone who purchases 1 or more B. Bumble patterns.
The shop hop is always a lot of fun with shoppers from all over the United States. (This is a popular area for "over wintering".) Last year we had flooding rains, but with the drought this year, there is little chance of that! The weather is beautiful and the fabrics are even more so. Unfortunately, the bluebonnets are not very showy this year because of lack of rain. The picture above is from last year.
 I have another tutorial coming next week, so be on the look out for it.
                  I'll be watching for you!

Monday, April 4, 2011

Project Pouch Tutorial

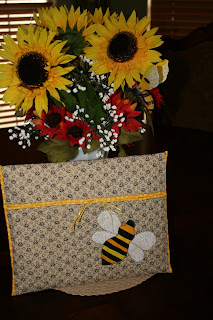
This quilted "envelope" pouch is 10 1/2" x 13 1/4" finished. It could very easily be larger or smaller by changing the size you cut it. I  made mine a size that could be easily made from fat quarters. It could hold your scissors, your rotary cutter, box of pins, small ruler, and even your folded quilt top. It holds my graph paper note pad, which is longer than a spiral notebook, and there is plenty of room for pencils. It could hold a color book and crayons and could be made in a cute novelty fabric!  I can envision using it to hold items in my suitcase that I don't want flying around loose - like panty hose or jewelry. I can imagine using it for photos, cards, maybe an iPad? Use your imagination. Remember, you can make it larger or smaller, depending on what you intend to use it for. Although it seems like a long process, it is quite easy. I have included photos of steps that most of you are already familiar with, but I didn't want to lose those of you who are new to sewing and quilting.
1. Cut the front piece 21" x 14".
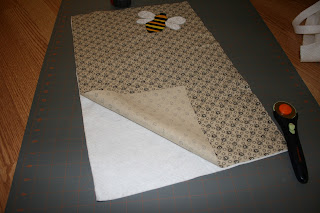
2. To determine placement of applique or embroidery, turn up the bottom to within 6" below the top of the fabric.
3. Add any trim you wish to use to decorate with - applique, embroidery, rick-rack, buttons, etc.
4. Cut the lining piece 22" x 14" (1" longer than the front piece).
5. Cut a piece of batting the same size as your front - 21" x 14".
6. Layer your pieces with right sides together and batting on top. Center the batting 1/4" from each end.
7. Sew a 1/4" seam at one end, sewing the front and lining together. Do not catch the batting in the seam. Pull the front fabric over to meet the fabric edge at the opposite end. Since the lining is 1" longer than the front, it will not lay flat at this point. Turn right side out.
8. Press so the 1/4" of lining shows at each end.
9. Stitch in the seam line on each side. Quilt the piece at this point.
10. Turn the bottom up to within 6" of the top, then turn the top down to meet it. Pin in place.
11. Cut 2 strips of lining fabric each 11" x 1 1/2" (for a wider binding, but them 2" wide.) Turn the raw edges at the ends in about 1/4". Fold in half lengthwise and press well. 
12. Pin raw edges of binding to each side. Folded edge should be to the inside. Sew 1/4" from edge on each side.
13. Turn the folded edge to the back and sew in place over the raw edges. With a binding this narrow, it is helpful to roll the binding to the back with your thumb and finger while pushing the raw edges and batting down out of the way with the needle..
 
14. You can add ribbon closures, button and loop closure, or tab and snap or any other closure you can think of. If you add it before sewing the sides, you can put a zipper in.( Do this before step 10.)
                                               Finished!

Friday, April 1, 2011

Orange Cream Pop Cupcakes!

Yummy! Maybe my cupcake pincushion tutorial last week (?I've lost track of time!) inspired me or maybe it's just that
I am helping host a baby shower soon, but I have been making cupcakes all week. I'm freezing them and plan on decorating them when I have more time. I happened to pick up the Better Homes and Gardens "magazine" (it costs $10 so I should call it a book!) called "Cupcakes, 150 Sweet Recipes". It is full of great recipes for cupcakes of every kind.
 This particular cupcake takes me back to my childhood when I would stand by the curb and hold out my dime for the ice cream man. He would hand me my Dreamcicle, a vanilla ice cream with an orange outer shell. It was wonderful. These cupcakes remind me of that taste. You can get the recipe here:  
http://www.bhg.com/recipe/cupcakes/orange-cheesecake-cupcakes/
or below (because they won't keep that recipe up forever!).
 What does this have to do with quilting? Absolutely nothing, except that quilters are sometimes asked to help with things like baby showers and they need good ideas like this one. Cupcakes are fast and easy - perfect for someone who is busy quilting!!!!

Orange Cream Pop Cupcakes


1   3-oz. pkg. orange-flavor gelatin
1   2-layer size pkg white cake mix
1   4-serving size package cheesecake instant pudding and pie filling mix
1 1/4 cups orange juice
4 eggs
1/3 cup vegetable oil
1 teaspoon vanilla
 Preheat oven to 350 degrees. Line twenty-seven 2 1/2" muffin cups with paper bake cups and set aside. (I used only 24.) 
Set aside 2 teaspoons of the gelatin for the frosting. In a mixing bowl beat the remaining gelatin, the cake mix, pudding mix, orange juice, eggs, oil, and vanilla. 
Spoon batter into the prepared muffin cups, filling each about 2/3 full. Use the back of a spoon to smooth out batter in cups. Bake 18 to 20 minutes or until toothpick inserted in middle comes out clean. Cool cupcakes in muffin cups for about 5 minutes, then remove from pan.
Spoon orange-flavor frosting into a pastry bag with a large round tip. Spoon the vanilla flavored frosting into another pastry bag fitted with a small star tip. Pepe orange frosting onto each cupcake to cover the top. Pipe a medium size star of white frosting onto each cupcake. If desired, insert a craft stick into top of each cupcake. 
Frostings: Prepare 1 recipe Cream Cheese frosting. Place 1/4 of the frosting in a separate bowl and beat in an additional 1/4 teaspoon vanilla. To the remaining bowl of cream cheese frosting, add the reserved 2 teaspoons gelatin from the cupcakes and 1 teaspoon finely shredded orange peel. If desired, add a few drops orange food coloring. Beat to combine. 
Note: Cream Cheese Frosting: 1 8-oz. pkg. cream cheese, 1/2 cup butter, 2 teaspoons vanilla, 5 to 6 cups powdered sugar. All cream cheese and butter to soften. In a large mixing bowl, beat butter, cream cheese and vanilla with an electric mixer at medium speed until light and fluffy. Gradually beat in powdered sugar until frosting reaches spreading consistency. Makes about 3 1/2 cups. 
 
Related Posts Plugin for WordPress, Blogger...