Buzzings from a quilter who bumbles her way through life!
Showing posts with label my quilts. Show all posts

Monday, September 19, 2016

September? Really?


New! Give Thanks
I can't believe it is September and fall begins on Thursday! How did that happen? I have been super busy giving presentations, teaching classes, and working on rethinking my patterns. I am going bigger, better, clearer, and with lots of pictures. That means that I have to remake the quilt to not only evaluate the pattern, but to take photos at every step. Not a quick thing to do!


New! Let It Snow!
The renovation is coming along. My sewing room is almost finished, but we still have the cutting table to do and the baseboards.
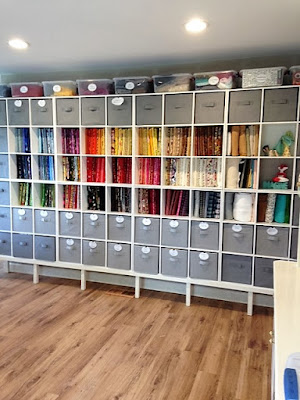
 This is my wall of cubicles. My husband built me a platform to put them on so they weren't sitting on the floor. I found the little gray collapsible baskets at Walmart! 
 This is the far end of the room. You can't really tell much yet by these pictures. The little island is temporary. We are going to build a cutting table that can be rolled around. There is a huge arched window to the left of the room at that end that gives lots of light and a beautiful view.
 Sugarplum has found a napping spot there!
The other patterns I have updated (so far!) are:
 Birthday Banner
(This has candles that can be removed and replaced and the child can put the right number on!)
 
Little Cowboy (or Cowgirl)


and The Good Shepherd.
None of these are updated in the download version yet, but will be soon. The paper version is $15 each plus shipping. 
My sister and I are also putting kits together for these patterns.
Things are beginning to happn again! 
Have a great  fall! (Oh NO! Don't! I've done that and it hurts!) I should say,
Have a great Autumn!
 
post signature

Wednesday, August 3, 2016

Just Sew!


I had a question about a wall hanging pattern I had in a local quilt shop and realized I had never uploaded it to my Craftsy shop! So now it is being uploaded and if you are interested in an easy, but showy, wall hanging for your sewing room the pattern is available!
On the sample above, I used buttons from my grandmother's button jar. The pins have little seed beads so they look like real pins! 
The size is 28" x 21 1/2" and the pattern is available for download at $8.99. ($12 plus shipping for a paper pattern.)
You can use my easy applique method (link to tutorial here) to hand applique or just sew it down by machine. 
Revisiting patterns I designed a few years ago gives me a renewed excitement to get started again! We are getting closer than ever to finishing the new sewing room. I can hear my husband in the background installing my cabinets! 
 The board in the middle of the room is to protect the floor from scuffing while I put together the cubicle cabinets. The cabinets in the background do not have their drawers in and are being installed against that wall. Baseboards are not installed yet. 
In the top photo, you can see the top of a large cabinet sitting out. We will have to have someone come and help install that over it's base. It's too heavy for me! 
I bought 13 ClosetMaid cubicle cabinets to put my fabric in.

I will have them stacked and anchored to the wall. I will tell you more about that when we finish. (I wish I were a ClosetMaid affiliate!
Until next time!
 

post signature

Tuesday, April 26, 2016

Hexed by a Hexagon!


1678_T_LACE      

I've been hexed! I found a fabric that I just HAD to have! (Imagine that!) It's Radiance Lace by Beth Studley for Makower. 
I brought it home and started pulling fabrics from my stash to see what I had that complimented the colors in the fabric. Then I started trying to decide on a quilt that would show it off. Most blocks required cutting the fabric into pieces too small to really let the design sing....except for these large hexagons. Each side is 6" long.


I love the look! I at first pulled bright reds and golds from my stash. I decided then that I would try to tone it down a little (really hard for me!) and give it a more feminine look. When I laid it all out to see, I wanted more. I went to a local thrift shop and bought some vintage laces and doilies. I embellished some of the blocks with these. Later, I read that Beth had been inspired by vintage lace, so it turned out to be quite fitting!


After that, I decided it was like a giant bee hive, so I appliqued some bees on half a dozen blocks.  


So here it is draped across a bed. I haven't decided on a "home" for it yet, but it is big enough for a twin sized bed and could easily be made larger. It is completely hand sewn with each block quilted as I went along. 


I can envision doing this with fabrics from  men's shirts or with novelty prints for a child. It could be any size you want with blocks any size you choose. 

On the homefront, we are getting closer and closer to finishing the downstairs. We are waiting on a couple of inspections before having the drywall put up. After that, I can paint! Of course, we still will have a LOT to do - tiling the showers, finishing the kitchenette, flooring! BUT, we'll be able to see the new rooms with walls.
My garden, small as it is, is beginning to bloom.


The hydrangeas are covered with buds, but they haven't opened yet. 

We are having some thunderstorms and hail, so hopefully, they will benefit from that and not suffer!
Until next time!


post signature

Monday, March 28, 2016

Spring is Here and Progress is Still Slow!


Spring is here in the Texas Hill Country and things are starting to bloom and leaf out! 


 The bluebonnets are not as showy around here as they have been in past years. I guess the weather just wasn't right for them. They are beautiful in patches, but just not as widespread as before. It can take a couple of years for the seeds to germinate, so perhaps next year will be more favorable for them. 

I went to a quilt retreat a few weeks ago with my sister and we both made tuffets. She is going to be teaching a class on tuffet making, so we were trying it out first.
Hers is the blue, pink and green one and mine is the multi-color one.


 I was going for the McKenzie-Childs look!
(and yes, my poor little tuffet is a little bit bowlegged! I need to take the legs off and try again!)

I have designed a new pattern for a spring quilt, but it is not in published form yet. 


(My camera has started taking out of focus photos!)

I have also finished a small quilt that is just the right size for the top of a card table. It would also make a nice crib sized quilt. This was a UFO I finished! I pieced it by hand on trips back and forth.
 

In other news, we've made the full time move to the new house and we're settling in quite nicely.  Sugarplum has found a new favorite spot in the office and is no longer afraid of the deer outside the window!

I hope that next time I will have more to show you on my new sewing room. At the moment it is the storage place for the cabinets and furniture for other rooms. I DID manage to strip some of the wallpaper off two walls. The rest is behind furniture and I'll have to do it later. The blue baseboards will also need to be painted!

We've had a plumber come in and do all the "roughing in" for the two new bathrooms and the kitchenette downstairs. The electrical is still in progress. When that is finished, we can start with putting up wallboard. In the meantime, I am sewing in my dining room upstairs.
 I hope you had a great Easter and if it is spring where you live, I hope it is full of flowers!

 
post signature

Monday, May 11, 2015

A Great Beginner Project Tutorial! The Yo-Yo!


This type of simple coverlet was among the first sewing lessons I had from my grandmother. This tutorial is for people of any age who have any level of experience with sewing, including none!
Sugarplum thinks that everything I work on is for her! This gives you an idea of the scale of my yo-yos. If you are from the UK, you may know them as Suffolk Puffs. 
 Yo-yos have been around in the United States since the 1920's and 30's. They were especially popular in the south because when sewn together, they form a lightweight, airy coverlet that needs no batting or backing, although it can be added. That comes in handy in areas where the temperatures climb into triple digits!

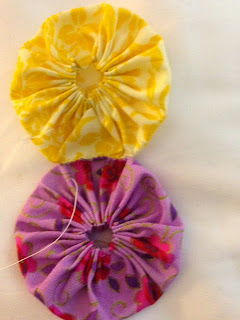
This is a Yo-Yo!  Most of you have seen it before and probably haven't even considered it seriously as something worthy of your time. I invite you to look at it with fresh eyes. It is easily made by hand with only a needle and thread. It is portable and very, very versatile. The arrangement of colors can give it a completely different look. OR, you can make it an explosion of color like I did.
You can use leftover fabrics, fat quarters, even that ugly, out of date print that you have hidden in your stash! I have also seen very old yo-yo quilts made from silks and satins as well as wool recycled from old clothing. 

Get Started:

 1. You don't need to buy a pattern! You can determine the size of  each piece. (Of course, the bigger the yo-yo, the faster it will be to put together.) For a
more "standard" size, a
ll you need is a DVD or a circle about that size that you cut from the top of a plastic Cool Whip container. Remember that your finished circle will end up about half of this size. Cut hundreds of circles using this template and you are ready to begin! 


2. Thread a needle with a strong thread (I use button hole thread) and make a knot at the end. 
(You don't know how to knot the end of your thread? It's not hard to do. I lick my pointer finger lightly, wrap the end of the thread  around it once, and then "roll" the thread across my finger with my thumb. The thread will roll into a knot that you slip off your finger and "slide" to the end of the thread with your fingernails. )

 Turn the edge of the circle over to the wrong side about 1/4" and sew (by hand) a running stitch around it with stitches about 1/4" to 1/2" long. (This is one time when short, neat stitches do not work well! The shorter the stitch, the less gathering you will be able to do!)
NOTE: I find that it is easier to hold the edge between my thumb and pointer finger in my non-dominant hand and turn the seam allowance under as I go.


 3. When you get back to where you started, pull gently to gather.


4. Use your finger to push out the fullness inside the circle.


5. Pull the thread until your circle is neat and compact. Your circles should all be the same size, so compare. You can manipulate the size by how tightly you gather the center.

 6. Put the needle back through the inside and back up (going through one layer only!). Give it a little tug to bring the knot more to the inside and less visible and then cut the thread close to the fabric. (It has not been cut in the bottom photo.)


You want the opening to be as close to center as possible. A little press with an iron will help it stay in position. 
Put two yo-yos back to back (or front to front if you prefer) and overcast (sew through two, pull the needle through and insert it back where you started.)  along the edge for about an inch. Of course, the amount sewn will depend on the size of your yo-yo, but you want just enough to secure them together, about 1/6 of the circumference of your yo-yo.
 I like to start and stop my thread inside the yo-yo, but you don't have to. I tie off my thread with two knots when finished, just to be sure it is secure.
I like to sew a long row together and then sew the rows together. You can choose to sew them into blocks of about three across and three down and then sew the blocks together. There is NOT only one way to do it! 
Sew the blocks or rows together as shown above. You will have a little diamond shaped space between each set of four yo-yos. You will notice that mine are NOT perfect. It will not matter when all is finished and it is on a bed. It is very forgiving!
You can change the look of your coverlet by manipulating the colors you use. You can use colors in rows or blocks or as borders. You can use a color as a "sashing" between yo yo blocks. Play with them a little if you want. I love the scrappy look, so that is what I did.
 I like to also press the entire top when finished for a neat, tidy look.
That's all there is to it!
Give it a try!!


The coverlet in our temporary bedroom.

Thursday, March 19, 2015

Meet and Greet - This is Me!


"Coffee Time"
Applique is the closest thing to painting with fabric that I have found. (except for actually painting ON fabric!)
I love finding fabrics that have textural prints that I can use to give the illusion of other things - sand, leaves, sky, etc. I tend to keep a box of "Textures" that I go to first when trying to create an applique. 
The quilt below used only solids, but many shades of each color.

Roses in bloom on a quilt I made for a blog hop in late 2013

 The bookcase quilt below was a custom quilt made before I started blogging. Every item on the quilt, including the words, were of importance to the recipient of the quilt. I hand dyed the variegated ivy leaves for realism.


"Creativity"
I have a very unusual method of applique that I came up with when I first started quilting. (I have since seen this method in a couple of other places as well. Great minds think alike!)  In actuality, I was having so much trouble with needle turn applique, I HAD to come up with something else. I also wanted turned under edges so my pieces would be more durable. Note: This method uses freezer paper, but it is NOT ironed to the BACK of the fabric!


Thank you for joining me today!!
You can see what others are doing by going to the list here!
                                                                      
Related Posts Plugin for WordPress, Blogger...