Buzzings from a quilter who bumbles her way through life!

Monday, May 25, 2015

A Treasure Hunt in a Tomato?

Update about Flooding: I have had many inquiries about my safety. Yes, we are in the middle of all this flooding, both in Pleasanton and in the Hill Country house. We are fine and have had no problems. More rain is expected, so your prayers are appreciated for those who have or who may lose homes and crops. Our hearts go out to those who have lost family members! Thank you for your concern!
 

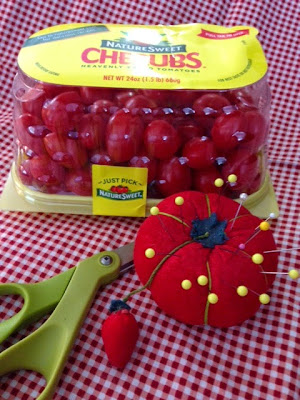
 Have you ever wondered why most of us have a tomato shaped pin cushion? Why a tomato? I wanted to know the answer! Here is what I found on Wikipedia:

"One popular design—a tomato with a strawberry attached—was most likely introduced during the Victorian Era. According to folklore, placing a tomato on the mantel of a new house guaranteed prosperity and repelled evil spirits. If tomatoes were out of season, families improvised by using a round ball of red fabric filled with sand or sawdust. The good-luck symbol also served a practical purpose—a place to store pins. Typically, the tomato is filled with wool roving to prevent rust, and the strawberry is filled with an abrasive to clean and sharpen the pins."

Did you know that those old tomatoes can have years of buried treasure inside? No, I'm not referring to that old, dusty filling. I'm referring to those needles that work their way down into the filling because they're not PINS! They don't have a head to keep them above ground! If you've ever dropped one and stepped on it, you will have a painful awareness of this fact! 
 I have a very old pin cushion that had belonged to my grandmother. Over the last few days, I have been picking needles out of it because they had worked their way down into the stuffing as they tend to do. 
 You may have done this. You squeeze and manipulate the body of the pin cushion, working the needles that are trapped inside, until the points stick out enough that you can grab them and pull them out. 
 After removing about 12 needles, I decided that there were others in there that I just couldn't get to! The little emory strawberry was coming off and I could see that there is nothing very complicated about the construction of this pincushion.
I clipped the white string that was gathering the top and slipped the green string off.

After dumping the filling into a plastic bag, I could see the treasures just waiting to be found!
I used a magnet to comb through the filling and removed over 70 more needles! Yes, SEVENTY! All but about three were in great condition!
Because this had been my grandmother's pin cushion and I was sentimental about it,  I put it back together.

I used six strands of embroidery floss to gather the top again. I refilled it with the original filling and tied off the floss.
After knotting the string twice, I put the tail of the thread on a longer needle and brought it through the center of the pin cushion to the bottom. I then moved over just enough to catch the fabric and went back up through the cushion to the top. I pulled it snug and pinched the center enough to give the "tomato" shape.

I used about 24" of green embroidery floss and a long needle to make the sections of the tomato. I used my fingernail to gently make the sections.  I made each indention before pulling the thread from the top, around the side, and through the bottom.  I pulled it snug and then came back up to the top to start the next section. I replaced the top after securing the green floss.
 Here is my old pincushion emptied of it's treasures, but put back together. There is an added benefit to redoing it. It is now firm and works a lot better!  As you can see, I put all those needles in a piece of wool and will sort them out by size later. All of the needles you see here came out of the inside of that pincushion! That's a LOT of needles and they represent a LOT of years of sewing! (My grandmother died this year at age 106!) 
I wonder if some of these were used to make some of the little dresses my Grandmother made for me? 
Does your pin cushion hold any treasure? 
I made a little "needle book" to hold my needles. It's nothing special, but it does the job!
There are 8 pages made of wool so I can catagorize my needles.


I have posted several "pincushion" posts in the past that you may want to check out:

Stuffing a Pincushion (suggestions for fillings)

A Pincushion that Protects Your Pins - a Tutorial (a pincushion you can easily make that covers your pins)

Cupcake Pincushion/Box Tutorial (a cute cupcake pincushion or box made from a Cool Whip container)

My Day at the Spa (art pin cushions, no tutorial)  

I also have several patterns for pincushions on Craftsy! Check them out by scrolling through the patterns at the top right of this page!
 

Tuesday, May 19, 2015

May 2015 at the Hill Country House

We had a really busy long weekend in the Hill Country! It was a gorgeous weekend with a few rain showers scattered throughout.  My husband spent many hours with a pressure washer, a brush, and enough Clorox to float a boat!

 Before

After

I planted some Cinco de Mayo rose bushes (a Mother's Day gift! I LOVED the ones I had at the other house) along with some Coreopsis, Ginger, Hydrangeas, and a Loquat tree. That also meant pulling out the overgrown plants that were in those beds. I left some lavendar that smelled so good I couldn't pull it despite the fact that it has grown toward the sidewalk and not the flower bed. 
(The lattice will be removed, but right now it is keeping the deer from eating the plants in this area! Most is fenced.)

My husband installed a drip system on the plants so we can keep them alive during the hot summer. Mulch will be next, but we ran out of time!
I cleaned up a $50 thrift shop secretary and moved it into the corner of the living room. 
Before
After
We ordered ceiling fans for the living room. We ended up going to a specialty shop to find what we had in mind, namely fan blades of real wood and not "contact paper" wood look or plastic. They'll be here in about two weeks.
 We ordered granite for the pantry (cream with a gray throughout that coordinates with the gray in the kitchen). It will be installed in about three weeks. We also ordered a sink and faucets for that area.
 AND, I painted and glazed the cabinets in the pantry.
First of two coats of base paint.

This photo is from the island cabinets, but the glaze in the pantry is the same. For some reason, I failed to get an after photo!

All that work and I still managed to stop by a thrift shop for a quick look. I found these little tea cups for 99 cents each! I bought 13, which was all they had.
Things are moving along! 

Monday, May 11, 2015

A Great Beginner Project Tutorial! The Yo-Yo!


This type of simple coverlet was among the first sewing lessons I had from my grandmother. This tutorial is for people of any age who have any level of experience with sewing, including none!
Sugarplum thinks that everything I work on is for her! This gives you an idea of the scale of my yo-yos. If you are from the UK, you may know them as Suffolk Puffs. 
 Yo-yos have been around in the United States since the 1920's and 30's. They were especially popular in the south because when sewn together, they form a lightweight, airy coverlet that needs no batting or backing, although it can be added. That comes in handy in areas where the temperatures climb into triple digits!

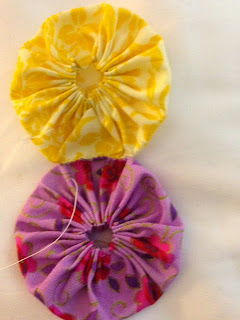
This is a Yo-Yo!  Most of you have seen it before and probably haven't even considered it seriously as something worthy of your time. I invite you to look at it with fresh eyes. It is easily made by hand with only a needle and thread. It is portable and very, very versatile. The arrangement of colors can give it a completely different look. OR, you can make it an explosion of color like I did.
You can use leftover fabrics, fat quarters, even that ugly, out of date print that you have hidden in your stash! I have also seen very old yo-yo quilts made from silks and satins as well as wool recycled from old clothing. 

Get Started:

 1. You don't need to buy a pattern! You can determine the size of  each piece. (Of course, the bigger the yo-yo, the faster it will be to put together.) For a
more "standard" size, a
ll you need is a DVD or a circle about that size that you cut from the top of a plastic Cool Whip container. Remember that your finished circle will end up about half of this size. Cut hundreds of circles using this template and you are ready to begin! 


2. Thread a needle with a strong thread (I use button hole thread) and make a knot at the end. 
(You don't know how to knot the end of your thread? It's not hard to do. I lick my pointer finger lightly, wrap the end of the thread  around it once, and then "roll" the thread across my finger with my thumb. The thread will roll into a knot that you slip off your finger and "slide" to the end of the thread with your fingernails. )

 Turn the edge of the circle over to the wrong side about 1/4" and sew (by hand) a running stitch around it with stitches about 1/4" to 1/2" long. (This is one time when short, neat stitches do not work well! The shorter the stitch, the less gathering you will be able to do!)
NOTE: I find that it is easier to hold the edge between my thumb and pointer finger in my non-dominant hand and turn the seam allowance under as I go.


 3. When you get back to where you started, pull gently to gather.


4. Use your finger to push out the fullness inside the circle.


5. Pull the thread until your circle is neat and compact. Your circles should all be the same size, so compare. You can manipulate the size by how tightly you gather the center.

 6. Put the needle back through the inside and back up (going through one layer only!). Give it a little tug to bring the knot more to the inside and less visible and then cut the thread close to the fabric. (It has not been cut in the bottom photo.)


You want the opening to be as close to center as possible. A little press with an iron will help it stay in position. 
Put two yo-yos back to back (or front to front if you prefer) and overcast (sew through two, pull the needle through and insert it back where you started.)  along the edge for about an inch. Of course, the amount sewn will depend on the size of your yo-yo, but you want just enough to secure them together, about 1/6 of the circumference of your yo-yo.
 I like to start and stop my thread inside the yo-yo, but you don't have to. I tie off my thread with two knots when finished, just to be sure it is secure.
I like to sew a long row together and then sew the rows together. You can choose to sew them into blocks of about three across and three down and then sew the blocks together. There is NOT only one way to do it! 
Sew the blocks or rows together as shown above. You will have a little diamond shaped space between each set of four yo-yos. You will notice that mine are NOT perfect. It will not matter when all is finished and it is on a bed. It is very forgiving!
You can change the look of your coverlet by manipulating the colors you use. You can use colors in rows or blocks or as borders. You can use a color as a "sashing" between yo yo blocks. Play with them a little if you want. I love the scrappy look, so that is what I did.
 I like to also press the entire top when finished for a neat, tidy look.
That's all there is to it!
Give it a try!!


The coverlet in our temporary bedroom.

Related Posts Plugin for WordPress, Blogger...