Buzzings from a quilter who bumbles her way through life!
Showing posts with label tips. Show all posts

Friday, April 10, 2020

Going Green with Red!


Note: This posted originally in 2012!  You can use this little tutorial to make a lipstick blotter to save on tissue and toilet paper!!!
Who would have thought we would be worrying about that in this day and age!
   
         Lipstick Blotter Towel


My husband's Aunt Rubye was an extraordinary seamstress. She had a career embroidering monograms for Neiman Marcus at one time! She shared with me the little embroidery design of the two birds with the word "Lip Stick" in between them. When I asked about it, she said that during World War II, tissues and toilet paper were at a premium and they didn't waste them by using them to blot lipstick! They made little red towels to blot their lips on! 
  Here I'm going to give you a simple tutorial for making your own!
(Of course, if you embroider, you can just hem a red cloth and embroider near the bottom.) This is such a simple project, many of you will not need a tutorial, but I have several followers who are new to sewing. I do have a little tip in there that even the more experienced might appreciate, so glance through it for that. If you're new to sewing, this is EASY! You can do it!
1. Cut two pieces for the front and the back (I'll call these A). Also cut a coordinating strip for the bottom (B) and if you want to add trim, cut that too. The size is not crucial. You can make it any size you want. My red strips are 7" x 13" and my bottom strips are 7" x 3". The trim is cut 7" long each.
2. HERE'S THE TIP! If you will use a glue stick to stick the trim where you want it, sewing it into the seam will be SO much easier! The trim I am using is so narrow, I have dropped it down so that only the top of it is on the 1/4" seam line. If your trim is wider, you can just glue it flush with the raw edge.
3. Place each A piece right sides together with a B piece, sandwiching the trim in between the two. Sew a 1/4" seam to connect the two.
4. Press each sewn piece, turning the seam upward so the trim will lay flat.

5. Put the two pieces right sides together. Pay attention to match the seams at the sides for the borders.
6. Sew all the way around, leaving a gap at the top that is about 2" to 3" wide. Turn the piece right side out through this gap. (I like to cut the points off the corners first to reduce the bulk, but be sure you don't cut across the seam when you do this!) Push the corners out with a long skewer or some other tool. Press and hand sew the gap closed. You're finished! Wasn't that easy?

Now you can feel like you're doing your part to save that paper!!


Monday, August 11, 2014

School Supplies for the Sewing Room!

(Check out Debby Kratovil  Quilts today! I've been featured! I made some throw pillows using a beautiful line of Bernatex fabrics!)


As a former teacher, I can't resist the school supply aisles at the local stores. I am drawn to them like a deer to water! 
I found these great little metal boxes this year! They have a black top and brightly colored sides. 


I used these great Expo Neon dry erase markers to write on the top of each what I would be storing inside the boxes. These markers are made for writing on windows.(Although the words can be erased, they do dull the shiny surface of the metal a little so you can tell where you have written.) 
I plan on a brightly colored sewing room, so I'm thinking these will add a pop of color on the shelves.
I think they would also make a great little toy for travel. Fill the boxes with the little magnetic alphabet letters and include a small box of sight word flash cards and let your child have an "educationally" great time!

Hill Country Updates:
We spent the weekend in the hill country. Although I posted that a lot would get done this week, there were delays. :(
We did walk in to find that the dry wall installer had been there! Yay! He did a lot of drywalling. Unfortunately, he did more than he was supposed to do! 


This half wall and these columns were supposed to be left for the stone workers to do. We have been removing dry wall where backer board and then rock are to be installed. This will delay us by quite a bit. We will have to have this removed. He also set all the electrical boxes that Doug had so carefully "UN-set" for the rock work.  Things like this can be a problem when you're not there to clarify things. I feel sorry for the dry wall guy. He was trying to do us a favor by getting this done before he had to go out of town.


We removed some picket fence and leveled an area in preparation for a garden shed. That will be built starting next Monday. There were raised garden plots here, so we shoveled the precious dirt out of them and into a different area. It was HOT work! 

At lunch, Doug went back to Home Depot and dropped me off at the thrift store. I found another souvenir plate! 25 cents!!! (I am working on a lap quilt that will be in the same room as the plates! I'm using them for inspiration. Watch for it in the See You In September Blog Hop!)


We bought a washer and dryer and it will be delivered around the end of September. (Hopefully, we will be ready for it by then!) 
The dry wall has to be in and the walls textured before the cabinets are in. The cabinets have to be in before the stone is in. The stone has to be in before the floor is laid.  Then we can take a break and go see our  grandkids. Thank goodness we live in an age where we can at least talk on the phone! Can you imagine how our great great grandmothers felt when their kids traveled west and even letters were few and far between? We really are blessed, aren't we?


Last summer we had a family Luau on our patio. My daughter-in-law had just returned from a two month duty station in Hawaii where my son had joined her for part of the time.


This was the last family get together there before the fire. Thank goodness for memories!

Thursday, September 5, 2013

Just How Hard is Freezer Paper Applique?

"There Was an Old Lady Who Swallowed a Fly"

Some of you have expressed concern that applique looks too complicated. I think you would be surprised at just how easy it can be. There are methods that are more complicated than others, but after trying them all when I first started, this is the method I settled on. I use a freezer paper method where the freezer paper is ironed to the RIGHT side of the fabric and the seam allowance is turned to the back using a glue stick.
There are several reasons I love this method:
  •  First, it is simple. This is something a beginner can do. Really!I've taught this as a class and the most common comment I hear is, "Oh, this is so much easier than the way I've been doing it! I can do this!"
    Large figures make for really easy applique!
  •  Second, what you see is what you get. Your edges are turned under and ready to sew before you even lay the pieces out on your background. That means you can see exactly what it will look like. You can change colors or fabrics at this point if you are not pleased with what you see, you haven't invested a lot of time in it yet.
  • Since your edges are turned under and ready, you can concentrate on your stitches.
  • Since the freezer paper is ironed to the FRONT of the fabric, you don't have to disturb your seams when you remove it.
  • You are not committed to hand applique. You can easily sew the pieces down by machine, but you have no raw edges. This means your applique will hold up to some real use.
    Tropical quilt with appliqued flowers for my granddaughter's room
  • You do not need to reverse your images when you trace them off. You trace it exactly as it will look when you finish.

    If you are interested in seeing a detailed tutorial of this method, go here. I also have some previous posts that you might find helpful for applique: (just click on the subject you are interested in)


 Finding the Right Background for Applique

Friday, May 10, 2013

Quilter's Favorites

                
 Welcome to my post for the Quilter's Favorites Linky Party.
                                
Whether you're here by accident or you are following the links, I'm glad you've stopped by!  Now for the questions I have chosen to answer!
Tell a little about yourself. 
 
  • I’m Linda of  B. Bumble & Co. I’m just a simple Texas girl with a passion for color, fabrics, and whimsy!( I’m married to a wonderful man who happens to be  a scientist and knows how to keep my feet on the ground!  We have three sons and two grandchildren.) I started college majoring in art, but switched to elementary education when I realized I would need to make a little bit of an income. (Didn’t realize just how” little” teaching would bring in, but I loved the children!!)
 Any advice for a successful color scheme of a quilt?
  •  Fabric companies have made it very easy to put together a nice color scheme. You can always pull colors from a focus fabric and go from there. BUT, if you want to really have fun, use the things around you that you love to inspire your color scheme. Here are some examples of how I used the things around me to pull colors for a quilt: (each is a link to a post showing the colors)
 
   Killdeer - to see the post go to this page. You will see her rust red underfeathers!
Children's book illustrations: Go here to see more!

  
  • Also look at dishes, wrapping paper, cards, famous artwork, and even magazine ads. Use a colorwheel to help you find color combinations that compliment each other.

Could you share some tips about quilt techniques other than patchwork? 
  •  I love applique. The method I use is very simple or I wouldn't use it! (I like to work FAST!) I use freezer paper and a glue stick and iron my pattern to the right side of the fabric. I turn all my seam allowances to the back and stick them down with glue stick. They are all ready to sew down by hand or machine when I finish. You can see a tutorial here.  

Do you have free tutorials on your blog?
  •   Yes! I have quite a few! You can find them by clicking on the "Tutorials" tab at the top of my page. (I know it is hard to read in brown, but when you hover the cursor over it the words will turn white.) I have tutorials for several techniques as well as many projects!

Share some tips for organizing the fabrics in your sewing room. 
  •  I have all my fabrics in tubs labeled by color or theme. All novelty fabrics go in a tub labeled with their theme: Christmas, Bugs and Spiders, Birds, etc.  All other fabrics are by color. Small scraps are in plastic zipper bags with the air squeezed out and are by color. I place those in tubs in cabinets.
 Oh, I wish it were this clean right now!!!
Would you like to share one of your favorite quilts, made by you?
  •  As you know, choosing a favorite quilt is like choosing a favorite child! I think "Who's Been Eating My Porridge?" is one of my favorites. It was one of my first patterns. The recipe for porridge is embroidered around the border.
                                    

Could you recommend a book to someone who just started quilting?
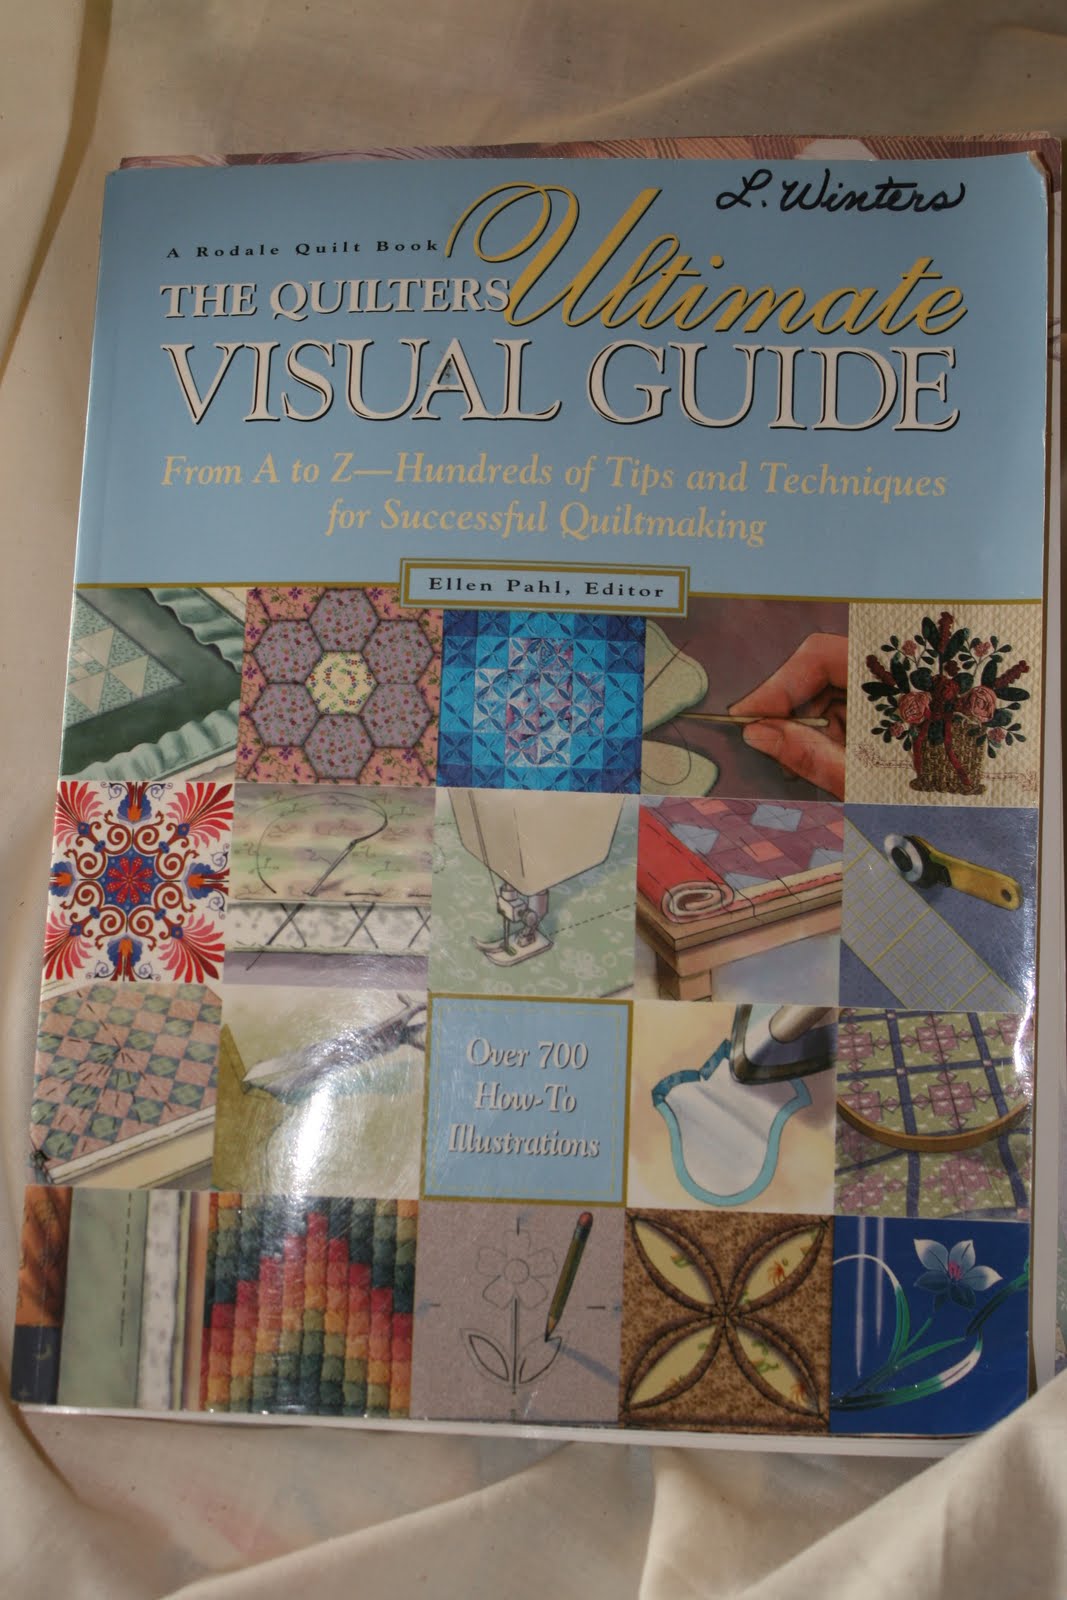
  •  First of all, there are hundreds of good books out there. The one I go to the most is The Quilter's Ultimate Visual Guide by Ellen Pahl. I have worn my book out and have had to put all the pages in a 3 ring binder since they were falling out anyway! This book is written like an encyclopedia. I think it has tons of valuable information for anyone, not only new quilters.                 
That's probably all you want to know about me and more! Enjoy the linky party!!
                         
Related Posts Plugin for WordPress, Blogger...