Buzzings from a quilter who bumbles her way through life!
Showing posts with label embroidery. Show all posts

Sunday, March 15, 2015

Bird Tree Blog Hop - My Day!

appliqued and embroidered pillow case border

The sun finally came out, but shadows couldn't be avoided!

Welcome to the Bird Tree Blog Hop! I really like birds, so I was very attracted this beautiful fabric by Tracy Lizotte for Elizabeth's Studio! It's called "Beautiful Birds". I decided to make a bedding set for a twin bed with fabrics from this line.

appliqued nest

I chose to cut the fabric into squares and sew a simple patchwork quilt with an appliqued border. This quilt fits a twin sized bed.

 I made pillow cases from some of the fabric and embroidered and appliqued a purchased sheet and pillow case to coordinate. I added a ruffle to the border of the sheet along with a verse and coordinating flange.
 I made throw pillows of the tree panel and a bolster pillow from the lining. When the top sheet is turned down over the top of the quilt, the ruffle and verse show.
Sugarplum was suddenly on "hunter alert" and was very fascinated with the birds! (That's how well they're illustrated!)

She finally settled down and relaxed.

Because of all the rain we've had lately, the days have been a little gloomy and dark. I found the sewing machine LED lighting kit by Inspired LED made my sewing a de-LIGHT!!! You can't imagine just how much easier it is to sew when the lighting is really good. This kit is easy to add to your machine and you won't believe the difference it will make to your sewing. You will be able to see so much better!!! You can read about them on their website here. For about $30 you can actually see to sew! I strongly recommend it!
Sewing Machine LED Lighting Kit
photo from the Inspired LED website showing how bright the light can be!
Before you go, be sure to visit my friends on the hop today!

                                  Monday, March 16
Sew Peace To Peace
Moose Stash Quilting
Buzzing and Bumbling
I Piece 2 Mary
Quilt Doodles
Just Let Me Quilt
Les Quilts
A Stitch In Time


Friday, November 30, 2012

Adding Words to Your Project

Giveaway!
Did that get your attention? Words can be very powerful things. After all, a single word can make your day, break your heart, scare you half to death, or spur you on to do your best!
I'm going to be the hostess for a blog hop called In Your Words. (Thank you, Mdm. Samm for that great title and idea!) Yes, there will be a fantastic "grand"giveaway and many small ones!What a great start to the new year! To encourage you to join us, I'm going to show you just how easy it is to put words on your projects.

  I have always loved adding words to my quilts and wall hangings. I have entire fairy tales on some, recipes, songs, rhymes, and even Bible verses on others. 

You might be wondering, though, just how to add those words. There are many ways and I will show you a few easy ones here. You can do any of these quickly and have your project finished in time for the blog hop!
Embroidery:
You can choose to embroider your words either by hand or machine. I often hand embroider words on my quilt borders. I write them on with a mechanical pencil very lightly and then embroider over the pencil lines. You can print them out on your computer and use a light box to trace them onto your fabric. Both the sample above and below are done in simple embroidery, stem stitch.

Rubber Stamps and Acrylic Paint

The sample above was stamped using the simple foam stamps below. Quilting around each letter, which is NOT as difficult as it sounds, gives each letter a finished look.
These stamps were from Michael's and were sold as an inexpensive set. I bought them several years ago, so I'm not sure what is available now, but the fact that they are on a clear plastic backing is VERY helpful in placing the letters. 
I simply brush acrylic paint on the letter, stamp it on where I want it, and if there is a void I fill it in carefully with a small artist's paintbrush. (I don't try to realign it and restamp it, but you may be able to do that.) Here are the craft acrylics I use: (Heat setting them with an iron makes them permanent on your fabric.)
If your fabric is dark, paint first in white and then in your color. 

Acrylic Paint and Fabric Paint  

Here is a sample where I have painted the words on. Quilting around them later will make them pop and will "clean" up the lines. Simply use an artist's paintbrush. (Do not use the cheap type sold for kids. You will not be able to get a good point on them. Use one that is small and tapers to a nice point.) I use the paints above. You can also use fabric paints the same way, but they are usually transparent, so keep that in mind.
fabric paint
 Paint Pen

I love using a paint pen and then embroidering or quilting right at the outline of the letter. It looks almost appliqued, but is VERY easy to do. Here are the pens I use:
They come in Fine, Medium, and Thick points. I use the medium. I taught school and can just write with these as if they were chalk, but if you aren't that confident, trace off your words with chalk first. Drawing off a top, middle, and lower line for each letter is helpful in keeping them uniform. Again, heat setting will make this permanent.

Applique
 
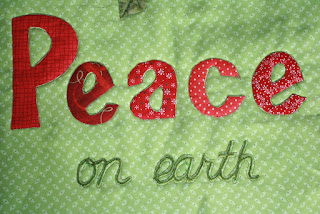
The sample above was done in fabric applique. I use my freezer paper method, where I cut out my shapes, iron them to the FRONT of my fabric, cut out the fabric leaving my seam allowance, and then turn the edges to the back using a glue stick. You can go to my tutorials and see a picture by picture tutorial of this method. It makes it EASY!!
(The "on earth" is embroidered and quilted around.)  You can also choose to trace off your words to a fusible product and iron them on. You would then want to sew around the edge to make it truly permanent. 

Felt

The word above has been blanket stitched onto felt. These letters were purchased craft felt. I could only find it in yellow, so I used fabric dye and "painted" them orange. If possible, use the letters that are NOT adhesive. It is very difficult to sew through that adhesive! You could also cut out your own felt letters!

This should be enough to get you started! I will have even more methods, some very untraditional, next week! 
If you would like to join in the "In Your Words" blog hop, just send me an email here.  It is going to be FUN and easy. You have no pattern to buy, no specific fabric, and you can do anything you want with fabric as long as you include at least one word. It will start January 7. I'll be taking names this week until we fill up, so be sure and send me your name, email address, and blog address. ( If you don't have a blog, we have a blog just for that, but there is only room for 15 of you, so let me know quickly!) 
Until next time....
Bee Blessed!   

Monday, September 26, 2011

Vintage Quilt and Embroidery Patterns

Quilters and Embroiderers have used patterns for a very long time. This is the way they shared designs and passed them on.  In 1974, my husband and I visited his Aunt Rubye. She was a remarkable "needleworker" who made a living at one time by embroidering monograms on shirts for Neiman-Marcus! (There were enough oil millionaires back then for her to do that!) She was also an accomplished quilter and seamstress. She was born before the turn of the century and learned as a young girl how to sew and embroider. On this visit, Aunt Rubye showed me her "workshop" - a creative jumble of project areas for crafting, sewing, and quilting. She pulled out her embroidery patterns and when she saw my jaw drop over the old patterns, she gave me a few. (I was only 24 at the time and these treasures seemed ancient to me!) I have treasured them over the years. They are extremely special to me, not only because they are old, but because they were hers.


 These embroidery patterns have been transferred to old brown paper grocery bags. They have designs that appear to have been from around the turn of the century. The paper appears to be waxed or oiled, which I'm sure has kept it from falling apart.


 I have no idea when these patterns were produced, but they are Butterick Transfer Patterns and I do know that Butterick made transfer patterns between 1863 and the early to mid 1930's..They are pattern #10436. I was unable to find out anything more than that.


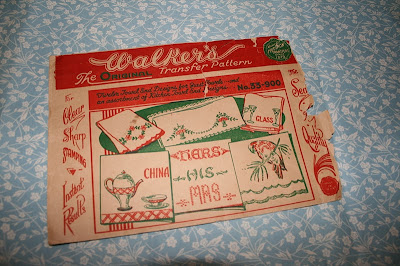
The  patterns below early examples from the Joseph Walker Co. These patterns are from  the late 1930's. The first was designed to iron onto children's clothing, crib covers, pillows, aprons, etc. to "give an embroidered effect". The second was an iron on transfer meant to be embroidered.

The Vogart pattern below was from after 1959, since it included Hawaii and Alaska as states.

Below are some Laura Wheeler Designs. These were sold through newspapers. The first one below is from 1946. The second one (with the baby design) is from 1960.


The last one I will show is also a pattern ordered from the newspaper. The address label on the envelope has been cut from the newspaper and filled out by the person who ordered it. This is from 1976. That was the year when quilting here in the United States had a resurgence. This was the Bi-Centennial year for this country and many "old" crafts were being revisited for fairs, school projects, demonstrations, etc. This soon carried over into home decor. I remember a popular wallpaper  I wanted that had reproductions of old Sears & Roebuck catalog pages from the 1800's. Quilt patterns came out in magazines and many women started quilting again because there was a new appreciation for old crafts. The pattern here is one for a State Bird quilt. 


I really love OLD things like this! I don't know if it's the history behind them that intrigues me, or the "romantic" ideas I form in my imagination about the people using them and the times they lived in. Some day maybe I'll make a quilt with some of these embroidery patterns worked up in the centers of blocks. If nothing else, I feel inspired when I look through them and that's worth a lot to me.

post signature
Related Posts Plugin for WordPress, Blogger...