Buzzings from a quilter who bumbles her way through life!

Tuesday, May 31, 2011

Flamingo Quilt!


 Here's the flamingo quilt for my granddaughter. I have binding to sew on, but that is the easy part. I had all of this fabric in my stash already. I love the Amy Butler print so much, I haven't used it until now. The flamingo is applique.  I also added some detail on the wings from the border print. I backed it with a pink, fuzzy minky that she will adore. I also knew she loved puffy quilts, so I used a polyester batting and minimum quilting. (I've never used polyester before. It was kind of a "dirty word" in most quilt guilds I've attended. I think it is fine for this application!)
So now she has her tropical bedspread AND her quilt with a flamingo in the middle, just like she drew out for me! 
Hopefully, I will be able to post pictures as we get her room together, but I will be having fun with both grandkids for the next two weeks. I am taking fabric for my grandson's room, too, but I wasn't as sure of what he wanted. He is 3, so I need to be there to figure it out!
California, look out.......here I come! 
    

                                           post signature

Sunday, May 29, 2011

Surprise! We Have Babies!


 I was out with my camera at sunset because the sun was such a gorgeous orange. I snapped a few pictures and then decide to look in on the little wren's nest that is in my hanging pot on the patio .( I showed the eggs in the nest in a previous post. here Scroll down to see the nest.)  I am only about 5'2" and the pot is hanging at about 8 or 9 feet, so I couldn't see in even standing on a chair. So I stood on the chair anyway and held my camera above my head and pointed in among the geraniums. I knew it was a long shot that I could see the eggs, but I thought it would be fun to try. I couldn't even see the thumbnail on my camera screen, so I was certainly shooting blind. When I downloaded my photo, this is what I had. I only took one shot. Aren't they cute? I just love babies!!!

 Tomorrow is a holiday here in the U.S., so I will be enjoying a day with my sweet husband. I hope you have a wonderful day full of good surprises!

                                                     post signature

Thursday, May 26, 2011

Tropical Island Quilt Finished (almost!)


 Whew! Finished! All except for the flower centers. I posed it in a guest room, so this is not it's final home. Hopefully, it will be cuter on my granddaughter's bed in her "tropical island" bedroom. I even draped the leis across my headboard trying to help the situation. Her bed is white, so I think that will be prettier.


I quilted this on a frame - a first for me. I've quilted everything I've ever done on my sewing machine. I started at 9:00 yesterday morning and  finished at 3:30 that afternoon. The frame allows only 7" of quilting space, so I spent more time rolling, pinning, and adjusting than actual quilting. I don't think I could have gotten this done under my sewing machine arm, though. I have a new respect for longarm quilters. My back and shoulders are pretty sore today! I spent today sewing on the binding and washing and drying the quilt.  I wanted it to be washed so that it would be soft and slightly puckered. I will mail it tomorrow and hopefully, it will be there when I fly out next Thursday. (No, not on a broom.) It won't fit in my suitcase unless I decide to not take clothes. Hmmm.....I guess I could buy a new wardrobe when I get there! I'll have to talk to my sweet, generous husband about that!  Good idea, right? Saves on postage!

I plan on letting my granddaughter help me sew buttons in the centers of the flowers. I have just sprinkled some on for the photo. I will let her choose which she wants and where. I believe in letting kids help as much as possible. It not only gives them ownership and teaches them a skill, it shows them how much work goes into something like this. She can be proud of the part she had in creating her room.
 I still owe her a quilt with a flamingo on it, so I will have to work on that idea. I have a flamingo all cut out and edges turned...ready for applique. I also have 3 of the tropical shirt blocks done. That quilt will have to be a lap throw. 
I also haven't forgotten that my little grandson also needs a room decorated. I need to start on that next. 


 Have I mentioned that I love, love, love being a grandmother?!!! I'm with the person who said that if they had known grandchildren would be so much fun, they would have had them first!


                                               post signature

Sunday, May 22, 2011

Flamingo Room Progress and a Tutorial for a Flamingo Window Header

This is just a trial run of the window treatment that I may use in my granddaughter's "Tropical Island with Pink Flamingos" room! Her walls are turquoise and her blinds are white. She will also probably have some curtains or drapes. I've pinned this up with straight pins to see how it would work. I've included a tutorial for it below.
                                               
I've finished appliqueing the flowers on the quilt top for my granddaughter's new bedroom. It's pretty big - about 96" x 83" before quilting. I'm anxious to find a backing and get started. I'm thinking I will need to mail it to her before I go in a couple of weeks because I'm not sure it will fit in my suitcase! We'll see.
Then I started thinking about the rest of her room. She will need a window treatment, for instance.
I got in the car and started searching for "Flamingo Inspiration."  At The Dollar Store (where everything cost $1), I found a couple of flamingos (about 12" wide) and some flower leis. I also bought a very inexpensive curtain rod at Walmart.
My haul for less than $7.

I removed the two wire "legs" that were inserted in the neck (they were intended to be removed and placed in two holes on the underneath and then stuck in the ground). I used the closed point of my scissors to "ream" the hole out just big enough for the end of the curtain rod. (Be careful to not get it too large!!!)


I removed the little finial on the ends of the curtain rod.
I inserted each end of the curtain rod into the holes on the two flamingos. (I think a little hot glue here would help stabilize it.)

I cut two ribbons, each 40" long, to use as legs. I folded them in half and then tied a loose knot in the center of each half  to act as knees. I cut 8 "tulip" shapes for feet.
I used Tacky glue to sandwich the end of each ribbon between two felt feet.
 I found the two holes on the bottom that the wires were supposed to be inserted into. (If your flamingo doesn't have these, I guess you could either make some or just use glue.) This is where I attached the legs (see next step).
I used a large, sturdy needle to sew through the two holes to attach the center of each set of ribbon legs. I was not able to do this with a small needle.
This is what I ended up with. The legs may be a little too long, but I will wait until they are safely in place in their new room to decide. It might be that we don't use them at all. I'll let my granddaughter decide.


Tah-Dah!
(probably not as pretty on MY window, but a start for hers)


Now I'm ready to hang the window topper. Remember that I was trying these out on my own windows before taking them to my granddaughter's. We will probably also have soft drapes on the windows that this will go over. I hung the rod and just draped the leis over it. All in all, I spent only about 20 minutes on the entire thing! What do you think? This goes in the same room as the tropical quilt. We already have some palm trees painted in the room, but she will help me add more when I go for another visit soon.
The things she wanted in her room were:
PINK
Tropical Island
Flamingos
Flowers 
"Fuzzy Pillows"

 Her bed is white, so I included some white flowers (they have tiny pink dots that you can't see in the picture.) I'm thinking maybe soft, white sheer drapes? She does have white blinds. I need to experiment when I get there to see what looks best! Maybe white drapes with a border (along the bottom) of pieced tropical prints? I'll be sure and take pictures when all is finished.

                                             post signature

Wednesday, May 18, 2011

A WIP and a Visit to My Garden


I'm working on a "tropical island" quilt for my granddaughter. I need to finish it before June, when I will see her again. She wants lots of pink and pink flamingos. The white is paper. I'm thinking of scattering flowers across the top of it. It is a very scrappy quilt using tropical fabrics cut in different sized squares. It is not anywhere near finished, but at least I'm working on something. Because she wants a big pink flamingo on her quilt, I'm trying to make a second one with the flamingo in the center and blocks depicting different tropcial "things" around it. I have made a block from Paper Panache that is an Hawaiian shirt. It has a little 3 dimensional collar and a real pocket. Now I'm trying to come up with a little hula dancer to go along with it! And flip-flops! (We used to call them "thongs", but I discovered to my daughter-in-law's horror that you can't call them that anymore!!!!)


 I went outside to water my flowers and discovered a little wren (?) has built a nest in one of my hanging baskets.  My entire yard is full of new life! Swallows have nests in three places around my porches, hummingbirds are still draining their feeders every day, and then there's Fiona, the little Chihuahua from next door. (Do I need to point out that her owner is a little girl?) She came over to show me her new manicure!


Fiona with her newly painted nails!

 I have really tried to quilt in subtle, soft colors, but I keep coming back to the brights. I love what some of you put together in soft pinks and pale blues, but maybe if you saw my flower beds you would understand . This is what I caught with my camera a few minutes ago. Some are already fading, but there will be others to take their places.
Bird of Paradise


Oleander ready to bloom

Geranium

Lantana

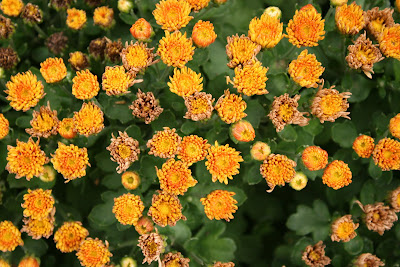
Chrysanthemum (yes, it's blooming in the spring!)

More chrysanthemums
Ixora
Yikes! A green spider killing a fly!  


                                              post signature

Sunday, May 15, 2011

Tutorial: Felt or Fabric Flowers


Fabric


Felt
This is an extremely easy project. It requires no sewing and the resulting flowers can be used as napkin rings (they have a loop of fabric in the back as a natural part of construction), hair clips, embellishment on clothing or bags, or whatever else you might think of. The felt flowers are actually a children's project. The fabric flowers are just as easy, but require stiffening the fabric first. 
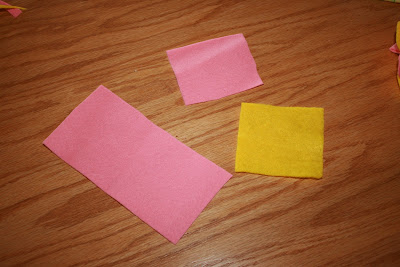
1. For felt flowers, you need two squares of felt about 3" square. (The size of the squares will determine the size of the flower.) I used yellow, but green would be more appropriate as that square represents the leaves. You also need a rectangle of felt. The longer the rectangle, the bigger the loop in the back of the flower. If you want your flower as a hair clip or embellishment, make the rectangle about twice as long as the square. If you want a napkin ring, you need it a little longer. 
2. Cut the green (yellow) square into leaf shapes by folding in half and then in half again and cutting the open ends into pointed leaf shapes. Make rounded petal shapes from the pink square in the same way. The rectangle should resemble a dog bone! You don't have to be perfect with this. Just don't cut too deeply into the center. If cutting these shapes intimidates you, you could use a cookie cutter to trace around, but I think you'll find it very forgiving.
3. Cut a very small slit in the center of the small petal and leaf sets.
4. Fold the "dog bone" shape in half and compress the middle enough to insert into the slit of the pink petal.
5. Pull it through (the slit should be small enough that it is a tight fit) until the petals gather up a little.
6. Next pull it through the leaf set.
7. Adjust the petals. You will find that there is a very small loop on the back formed by the center of the "dog bone" shape. If you want this loop to be bigger, just make the shape longer. The ones I made are big enough to put a hair clip through . These are simple enough for a child to make. 


8. To make these flowers out of fabric, you need to stiffen the fabric first. You can use undiluted liquid starch (soak the fabric, let it dry, and then press) as I did, or you can stiffen it with glue or a clear medium such as Mod Podge. I also found that you need to put more layers of petals (I used 3 - one larger than the other two) to give it more body. I used two different fabrics here, but you can use the colors you want. Scraps are perfect! The construction method is the same.
  

                                                                                             post signature 


A Sehpherd of a Different Color


I have been busy this week making another Good Shepherd quilt. This one is for a silent auction to benefit a group of children's homes called Arms of Hope. I used the new Moda wildflower fabric that is designed for the big Texas Shop Hop! If I am not mistaken, it is only available in the shops that are participating in the shop hop. It depicts Texas wildflowers and birds.  Below is the original. (I think I like the original best, but sometimes you have to just try things to know. Besides, the new one has the special fabric in it, so it might appeal to people who appreciate "all things Texan". ( I do think it looks better "in person" though.


                                                                                  post signature

Thursday, May 12, 2011

Rain at Last!

It's Raining! Yay!
We've been "caught up" in a drought here in South Texas and have needed rain for a very long time now. Today, it started raining! I've forgotten how to drive in rain, but I managed to get myself home without any mishaps. 

The plant on the left has rain water up to its brim. 
Just a couple of days ago it was 101 degrees here! The grass that is out of reach of the sprinkler system crunched under my feet as I walked. Driving down the interstate, you pass areas along the road that were burned by grass fires. This rain is a very welcome relief. (I did see harvesters heading out to someone's fields. I do feel sorry for them. Rain is not a good thing when it is time to harvest.)
What a perfect day to sit and sew if the power stays on! There is certainly a lot of thunder, but so far, so good!

Monday, May 9, 2011

Tutorial:Travel Roll-Up with Removable Pouches

     
I have a great makeup bag designed for travel. It has several pouches (attached with hook and loop tape) that can be removed and replaced easily. I decided that I needed a similar bag for sewing and quilting notions. I could fill the pouches with thread, scissors, rotary cutter, fat quarters, embroidery floss, etc. I could then roll it up, place it securely in my tote bag, and take it along to workshops and retreats. Everything would be easily accessible and in one place. I could also use it on trips, filling it with socks, underwear, jewelry, or how about toothpaste, toothbrush, makeup (if you don't already have one of those makeup bags) and other toiletries. 
Make one for a child and fill it with crayons, pencils, a small notebook, stencils, snacks, etc. You can use one pouch, two, three, four, or even more.
You'll need the following materials:
1.cloth for the front and back of the Roll-Up 
2.batting 
3.Binder pouches (these are made for pencils and crayons and have grommets to allow them to be put in a notebook binder. The ones I found were made by Elmer's and cost me 97 cents each.
4.Hook and loop tape - You will need both the adhesive type and the sew in type. You will use the adhesive type on the pouches and the sew in type on the cloth
5.ribbon, about 1 yard
6.binding for top of roll-up
Note: I didn't give amounts because this can be made any size and the width depends on the width of the binder pouches you get. 
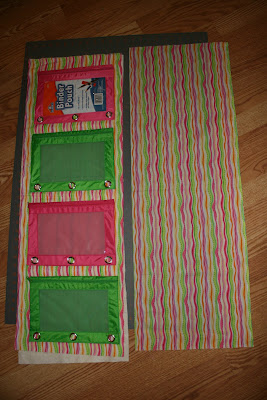
1. Lay the pouches out about 1 1/2" to 2" apart and determine the length and width you want. You can use any number of binder pouches. 
2. Cut front, back and batting  this length and width and layer with front and back right sides together and batting on the back (Not sandwiched between!)
3. Sew 1/4" around the edge of three sides, leaving one end open. Turn it right side out. This will leave the batting inside.  Machine quilt the roll-up at this point. (I did simple quilting about 1" apart by following the lines of my fabric.)
4. Trim the open end  after quilting to make it straight.
 
5. Put the "bristle" side (or hook side) of the adhesive hook and loop tape on the pouches and the soft side of the sew on tape on the cloth roll-up. (I tried the adhesive type on the cloth and it didn't work! I also tried sewing it and it ruined a needle. SO.....I recommend using the two types. Yes, you are wasting half of each, but maybe you could combine them for something else?) I also took this picture using the adhesive type on the cloth. When that didn't work, I switched to a sew on type that was 2" wide because that is what I had. I put two rows of adhesive tape at the tops only of each pouch to match up to this wider tape.
Match up the tape on the pouch and the roll-up so that they meet. Sew the soft side (the loop side) of the hook and loop tape to the cloth roll-up, loop side up of course. NOTE: Try to place the tape in the same place on each pouch so that any pouch will fit on any space.
6. Fold the ribbon in half and sew to the open end of the roll-up. (I have sewn across the open end of the roll-up  1/4" to stabilize it, but that is not really necessary because you will be sewing a binding on.
7. Cut a piece of binding 1" longer than the end you will sew it to. Turn the edges of the binding in 1/2" so that you do not have raw edges. Fold the binding in half, place the raw edges of the binding against the raw edges of the roll up and sew using a 1/4" seam. (Just as you would sew on a quilt binding.)
8. Turn the folded edge of the binding over the raw edge and  sew down by hand. You  will catch the sewn end of the ribbon in the binding. 
9. Place your pouches on the roll up. If you lined up your hook and loop tape correctly, they should all stick in place just right! I bought some binder rings that can be hooked through the grommet holes and used to hang scissors or anything else that has a hole it can go through. I didn't find that I needed it. Keep that in mind, though. It might be that you could use it. The holes might also be handy for keeping embroidery floss separate for a project.
10.Roll it up (you are actually almost folding it over and over. Pull the ribbon around in opposite directions and tie to close.
 That's it. It's a very simple idea. Everything is contained in a neat little packet. You can place it in a tote or a suitcase. You can tuck your project in among the pouches and roll it up with them.
Related Posts Plugin for WordPress, Blogger...