
Here's an easy little storage container you can make to serve as storage or as a pretty little gift basket. It is just the right size for fat quarters, a pattern, and a few spools of thread. It would make a nice gift for a friend who is learning to quilt or as a nice prize for a quilt guild. Several of these full of fat quarters would look neat and nice on your shelves. At the end of this post, I've listed some other ways you could use this basket.
This is how I made the basket at the top of the page:

Cut your outer fabric, your lining, and your interfacing (mine is felt, but fleece or even stiff interfacing will work fine) into rectangles 26 1/2" x 24".

Layer the lining and the interfacing and fold in half lengthwise. Sew the two short ends together.
Also fold the outer fabric and sew in the same way.

Cut a template that is 3 1/8" square. With the fold at the bottom, set the template in each corner (do not include the seam in the measurement!) and cut out. Do this on both pieces.
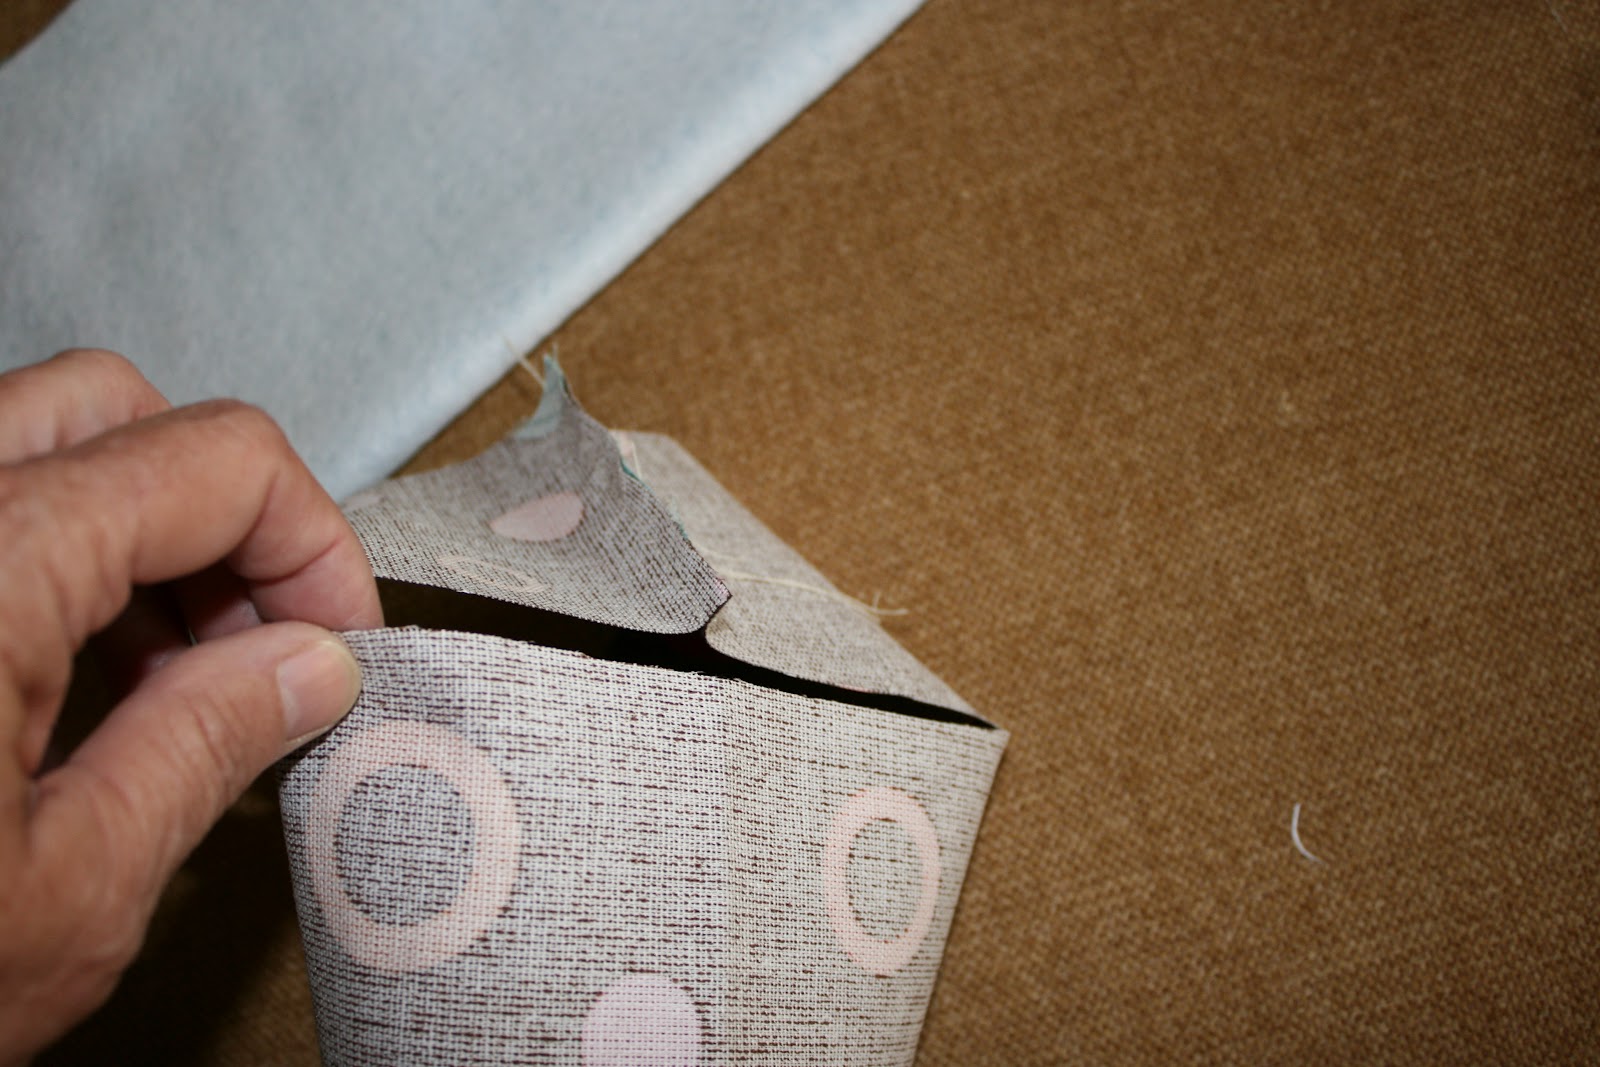
Now here's the best trick of all! I learned it from Ooh! Pretty Colors several years ago and made a TON (about 50) of "Busy Bags" for the little children at church using this method! (Thanks, Diane!) Simply open up the corner and bring the middle of the bottom up to meet the side seam (as in the photo above). Pin in place.

Pin this opening together in both pieces. You will end up with something similar to the picture above.

Place the bottoms together and re-pin so that the outer fabric, the interfacing, and the lining will be sewn together. Sew across each opening. This will assure your lining and your outer piece will always stay in place! (The "points" in the photo are just the sides of the basket flattened out.)

Here you see the seams sewn. The outer body fabric is on the underneath, not shown well in this photo. At this point, insert a piece of lightweight cardboard in the bottom, between the outer body fabric and the interfacing. It will be ABOUT 6 1/4" x 8 1/4", but the width of your fabrics can make a difference in this. Measure the bottom to see what yours will be.

Turn inside out so that the outer body is now on the outside.

For handles, cut two strips each 13" x 3". On each, turn under one edge about 1/4". Fold the opposite edge over about 1", then bring the folded edge over this to the side, as shown. I used a glue stick to hold down the folded edges. Now topstitch down each side.
Pin in place on each side of the box, where you want it.

Cut a strip for a binding that is 2 1/2" x about 36". Be sure it is long enough to go all the way around the top of your box. Fold it in half lengthwise, press, and place the raw edges along the top of your outer body (do NOT sew through the lining unless you have used a very stiff interfacing or do not want to add cardboard in the sides.) Do sew the ends of the handles in place as you sew the binding on. The should be under the binding.
Cut two pieces of cardboard for the ends and two for the sides. Mine were 6 1/2" x 3 1/4" for the ends, and 8 1/2" x 3 1/4" for the sides. (Check yours before cutting. You can always start bigger and trim if needed.)

Insert the cardboard into the sides and the ends between the body and the interfacing. (Although in the photo I do not have the binding sewn on, I ended up having to remove the cardboard after the photo to sew the binding on! Some things you just learn by experience.)

Turn the binding over the top and pin or clip in place. Sew it to the lining, or by sewing through the cardboard back and forth from inside to outside. If you make your cardboard enough shorter than the sides, you may be able to sew by machine by sewing the binding ABOVE the cardboard.

Now fill it with goodies and give it as a gift to yourself or someone else! Here are some other gift ideas using this little basket. Use a fabric that will compliment what you put inside if you want!
1. candy, bubble solution and wand, small toys, etc. for a child in the hospital. (Check on what is actually allowed for that child first.)
2. produce from your garden to give to an elderly neighbor. Include some home canned goodies if you have them!
3. homemade bread for a friend.
4. apple, pencils, hand lotion, gift card, etc. for a teacher
5. homemade cookies
6.small houseplant, hand lotion, candies for a nursing home resident
7. crayons (the BIG box with LOTS of hues), sketch book, and colored pencils for a child
8. soft, fluffy socks in all colors for an elderly or sick friend
9. tools for a specific need - baby items, kitchen items, toiletries, gardening tools and seeds, off to college, etc.
10. seven little boxes or bags with little treats inside along with scriptures or encouraging notes - one for a depressed or discouraged friend to open each day for a week.
I'm sure I'll think of more things that I will wish I had listed, but you probably have some great ideas of your own. I love the idea of using this to brighten someone's day, but it might be that you need your OWN day brightened.
Until next time.....

What a great little basket. Thanks for the great tutorial Linda.
ReplyDeleteGreat basket and tutorial Linda (as always)... so have filed that one for a future project for sure! Thanks :)
ReplyDeleteThis is so darling...thinking this would be a very cute project for me to tackle this summer. Hugs to you
ReplyDeleteThis is a wonderful tutorial Linda! Something I could make for my grandkids, and fill with fun things when they visit. Thank you!
ReplyDeleteWhat a cute basket and wonderful tutorial Linda!
ReplyDeleteThanks so much for the great tutorial and wonderful gift basket ideas! You're such a thoughtful person :-)
ReplyDeleteBRILLIANT - love this Linda, thank you so much!
ReplyDeleteLinda, I love the little basket! This would make a great tut for my bee meeting, thanks for sharing.
ReplyDeleteThank you for sharing this tutorial with us. It is easy to follow and a perfect Christmas project! Thanks Linda.
ReplyDeleteI love this tutorial. It is so easy to follow. Thanks for sharing.
ReplyDeleteregards,
irene of E5
Keep in mind that you will probably acquire more objects throughout the years, and be sure that you choose a building size that you won't outgrow within the first few years.
ReplyDeleteoutdoor storage shed