Buzzings from a quilter who bumbles her way through life!

Saturday, April 30, 2011

Home Again, Home Again, Jiggetty Jig

 Here I am. Trying to crawl out of the snow near Mt. St. Helens on Thursday morning. As you can see, one leg is still stuck in the snow and it comes well above my knee. Now, this South Texas girl doesn't have a lot of experience in the snow. I didn't realize that snow can be like water, with some areas deeper than others! I also didn't realize just how hard it is to climb out of it when you sink down deeper than your knees!  My three grown sons and husband thought it was pretty funny. (It's even harder to climb out of the "snow pit" when you're laughing so hard you're afraid you might embarrass yourself!)
I've been in California with a "side trip" up to the Portland, Oregon area and about an hour north of that. It seems so strange to leave temperatures in the 90's, land in central California with temperatures in the 70's, drive to Portland in the 50's, and drive up to the mountain where it was obviously below 32. Isn't this supposed to be spring?
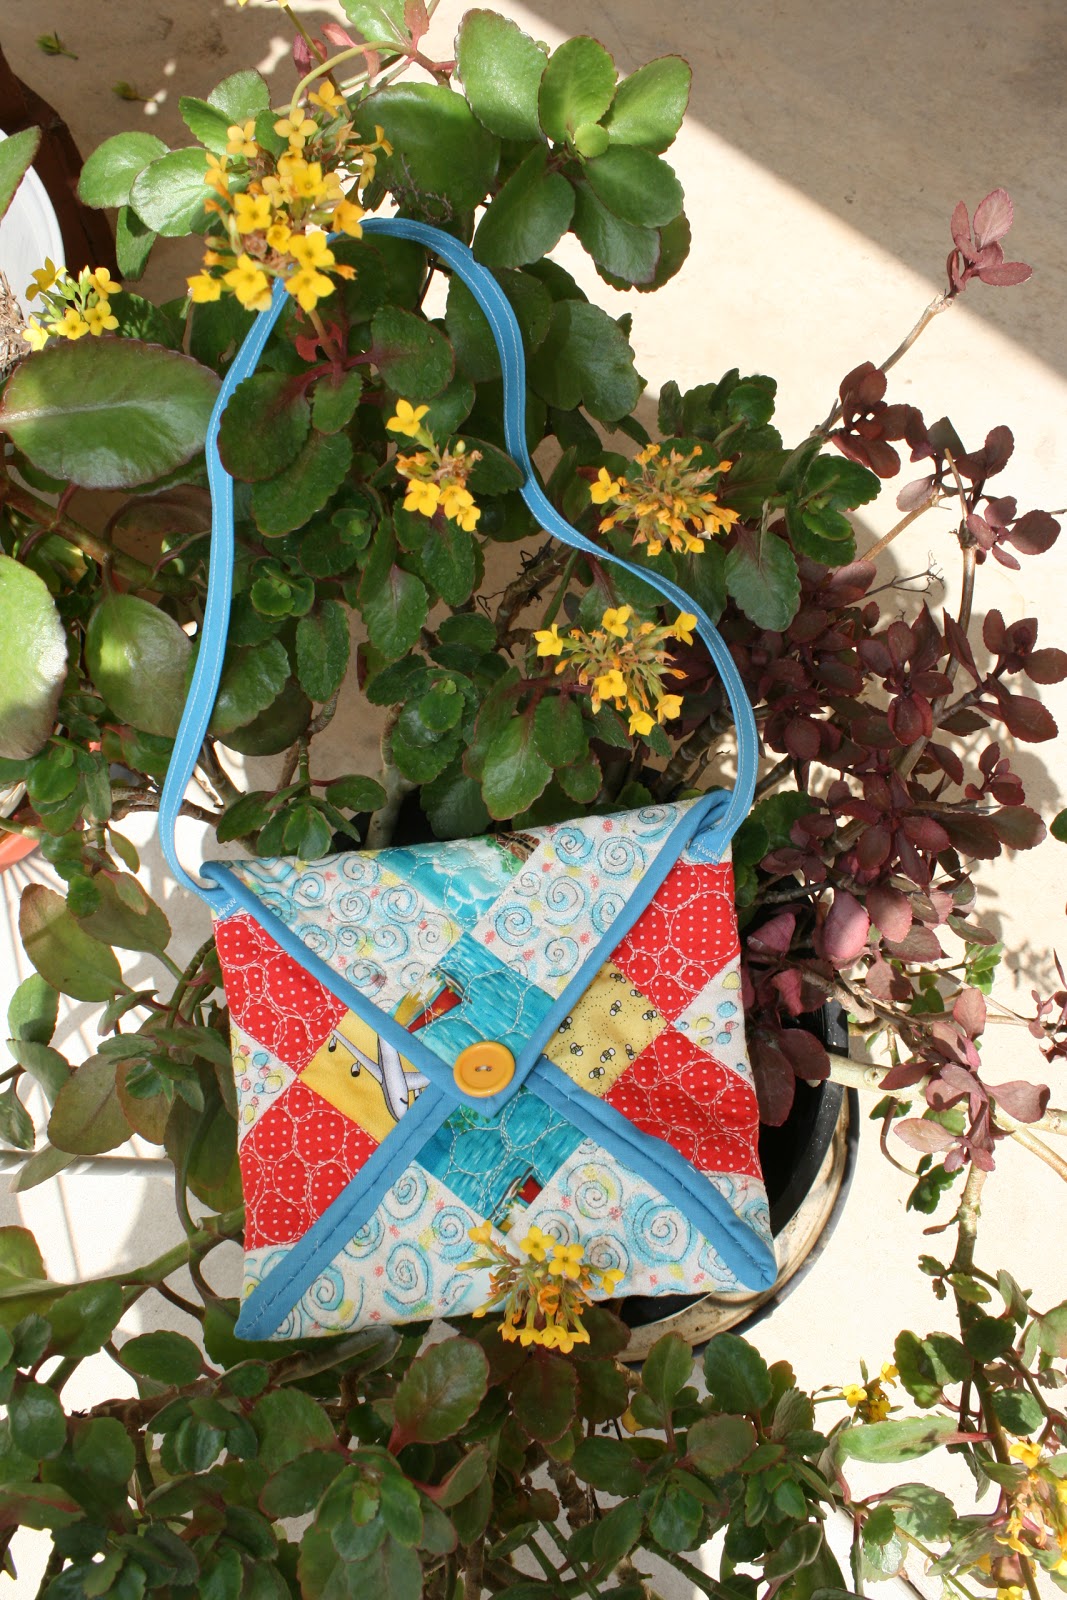
 The first day of the trip, I gave my 8 year old granddaughter the little purse (see the last tutorial). I showed her my blog and the picture there of her purse. (I did add buttons over where I sewed the strap on. MUCH better! Wish I had thought of that earlier!!!) She was thrilled to see HER purse on the internet. Later in the car we heard from the back seat, "I just can't get over it. My purse is FAMOUS!" So cute!
 Thank you to everyone who commented and to all my new followers. I can't wait to read your comments. (It's late now and I need to go to bed.) I will post "for real" on Monday. I hope to have a new tutorial then if I can get my act together. If not, it will go up very soon.

Friday, April 22, 2011

Tutorial:Leftover Block Envelope Bag

This very simple little envelope bag is going with me on a trip to California. I plan to give it to my granddaughter to use for little things she might want to carry - lunch money, cell phone, little notebook, etc. 
I started out with a variation of the Road to California block. (A hint about where I'm going!) If you want this block in particular, you can find directions here: http://www.blockcentral.com/bom2009-2.shtml
 
1. Start with a finished block. Mine is a 10" block, but any size will work. The bigger the block, the bigger the bag! Layer it with batting and backing. Quilt it and bind it.
Actually, this is the block I started with: (It was a little too plain for me so I used fabric dye and added some color and design! Remember, this is a block I would have thrown out anyway, so I had nothing to lose by experimenting! )
2. Bring three corners up to the middle. I chose to bring the yellow corners to the center for balance. Try different corners to find which is best on your block.


3.Sew the sides of these corners together. It is helpful to turn it inside out to do this. You will have only two seams.
4. Using the same binding (that you bound the block with) turn the raw edges to the center and press. The length will depend on how much strap you want. Mine is 24", but you may want yours longer. Try it out first!
5. Fold the binding in half with the raw edges inside and press. Sew along each side. This forms your strap.
6. Fold under each end of the strap about 1/4" and sew to the top at each side of the bag. I sewed it about 1" below the top because I have the flap overlapping about 1" at the closure. Sew hook and loop tape (or snap, magnetic closure, button, etc.) just below the "junction" of the three corners that you have sewn together. Sew the corresponding hook and loop (or other method) to the top flap. I chose to sew a button on the front of the flap for color.


                       That's all there is to it.
                     Have a wonderful Easter
                       and I'll be back soon!

Wednesday, April 20, 2011

Inspiration in the Kitchen and Patio

I was in my kitchen when I was inspired.My thinking went a little like this.....
I like the scallop on the inside with the narrow pink border separating it from the white. I like the contrast of the black and white and also the checked "binding".


I like the contrast of the white on blue. I also like the red "binding" and the gold "center". Not as sure about the aqua.

How about appliqued flower petals inside a border like this? AND, how about the undulating line with the red dots? How could I give that effect?
    
Maybe a more simplified appliqued "feathering" between a blue binding and the gold narrow border.

                                     Maybe I could get this effect with yo-yos placed side by side along a border.

 Hmmmm....I like the idea of an applique in a scallop. Maybe even a scrolled design similar to this as the applique.


I'm inspired by so many things around me.....the lines of a pretty gate, the colors of a salad, the circles of irrigated fields as seen from a plane, and on and on. I don't take them exactly as they are. I might like the color scheme or maybe the graceful lines. It might inspire me to put two fabrics together that I might not have considered before. 
Let yourself be inspired by the things around you and you will find that the world will look different to you! Find the beauty in the everyday object. 

                     What inspires you?

Monday, April 18, 2011

Making Faces Tutorial

First Flight
Many of my quilts have children or other characters depicted. I've been asked to explain how I do the faces on my "characters", so this tutorial will attempt to do just that. The face I will use comes from my "girl on a swing" quilt - First Flight.
First of all, I have already given tutorials for creating your own skin toned fabric and for preparing the figures for applique, so I will not duplicate that. If you want to see those tutorials, you can find them here: 
http://buzzingandbumbling.blogspot.com/2011/03/using-tea-or-coffee-to-create-flesh.html 

http://buzzingandbumbling.blogspot.com/2011/03/applique-tutorial.html 

1. After turning the edges on your applique piece, cut a piece of batting a little smaller than the turned face. Set the batting aside.
2. Peel off the freezer paper and trace the face onto the front of the face piece. (Although you see a pen in this photo, use a mechanical pencil and draw lightly!)
3. Glue the batting to the back of the face. You don't really need a lot of glue, just a little around the edges.
4. Using a pair of small, pointed scissors, carefully cut the eyes out of the freezer paper face pattern and iron it back on the face, lining up the eyes carefully!
5. Now you're ready to paint. Using craft acrylics, carefully paint inside the eye area with white paint. It is helpful to stroke from the paper to the fabric instead of from the fabric to the paper, as doing that can force the paint under the paper.. Do not water it down! Let it dry completely before going on to the next step.
6. Pencil in the iris and pupil of each eye. You can cut them out of the pattern if that is helpful to you and just trace the outline.
7. Again using craft acrylic, but in the eye color you want, paint inside the iris area.
8.Mix a dab of black with your eye color to make a darker shade to give shadow below the upper eyelid.
9. Do the same with a dab of white paint to make a lighter shade to put above the lower lid. This shading is not absolutely necessary but will give your eye a nicer look.
10. Dip the tip of the"tail" end, the end with the bristles, in the black paint.
11. Dab onto the pupil area of each eye. If you want a larger pupil, use a larger brush end.
12. Make two dots of white beside the pupils - one above and one below. This is important to giving the eye "life".
13. After the paint is dry, peel off the freezer paper.
14. Embroider features using 2 strands of floss. I use brown for eyebrows, upper lid, and eyelashes and dark flesh for other features, including lower lid.
15. Using floss of your eye color, embroider along the edges of the iris.
16. For the cheeks, I use a "PaintStik" made by Shiva. You can also use powdered blush (although it will not be permanent) or crayon (use very carefully). The PaintStik is permanent when heat set. Follow the instructions on the label to use. I use pink.
17. I apply some of the "PaintStik" to the shiny side of a scrap of freezer paper. I then pick up a little on a stencil brush. (A stencil brush has a flat, stiff bristle end. It is different from a regular paintbrush. You could experiment using a cotton swab.)
18. Brush off most of the color on a scrap of fabric.
19. "Scumble" the color onto the cheek area very lightly. It is much easier to build up from too light to just right. It is difficult to take paint off! Also put a little color in the ear area. I often add color to the knees, elbows, hands, etc. Press face with an iron  to set the paint.
That's all there is to it! You now have a face ready to applique.  Although I've shown a lot of steps, it is not difficult. You can have a face finished in a very short amount of time. Drying time takes longer than anything else. Do this BEFORE you sew the face on. That takes the pressure off in case you have an accident with paint. I wash my quilts and the paint has lasted through many washings! 
    Give it a try! Making faces can be fun!
Hop on over to the Confused Quilter  for a special giveaway this week! Staci is giving away 5 of my patterns!

Saturday, April 16, 2011

What Kind of Hummingbird Are You?

 
It has been spring here in South Texas for the last 2 months. The hummingbirds have been busier than usual, perhaps as a result of the drought. We didn't have the wildflowers this year for them to feast on, so they have flocked to my feeders in record number. I think you can only find 6 (you can click on the photo to enlarge it and find them) in this picture, but there were 20 of them swarming around these feeders this morning. (I spooked them when I came out to take a picture.)That doesn't count the 8 that were sitting on a feeder across the patio. I have been refilling at least one feeder every day now. I filled these three yesterday afternoon! My sugar bill will be higher than my water bill if this keeps up! It's worth it, though, to watch them. 
They are like people in some ways - there's a bully in every group who claims the feeder as his own and guards it jealously. He dive bombs any interlopers that might come by, chattering loudly the whole time! Then there are the birds who don't seem to mind in the least sharing with others.
Some seem to be constantly flitting around. They find a place to perch and  stay there between "snacks". Did you know that hummingbirds also eat bugs, including mosquitoes? As far as I'm concerned, I get my money's worth from them. I will buy all the sugar I need to buy until they move farther south to Mexico in the late fall.
I like to think that most quilters are like the hummingbirds that share. I have not met a quilter yet who will not share her knowledge and encouragement. Most quilters LOVE getting their friends into quilting. Our great grandmothers even shared the labor during quilting bees, helping their friends finish the quilts that would keep families warm during harsh winters. 
(I won't mention the sugar. There are some comparisons there, too, for most of us.) 
"Lord, the eyes of all look to you  and you give them their food at the proper time.. You open your hand and satisfy the desires of every living thing." Psalm 145: 14

Monday, April 11, 2011

Fringed Edge Easter Basket Tutorial

How about a simple, fringed edge Easter basket for that special little somebunny this season? 


You could use denim (this is from an old pair of jeans). If you use a thick fabric like denim, do not use as many layers of fabric as directed. I used only 2 layers of denim and one of bandana red cotton.

Fiona, the neighbors little chihuahua, was visiting me and had to check out the more "girly" of the bags. She has dreams of being a model. She evidently approved because she didn't want to leave it alone! (or was it the little bumble bee Easter egg she was after?)
Here is how this simple little project is made. You can make it any size you want, by the way, by changing the size of the circle.
1. Stack 6 or 7 fabrics of the colors you want. Trace off a large circle. I used a large platter that is 16" across. 
2. Cut out all layers. Put the bottom layer down with the right side down and the top with the right side up. Sew all layers together by sewing 1" inside the outer edge.
3. Draw a circle in the center of the circle that is half or less than the size of  bigger circle. I used a saucer that is  8" across. Sew layers together in the center by following your traced circle. (you can reinforce it if you like by sewing a couple more rings inside this.
4. Cut 2 strips that are long enough for a handle. Mine are 22" long and 4" wide.. Stack them  one on top of the other.
5. Fold in half lengthwise and sew 1" from the raw edge.
6. Fringe the edge by cutting down to, but not through, the stitching.
7. Roll the fringe to the center of the strip and sew along each edge to reinforce and hold it in place in the center.
8. Stick the ends of the handles inside the edge at opposite ends. Sew in place just outside the existing seam. Check to be sure you've anchored it in place well. (After all, it has to hold a lot of eggs!)
9. Fringe the edge all around the basket as you did for the handle. Use a piece of cording, yarn, or even dental floss and zig-zag over it along the 1" seam line. Be careful to not sew into the cord or whatever you are using. It should be free inside the zig-zag stitches.Then pull the cording to gather the basket all the way around.
10. Adjust the gathers evenly all around the perimeter of the basket. Get the fringe on handle and basket wet and place in the dryer with some towels. This will fluff up the fringe. 
That's all there is to it! It takes between 15 and 30 minutes, depending on your speed, to finish one. For deeper sides, make the circle in the center smaller. If you want a stiff bottom, you can either insert a circle of plastic or cardboard or cover a circle of plastic or cardboard with fabric and place it in the bottom. 
                        Have fun with it!
Related Posts Plugin for WordPress, Blogger...