Buzzings from a quilter who bumbles her way through life!

Friday, November 30, 2012

Adding Words to Your Project

Giveaway!
Did that get your attention? Words can be very powerful things. After all, a single word can make your day, break your heart, scare you half to death, or spur you on to do your best!
I'm going to be the hostess for a blog hop called In Your Words. (Thank you, Mdm. Samm for that great title and idea!) Yes, there will be a fantastic "grand"giveaway and many small ones!What a great start to the new year! To encourage you to join us, I'm going to show you just how easy it is to put words on your projects.

  I have always loved adding words to my quilts and wall hangings. I have entire fairy tales on some, recipes, songs, rhymes, and even Bible verses on others. 

You might be wondering, though, just how to add those words. There are many ways and I will show you a few easy ones here. You can do any of these quickly and have your project finished in time for the blog hop!
Embroidery:
You can choose to embroider your words either by hand or machine. I often hand embroider words on my quilt borders. I write them on with a mechanical pencil very lightly and then embroider over the pencil lines. You can print them out on your computer and use a light box to trace them onto your fabric. Both the sample above and below are done in simple embroidery, stem stitch.

Rubber Stamps and Acrylic Paint

The sample above was stamped using the simple foam stamps below. Quilting around each letter, which is NOT as difficult as it sounds, gives each letter a finished look.
These stamps were from Michael's and were sold as an inexpensive set. I bought them several years ago, so I'm not sure what is available now, but the fact that they are on a clear plastic backing is VERY helpful in placing the letters. 
I simply brush acrylic paint on the letter, stamp it on where I want it, and if there is a void I fill it in carefully with a small artist's paintbrush. (I don't try to realign it and restamp it, but you may be able to do that.) Here are the craft acrylics I use: (Heat setting them with an iron makes them permanent on your fabric.)
If your fabric is dark, paint first in white and then in your color. 

Acrylic Paint and Fabric Paint  

Here is a sample where I have painted the words on. Quilting around them later will make them pop and will "clean" up the lines. Simply use an artist's paintbrush. (Do not use the cheap type sold for kids. You will not be able to get a good point on them. Use one that is small and tapers to a nice point.) I use the paints above. You can also use fabric paints the same way, but they are usually transparent, so keep that in mind.
fabric paint
 Paint Pen

I love using a paint pen and then embroidering or quilting right at the outline of the letter. It looks almost appliqued, but is VERY easy to do. Here are the pens I use:
They come in Fine, Medium, and Thick points. I use the medium. I taught school and can just write with these as if they were chalk, but if you aren't that confident, trace off your words with chalk first. Drawing off a top, middle, and lower line for each letter is helpful in keeping them uniform. Again, heat setting will make this permanent.

Applique
 
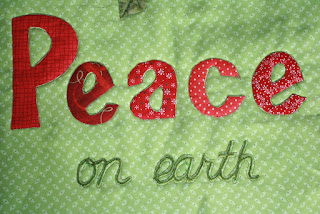
The sample above was done in fabric applique. I use my freezer paper method, where I cut out my shapes, iron them to the FRONT of my fabric, cut out the fabric leaving my seam allowance, and then turn the edges to the back using a glue stick. You can go to my tutorials and see a picture by picture tutorial of this method. It makes it EASY!!
(The "on earth" is embroidered and quilted around.)  You can also choose to trace off your words to a fusible product and iron them on. You would then want to sew around the edge to make it truly permanent. 

Felt

The word above has been blanket stitched onto felt. These letters were purchased craft felt. I could only find it in yellow, so I used fabric dye and "painted" them orange. If possible, use the letters that are NOT adhesive. It is very difficult to sew through that adhesive! You could also cut out your own felt letters!

This should be enough to get you started! I will have even more methods, some very untraditional, next week! 
If you would like to join in the "In Your Words" blog hop, just send me an email here.  It is going to be FUN and easy. You have no pattern to buy, no specific fabric, and you can do anything you want with fabric as long as you include at least one word. It will start January 7. I'll be taking names this week until we fill up, so be sure and send me your name, email address, and blog address. ( If you don't have a blog, we have a blog just for that, but there is only room for 15 of you, so let me know quickly!) 
Until next time....
Bee Blessed!   

Thursday, November 29, 2012

Owl Be Seeing You!


When my ten year old granddaughter came to visit during Thanksgiving, she made a few Christmas ornaments for their tree. Do you remember these little owls? (You can find the tutorial here.)
 We chose some scraps and she went to work. She has become very proficient with the sewing machine. Her little owls will join these in her Christmas decorating this year. She made them with almost no help at all!
These young west coast grandchildren learned a little Texas history on this trip. 
We also took a trip to the wonderful San Antonio zoo, where we discovered........
a jarring family resemblance! (He had styled his own hair that day!)
Have a wonderful weekend and...
Bee Blessed!  

Sunday, November 25, 2012

My Quilt Shop!

Yes, I own a quilt  shop. Of course, it is a miniature one and I only get it out at Christmas, but it is a special reminder to my family of my love of quilting (as if they needed to be reminded!). (It also says "Jane's Quilt Shop" and my name is Linda, but that is beside the point.) I bought it when I first started collecting village pieces. It was not an expensive piece and, in fact, I repainted it with oil paints because it was so plain. 
 My grandchildren helped me out this year by putting up my Christmas village. They had a lot of fun making up stories about each of the characters they added to go with each building. According to them, the boy below is waiting to throw snowballs when the people come out of the house
 Every piece that I collect has a special significance. I have a bike shop for my son who loves bicycling. I have a Smoke House for my husband, who is known for his smoked brisket (a Texas BBQ favorite). A dairy barn with its cows, a green house, a lighthouse, a hospital, and many more, each have a connection to a special family member or memory.  This keeps me from just collecting piece after piece, which I would happily do just because I love the way each one looks. 
This year I kept it small so that the kids could manage it, but I have tried many different ways of displaying my village. The photos below are from 2009.


The artist is painting a watercolor that just happens to match the one I have hanging in my house. (My sister painted it for me. I just did a little cut and paste of a small copy onto the easel) 
  I put my village up each Christmas as a memory keeper. It thrills me that it can also be a memory maker for my grandchildren! 

I hope you're enjoying the Holiday Lane Blog Hop! I posted last Friday. If you missed it, you can still leave a comment on Friday's post for a chance to win a surprise giveaway! 
You can check out today's posts by clicking on the Holiday Lane button on my sidebar. 
Until next time.....
                                          Bee Blessed!  

Thursday, November 22, 2012

Reindeer Games - My Day on the Holiday Lane Blog Hop

    
  Reindeer Games

Twas the night before Christmas and all down the lane...
The reindeer were playing their games....quite insane!
Poor Santa had just started out down the flue
when "middle aged spread" made it too hard to do!
 So there he stuck fast while the reindeer, in glee,
Were as naughty and mischievous as they could be!
Prancer hung over the eaves for a wreath
While Dancer looked on in sheer disbelief!
Donner and Blitzen and Cupid played "Tag"
While Comet, how awful, dumped Santa's big bag!
Poor Rudolph sat quietly, shining his nose,
And all of the others - well, goodness! - Who knows!
While children were dreaming all snug in their beds,
Visions of bedlam filled Santa's poor head!
When morning came finally to Holiday Lane
Nobody dared fuss or even complain.
They pulled poor old Santa right out of that fix
By removing some mortar and quite a few bricks!  
The reindeer had all flown back home quite ashamed
And knew that for all that they'd done they'd be blamed.
But Santa made up for the mess when he gifted
Each person, who smiled as his spirits were lifted.
"Happy Christmas to all", he said with red face,
and then he was gone without leaving a trace!    
    Be sure you go visit the others today on the Holiday Lane Blog Hop!


Friday November 23

I have not had time to go buy a giveaway, but I do like to give one. I will choose a winner the day after the hop is over and they will get something fun, I promise! It will be a Christmas surprise! One comment for a chance to win and another comment for following (on my sidebar).
Thanks to our sweet cheerleader Pauline, our hostess Mdm. Samm, and to Jill for the pattern!
Until next time.....
Bee Blessed!

Monday, November 19, 2012

A Christmas Tree for a Small Space!

       This little Christmas Tree Quilt is perfect for a dorm room, small apartment, hospital or nursing home room, a military hero's space or even a large room that needs a little Christmas Joy on the wall! I have two of these that I made to go in very small spaces. (I used to put a tree in every room and some rooms didn't lend themselves very well to the 3-D type!) These trees can be as large or small as you want. This one is about 45" x 30". The tree below is about 36" x 24".
The ribbon loops are perfect for hanging ornaments or candy canes (I've even put ornament hangers on Hershey bars and hung them from each loop for my version of a Chocolate Christmas tree!)
 

       You can see that I have two of these simple little trees. One is skinny, one is not. You don't need a pattern to make these. Each layer of the tree is a strip. The green is inserted with the sides angled. You can decide how much of an angle you want. You can see that the two trees above have different angles to the sides. As long as they are the same, it will be fine. For the tree on the right, I used large half-square triangles with pieced strips in between. I just made the pieced area progressively longer.  The tree on the right does not have pieced strips and the angle is a little different.
While pinning each strip together, just pin the raw edges of folded over ribbon (each length about 3" long) into the seam. You can use as many or as few as you want. I chose to use different green ribbons, but there is no reason you couldn't use color.
The trunk is just a narrow brown strip sewn in the center of the last row. 
 

Related Posts Plugin for WordPress, Blogger...