Buzzings from a quilter who bumbles her way through life!

Tuesday, May 29, 2012

Finding the Right Background for Applique


 I do a lot of applique. The method I use, seen in this tutorial, allows me to turn under all my edges and layer my pieces before I even put them on the background to sew down. I can see exactly what I'm going to get! In this way, I can find the best possible arrangement and background. 
When I have a design with a lot of pieces, I don't want to take the time to arrange the entire design on each background candidate so I came up with this little trick.


I cut a square of clear vinyl (the type sold for table and furniture covering. It is fairly thick.). My square is about 20" x 24". Make it the size of the largest applique you might do. This is a reusable tool!
 Cover the edges of the vinyl by folding masking tape over the edge. This will be helpful because you don't want to spend time looking for the edges of the vinyl.
Now arrange your applique on the vinyl, sticking the pieces in place with a dab of glue stick (which can later be wiped off with a damp cloth) or pieces of rolled making or transparent tape. I used the glue stick. If you only have one piece, you don't have to do this. 


Now you can move your applique from background to background, and see which you like best! (Sorry about the sideways photo!)
You can easily roll the vinyl (with your applique stuck on) and take it to your quilt shop to "audition" backgrounds! 


By the way, I also use this vinyl to try out quilting designs. I use Dry-Erase Bright Crayons (by Crayola) to try out quilting designs. I can rub off the designs when finished.

Until next time.....
post signature 


Saturday, May 26, 2012

My Garden Inspiration


Purple Heart, red begonia, roses


 Here's hoping you all have a wonderful weekend! If you live in the United States, have a great Memorial Day!

I'm sprucing up my garden this weekend. I LOVE Mexican pottery and I put two birdbaths in my yard yesterday. One in the front, and one in the back.
.
Sago palms, Cinco de Mayo roses
 This post has nothing to do with quilting, but everything to do with my love of color, which greatly influences my quilting! Here are a few shots of my garden. (It is already in the low 90's here during the day!)
Duranta
Knockout roses, chrysanthemums, and African daisies 

Ixora
Geranium
Cape Plumbago
Bougainvillea
 I will stop there, but I still haven't shown you my red-orange zinnias, my yellow/red/orange lantana, my orange Denver's Dream miniature roses, ......oh, I could go on. I even have orange bougainvillea. Can you tell I love color? Now you know why I avoid quilting with the somber colors like brown. I think we tend to use the colors that make us happy! 
I'll post on Tuesday (Monday is a holiday here) about a tool you can make that will make choosing a background for your applique much easier!
Until then......


post signature 


Monday, May 21, 2012

The Winner is.....


Using the Random Number generator, the winner of the My Memories Suite from my giveaway is number 4, Mary Ann! Congratulations, Mary Ann! I will be sending you the code for your free program. I hope you enjoy it as much as I have!
 (I've contacted Mary Ann by email.)
Many thanks to everyone who participated! I wish you could ALL be winners. You can still get the program at a discount using the code I gave you. 
I'll be posting Tuesday, May 22, with a cute little tutorial , so be sure and "tune in"! I had it written and lost it all when there was some type of glitch, so I need to write it all out again. :(  
It might be late morning before it's up.

Until then.....
post signature


Last Day of Giveaway!


 If you have not commented on the giveaway post, HERE, you have until 10:00 tonight CST to be entered for the giveaway! You have a good chance since there are not that many comments! Please leave your comments and check out this great software program! I will be choosing a winner and they will receive a free download that they can use for more than just scrapbooking! I had so much fun printing off quilt labels with photos and embellishments. I also made several gift cards and thank you notes decorated with photos of my quilts. 
So, be sure and leave your comments (you have 2 chances) and come back tomorrow for a great little tutorial!
post signature

Tuesday, May 15, 2012

Printed Quilt Label Tutorial


Fabric ironed to freezer paper and printed onto the fabric
side.
Did you know that you can make quilt labels using the My Memories program? I chose the "design my own" option and plugged in photos from a trip we took several years ago. The fabric from the quilt (which is actually not made yet!) was bought from the shop in the photo. I added a few I can always remember where the fabric came from.

It's really easy to transfer your design to fabric. Start out by ironing your fabric to the shiny side of freezer paper. Cut it the size of a sheet of paper for your printer. I am careful to iron it down well around the edges.

Trim the label, leaving a seam allowance around the edges. I finger pressed along the edge of each side of the printed label. Peel off the freezer paper. Press your seam allowances under and you're all set!
This is so much fun! I can imagine putting photos of myself on labels "From Nana" and photos and journaling on memory quilts. This program makes it so easy! I am not very "techno-savvy" so if I can do it, anyone can!

Have you left your comments yet for the giveaway? You have 2 chances to win! Just be sure you leave your comments on this posto win the My Memories Suite software program. I'll be choosing the winner by random generator on Monday, May 21.

I still don't have an internet connection and the storms continue to come. We welcome them because we were heading into drought conditions again, so I'm not complaining, but hopefully I will be able to respond to all of your comments and visit your blogs very soon. They promise tomorrow, so please bear with me! I will have a lot of catching up to do!
Until then....     Bee Blessed! (Now I've lost my signature! Oh, my!)

Monday, May 14, 2012

A Giveaway!


 I'm working on a borrowed internet connection because the recent storms "killed" my mobile hotspot and I can't get a new one until at least Tuesday! You don't realize just how you depend on modern technology until you don't have it anymore!
Speaking of modern technology, today I want to share with you a great program! You've probably seen it around, but did you know that you can use it along with your quilting? The program is the My Memories Suite . Although it is called a Scrapbook Software program, that doesn't mean it can't also be useful for many other applications.
 When people ask me what I do and I start telling them about my quilt pattern business, most of the time I can see their eyes glaze over as they search their memory banks for something to say in response. They usually say something like "Oh......my grandmother made quilts." That's when I pull out one of my scrapbooks and show them that my quilts are probably not anything like their grandmother's quilts. I even try to keep a very small scrapbook in my purse.  Remember, "a picture is worth a thousand words!"
I have a giveaway today that will allow you to not only have large scrapbooks of your quilts, which is a great idea so that your descendants will know that these are too valuable to put in the doghouse, but will also allow you to make small ones that can be carried around in your purse. 
But that's not the end of the story! You can make greeting cards, videos, blog banners, labels for your quilts, bound books for your children or grandchildren (think about how fun it would be to make a book with pictures of your projects along with your favorite recipes and family photos and have it bound so it can become a tangible gift for your family members!) I also made a few gift cards using photos of my quilts as part of the front design. How fun would it be to give a gift of a quilt and a gift card with a photo of that quilt on the front! Or how about a quilt label (printed on fabric) sweetly designed with photos of the recipient or even the quilt itself!
My Memories Suite  has offered my readers a special deal and a chance to win this great program! All you have to do to be entered to win is go visit the My Memories Store and choose your favorite digital paper pack or layout. Then come back and leave a comment on this post telling me which you choose.
Be sure and use your Share the Memories code to get your $10 off and your coupon for an extra $10 to use in the store! Your code is:
                                    STMMMS47176 
Be sure and leave your comment! Oh, and for an extra chance to win, just leave a separate comment giving us an idea of what you would do with your program if you won! The winner will be announced next Monday, May 21, giving you plenty of time before Memorial Day!

post signature


Monday, May 7, 2012

My Sister's Fabric Designs


My sister, Darla, has done it again. She has designed a fabric that I think is gorgeous! Can't you imagine a quilt made from the fabric above? She has entered it in the Fabric8 contest on Spoonflower. This contest is in conjunction with Robert Kaufman fabrics. (This gives you a chance to have a say in what will become a new fabric line in the near future!) Out of nearly 800 entries, the Spoonflower and Robert Kaufman staffs chose the top 100 to be in the Semi-Finals. Darla's design, "Where the Green Fern Grows", is one of these! Now the selection will be narrowed down to the top 8 by popular vote. You can vote by going to Spoonflower and clicking on your choice(s). You don't have to have an account to vote, but only one vote per computer will count unless you are logged in on their site. 


The winner will also be designing coordinating fabrics to form an entire line of the winning design. I can't wait to design a quilt around this beautiful fabric! Have you voted yet? If not, you can go here.  There are 7 pages of fabrics in the running. Darla's, just in case you didn't catch it earlier, is "Where the Green Fern Grows" by droyal. (Check out her online Spooonflower shop while you're at it! She has other designs already for sale, like pillowcase dresses for little girls, purses, and other fabric designs.) 
Even if she weren't my little sister, I would vote for her!
Until next time........


post signature


Friday, May 4, 2012

Bandana Baby Tutorial


This quirky little doll is another bandana project. (Can you tell I bought a few bandanas?) It is made of one bandana and is intended as a quick and easy doll for a young child. It could also work as a puppet, as you can get your hand up under it to move the arms and head. It is inspired by the handkerchief babies my grandmother made for me a few times by simply folding the handkerchief and knotting the points to form arms and legs.
1. Start by folding the bandana in half from point to point as shown.
2. Fold the wide end down about 5".
3. Fold each end straight down.
It should look like this. (My bandana has a variegated color.)
4. For face and hands, cut a square about 7" and two about 3" and draw a 5" circle on the back of the big square and 2 1/2" circles on the other two squares. Sew large gathering stitches around the circles. Stuff with polyester fiberfill and pull the stitches closed. These will form the head and hands.
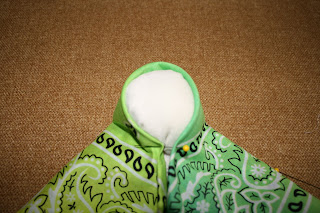
5. Set the face in the top of the bandana and pin in place.
6. Sew in place about 1/2" under the edge of the opening.
7. Sew the front together from the "chin" to about 4" down.
8. Sew the hands in at the end of the "sleeves".
9. Knot the "feet". If you want to, add beads for eyes and mouth. If this is for a baby, I would leave off the beads and even the hands for safety reasons.  

  That's all there is to it. You can make on in no time at all! It's a baby only a very young mother could love, but it leaves a lot of room for imaginative play. 
I'm off to paint the house......... (UGH!)


post signature 


Related Posts Plugin for WordPress, Blogger...