Buzzings from a quilter who bumbles her way through life!
Showing posts with label leftover fabric. Show all posts

Sunday, March 3, 2013

Snack Tray or Basket Tutorial

These little snack trays are simple to make, fast to make, and best of all, they save on paper plates for snacks and sandwiches. You can coordinate your trays to your tablecloth or picnic spread, or use them for popcorn for movie night at home. (One has an iron-on laminate, so it can be wiped out and reused easily!)


You don't need a pattern and you can make these as small or large as you want. You control the depth of the sides, so you can have a tray or a basket. (Easter basket anyone?) Large scraps or fat quarters are perfect for these!


 I've filled the basket with 6 little mini-trays - just right for a serving of chips, popcorn, apple slices, baby carrots, .....use your imagination! Even cookies will work in these! Of course, they don't have to be for food. You can use these little trays to hold jewelry, mail, make-up, sewing notions, socks in a drawer, fat quarters, Legos, dry cereal snacks for toddlers, etc. etc.
 Here's how they're made:
 First decide on a size. If you want a tray that is 7" x 9" with 1 1/2" sides, you will cut your fabric and batting 10" x 12" (7 + 1.5 + 1.5 = 10), (9 + 1.5 + 1.5 =12) You will need a fabric for the inside, one for the outside, and a batting for the inside to give it body. (Yes, you could use interfacing, but most of us have scraps of batting around and it works well.) NOTE: If you want a laminate inside, you can buy an iron-on type that is very easy to use. You just press it on, using the paper it comes on, and treat it as a piece of fabric. Be sure and follow the directions on the brand that you buy!
 Layer the batting between the inside and outside fabrics, right sides showing! Using a glue stick or a little spray basting will help it all stay together while you work. Even spray starching will help
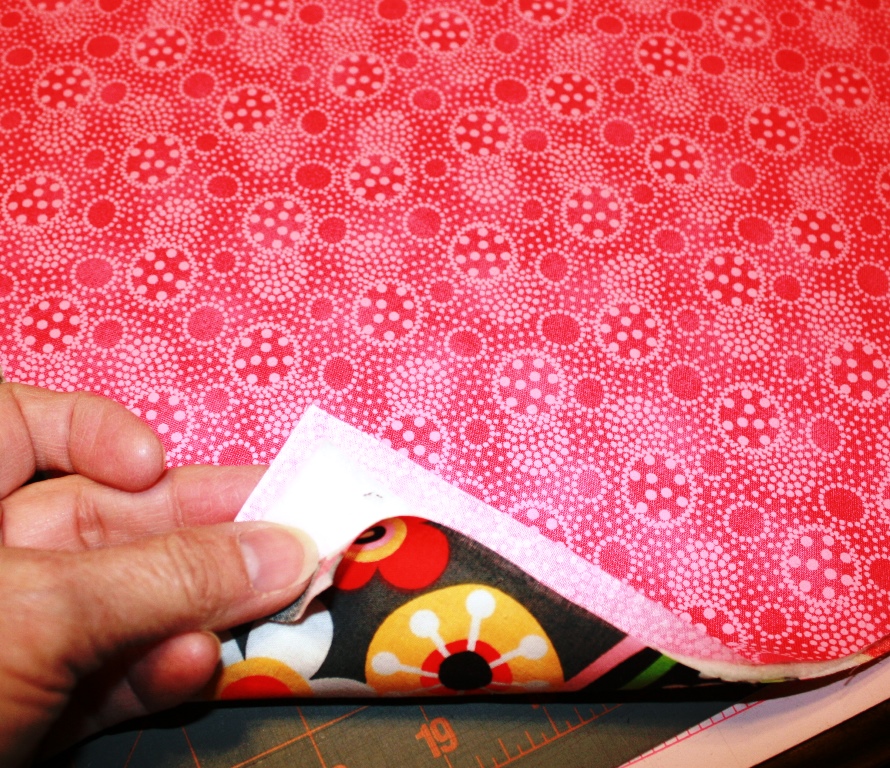
Different set here, but you can see on this piece that you will then mark 1 1/2" (or whatever depth you want for your sides) around the sides and sew along the mark. I use a Frixion pen that disappears when I iron the piece. I also zig-zag along the edge. 
Use your ruler to make a mark that is a continuation of the stitch line you made. Do this at both ends. (It doesn't matter which two sides you choose.) This will give you a guide for the next step. At this point, you may want to make some simple quilting lines in the area that will be the bottom of your tray. I made an X on the small ones, and parallel lines on the larger ones.
 Fold on the diagonal at each corner and sew across the line you have just made. You will be stitching from the corner of the stitches in the middle to the edge.
 You will have a box now with sides that poke out!
 Fold the sides in as shown (I chose to fold them in on the shorter sides, but that is up to you.) Sew across the top to hold them in place. If you have laminate on the inside be careful to not touch the laminate with an iron, but press these in place. (You can sew the flap down along the diagonal fold if you wish. It is a little hard to do on the small ones with laminate, but easy on the larger ones.)
Cut a strip to use for binding. 2 1/4" wide will work unless you've made your tray really thick! Fold it in half lengthwise and press.
 Before sewing it on, turn one end under 1/4" so that the raw edge is hidden. Leaving the first 1 1/2" free, sew it on as you would a quilt binding - raw edge to raw edge, sew 1/4" from the raw edge, and when you come to the end.....
 ...slip the end inside the end that is turned under. Sew the remainder on. You will be stitching this closed by hand.

 Press the binding open. Remember to use the paper over any piece with laminate!!! Turn the binding to the other side to just cover the stitching and sew down either by hand....

                                         or machine.

Here is a basket (deep sides) and here are the trays (shallower sides).....


If you want sharper corner edges, just topstitch them! You can add a handle, or handles, to make a basket  Simply cut a strip about 3" wide, put a 1" wide strip of batting in the center, turn one edge in about 1/4", overlap the edges with the turned under edge on top, and topstitch. A glue stitck makes all of this much easier!
                                      Give it a try!
Until next time......
                             

Friday, February 15, 2013

A 3-Hour Quilt and Another Free E-Book!

 
McCalls has again inspired me with their free e-Book, Modern Quilt Patterns. The quilt you see above is one I made from this little e-book and is called Lemon Squeezy. (The one in the book is much prettier, but I used strips of scraps I had in my scrap bin.) I made this quilt in 3 hours from start to finish! (Most of my strips were leftovers and already cut.)
Sugarplum was fascinated with this quilt. She thought it was hers!
Your quilting is done as you sew, so after sewing all the strips, all you have to do is square up and bind! Need a quick crib quilt? This is a good candidate!
This little book is only 10 pages long, but the three patterns inside will inspire you with the spring colors and easy, modern designs - Baubles and Beads (a modern square within a square design), Rainbow Rhythm (a contemporary take on half square triangles) and Lemon Squeezy (the quilt as you go strip quilt).
Here is where you can get your free download! Give it a try! You have nothing to lose!
  Until next time..... Bee Blessed!
 

Thursday, February 7, 2013

Herringbone Scrap Quilt Tutorial

 
 I have a LOT of scraps that I would like to use this year. I have been trying out different fast and easy methods of using them in my quilts. One very easy method is the "Herringbone" quilt. This is a very old and very easy method. Best of all, you can custom cut your strips to fit the size scraps you have. Both of the quilts above were made using this simple method.
First you need to cut your strips to the same width and length. The batik quilt above used a purchased set of batik strips similar to a "Jelly Roll". The strips were 2 1/2" wide x 42". I cut them into 10 1/2" lengths and left the width the same. The quilt on the right used scraps that I cut to 1 1/2" x 5". (A pleasing size seems to be the a width you choose and the length ABOUT 4 or 5 x that width. So a 3" width might have a length that is somewhere between 12" and 15".  This is not a hard and fast rule. Experiment with what you have!)
Here is the way to start:
 
 Sort your strips into colors. Pull from each stack as you go. You can either leave it very random as in the quilt on the right, or planned as the quilt on the left. 
Place two strips right sides together as shown above. Sew across the end as shown. The first set will be a short seam
Finger press the seam toward the point.  
 The next strip will go across the intersection of the previous two strips, as shown. Press the seam toward the point.
 The next strip goes across the new intersection and along the second strip you added.
 This is what you will have so far. The next strip will go along the orange/blue strip. Just remember that you will always be sewing across the end of the last strip and the length of the previous one.(Note the next strip will be sewn to the orange/blue side and not the all orange side in the photo.)
 Keep going like this. You will find that when you get going, it will be very fast and easy! Keep finger pressing the seams to the point.
Lay out your strips to see the arrangement you like. If you want an arrangement like the one above, you will have to sew some strips in reverse. (Where you started with blue and then added red, on the next strip start with red and add blue. It will make sense when you see it.) If you are making a random arrangement, you don't have to change anything.) Make the rows as long as you want. Instead of just holding them up to see if they are long enough, count the strips along the edge.
NOW PLEASE TAKE NOTE: You have edges now that are bias. Handle the strips gently and sew a "stay stitch" along the edge to stabilize it before sewing the strips together. Also, it is helpful to not cut the points off the edge until after you've sewn the row together.  I didn't do either of these things in the batik quilt and had some distortion because of it.
Another thing to take note of is to match up the seams along the edges of the rows you are sewing together so that the rows match up. 
   On the smaller quilt, I chose to sew a strip between the rows. (I also stay stitched before sewing to keep my bias edges from distorting!)
  You could alternatively choose to cut your strips into blocks.
 Start saving those strips you have left over from borders and sashing. You might even want to start cutting scraps into strips and stashing them together until you have enough for a quilt. 
Have fun! Until next time....
Bee Blessed!
 

Thursday, October 11, 2012

Tutorial for the Don't Leaf Me Alone block

I promised you a tutorial for my "Don't Leaf Me Alone" block.
My block, shown above, is a simple leaf using lots of small scraps! I thought it up one night when I couldn't sleep and to my amazement, it worked with very little tweaking. I love it when that happens! It is a combination of paper piecing and freezer paper applique, and although I appliqued by hand, you can use your machine to sew it down if you wish. Don't be scared away.....it REALLY is simple, despite the number of steps I've shown. I just wanted to be sure you knew EXACTLY what to do!
1. Fold one sheet of 8 1/2" x 11" paper with a piece of freezer paper. On the fold, draw concentric lines as shown above.

2. Cut on the lines with the paper still folded. When you open it up, you should have shapes similar to the ones above. You will need to repeat this for each leaf you make.


3. Lay a scrap right side up on one point of the bigger plain paper shape. The freezer paper will be used later.
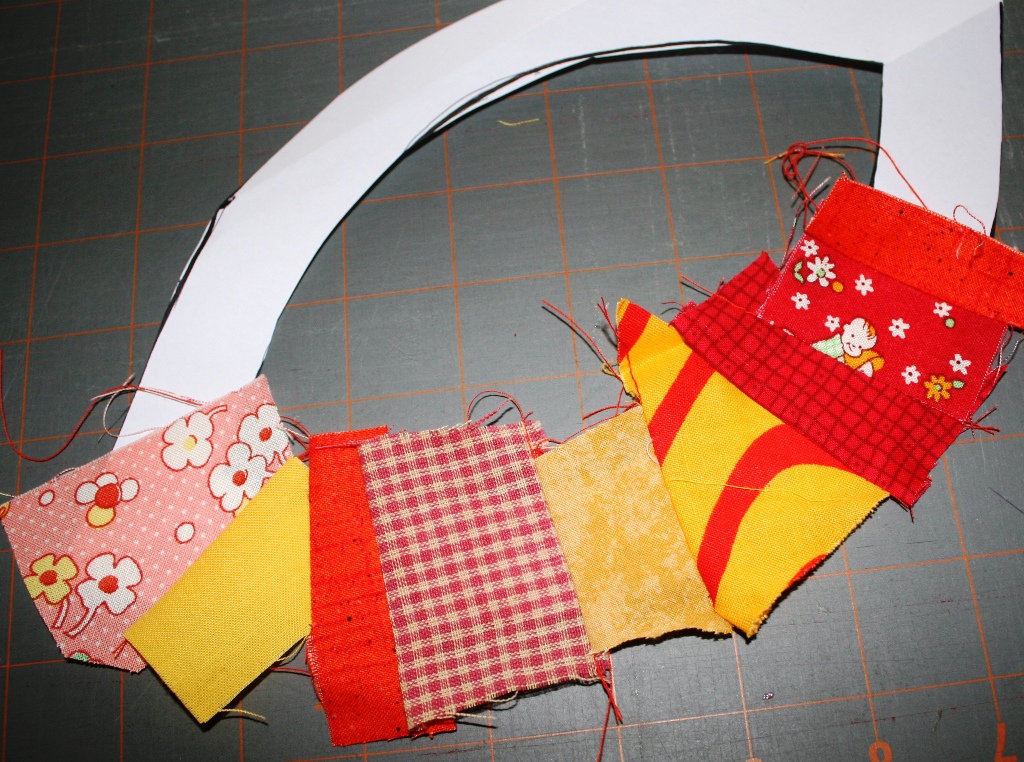
4. Lay another scrap right sides TOGETHER at the edge of the first scrap.
5. Sew 1/4" through all layers including paper at the edge of the two pieces.
6. Turn and press.


7. Continue all the way around to the top. Be sure your pieces overhang each side of the paper by at least 1/4". Starting back at the bottom point, do the exact same thing going up the other side.
8. When you get to the point at the top, clip through the paper so you can sew the two fabrics together. (You can see I just used scrap paper for this!)
9. Put the two fabrics at the top right sides together and sew a seam just where the paper comes together. (You can feel where the stiff paper is and that will help you judge where to sew.)
10. Trim the fabric that overhangs the outside of the shape to about 1/4". (top photo) You will later turn this under, so be sure you have enough to easily turn. Iron the freezer paper shape (the one that matches) to the FRONT. (lower photo)
11. Carefully pull the paper off the back. (I did trim these seams at this point, but that would have been easier to do as I sewed. Live and Learn!)
12. Use a glue stick to turn the seam allowance around the outer edge to the wrong side. Press. Leave the seam allowance in the center as is.
13. After pressing, pull off the freezer paper.
14. Repeat the above steps for the second leaf shape. After turning the edges, use the glue stick to position it in the center of the larger leaf shape. You will applique this down either by hand or machine.
Add caption

15. For the last shape, you will not be piecing. Iron the freezer paper to the FRONT of the fabric you have chosen. Trim around the edge 1/4". Run a line of the glue stick on the WRONG side of the seam allowance and turn the seam to the back. Press. 
16. Use the glue stick to position this shape to the center of your leaf. You are now ready to applique it down.
17. From freezer paper, but a branch and vein design similar to the one above. Use the same method of ironing, trimming, gluing the seam allowance to the back, pressing as in step 15.
 18. Use the glue stick to position the veins where you want them. Applique the entire piece to your block. 

That's all there is to it! I think this could be really pretty as blocks in a larger quilt. 
Remember to check back on Monday to see who won the giveaway! 
Until next time.....
post signature
Related Posts Plugin for WordPress, Blogger...