You could use denim (this is from an old pair of jeans). If you use a thick fabric like denim, do not use as many layers of fabric as directed. I used only 2 layers of denim and one of bandana red cotton.
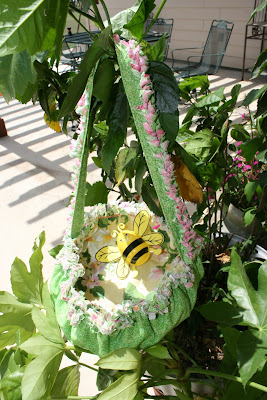
Fiona, the neighbors little chihuahua, was visiting me and had to check out the more "girly" of the bags. She has dreams of being a model. She evidently approved because she didn't want to leave it alone! (or was it the little bumble bee Easter egg she was after?)
Here is how this simple little project is made. You can make it any size you want, by the way, by changing the size of the circle.
 | |
| 1. Stack 6 or 7 fabrics of the colors you want. Trace off a large circle. I used a large platter that is 16" across. |
 | |
| 2. Cut out all layers. Put the bottom layer down with the right side down and the top with the right side up. Sew all layers together by sewing 1" inside the outer edge. |
 |
| 4. Cut 2 strips that are long enough for a handle. Mine are 22" long and 4" wide.. Stack them one on top of the other. |
 |
| 5. Fold in half lengthwise and sew 1" from the raw edge. |
 |
| 6. Fringe the edge by cutting down to, but not through, the stitching. |
 |
| 7. Roll the fringe to the center of the strip and sew along each edge to reinforce and hold it in place in the center. |
 | |
| 10. Adjust the gathers evenly all around the perimeter of the basket. Get the fringe on handle and basket wet and place in the dryer with some towels. This will fluff up the fringe. |
Have fun with it!


This is really clever, although I doubt that I could do it in 30 min. But even if it would take me 2 hours, it's still fast ;). Thanks for sharing.
ReplyDeleteYou know, Oops-Lah, you're probably right. I was a little optimistic on the time. It is probably more like 30 to 45 minutes from start to finish. Although the little denim one only took me 15 minutes. (Of course, I made it from a recycled pair of jeans and just cut off the waistband to use as a handle. That cut the time some.) I'm still a little brain dead from the Shop Hop or I would have caught that. Thank you!
ReplyDeleteThey turned out so cute. I will have to make some for my grandchildren. I have seven of the ten coming for Easter. That sounds like a days worth of work. I see you found a use for the bubble bee eggs!
ReplyDeleteA wonderful idea! Thanks for sharing. May have to save this pattern for Easter baskets next year for Sunday school.
ReplyDeleteKristie
Absolutely darling. Thanks for the easy and great tutorial!
ReplyDeleteThis is just a great tutorial and what a fun project! I never thought of making a basket from material for the kids' Easter baskets! VERY cool - how about a pattern? :-)
ReplyDeleteHow good is ThAt basket! I love it... you certainly come up with fantastic ideas! :)
ReplyDeleteOH YOU KNOW I AM MAKING THIS! You are a natural at this tutorial thing!!!! I just want to be you when I grow up!
ReplyDeleteYou're so funny, Lana. I don't even know what I'M going to be when I grow up!
ReplyDeleteVery cute! The dog I mean. :) Oh and the basket too! blessings, marlene
ReplyDelete