I promised you a tutorial for my "Don't Leaf Me Alone" block.
My
block, shown above, is a simple leaf using lots of small scraps! I
thought it up one night when I couldn't sleep and to my amazement, it
worked with very little tweaking. I love it when that happens! It is a
combination of paper piecing and freezer paper applique, and although I appliqued by hand, you can use
your machine to sew it down if you wish. Don't be scared away.....it
REALLY is simple, despite the number of steps I've shown. I just wanted
to be sure you knew EXACTLY what to do!
 |
| 1. Fold one sheet of 8 1/2" x 11" paper with a piece of freezer paper. On the fold, draw concentric lines as shown above. |
 |
| 2.
Cut on the lines with the paper still folded. When you open it up, you
should have shapes similar to the ones above. You will need to repeat
this for each leaf you make. |
 |
| 3. Lay a scrap right side up on one point of the bigger plain paper shape. The freezer paper will be used later. |
 |
| 4. Lay another scrap right sides TOGETHER at the edge of the first scrap. |
 |
| 5. Sew 1/4" through all layers including paper at the edge of the two pieces. |
 |
| 6. Turn and press. |
 |
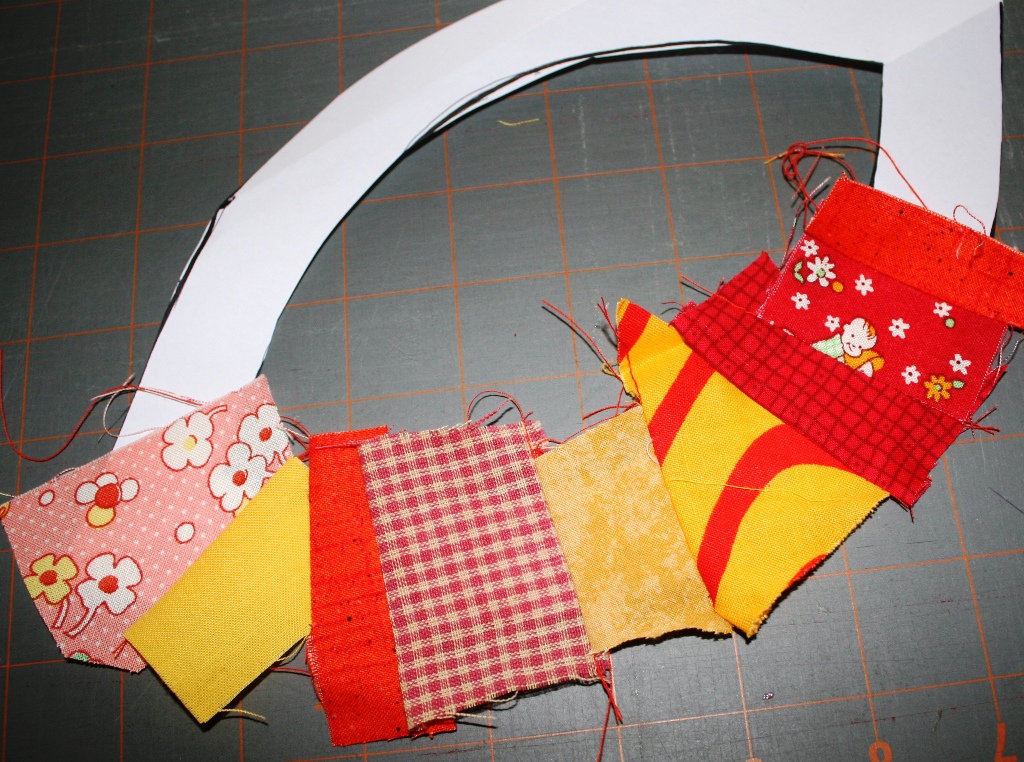
| 7.
Continue all the way around to the top. Be sure your pieces overhang
each side of the paper by at least 1/4". Starting back at the bottom
point, do the exact same thing going up the other side. |
 |
| 8.
When you get to the point at the top, clip through the paper so you can
sew the two fabrics together. (You can see I just used scrap paper for
this!) |
 |
| 9.
Put the two fabrics at the top right sides together and sew a seam just
where the paper comes together. (You can feel where the stiff paper is
and that will help you judge where to sew.) |
 |
|
10.
Trim the fabric that overhangs the outside of the shape to about 1/4".
(top photo) You will later turn this under, so be sure you have enough
to easily turn. Iron the freezer paper shape (the one that matches) to
the FRONT. (lower photo) |
 |
| 11.
Carefully pull the paper off the back. (I did trim these seams at this
point, but that would have been easier to do as I sewed. Live and
Learn!) |
 |
| 12.
Use a glue stick to turn the seam allowance around the outer edge to
the wrong side. Press. Leave the seam allowance in the center as is. |
 |
| 13. After pressing, pull off the freezer paper. |
|
 |
| 14.
Repeat the above steps for the second leaf shape. After turning the
edges, use the glue stick to position it in the center of the larger
leaf shape. You will applique this down either by hand or machine. |
 |
| Add caption |
 15.
For the last shape, you will not be piecing. Iron the freezer paper to
the FRONT of the fabric you have chosen. Trim around the edge 1/4". Run a
line of the glue stick on the WRONG side of the seam allowance and turn
the seam to the back. Press.
16. Use the glue stick to position this shape to the center of your leaf. You are now ready to applique it down.
17.
From freezer paper, but a branch and vein design similar to the one
above. Use the same method of ironing, trimming, gluing the seam
allowance to the back, pressing as in step 15.
18. Use the glue stick to position the veins where you want them. Applique the entire piece to your block.
15.
For the last shape, you will not be piecing. Iron the freezer paper to
the FRONT of the fabric you have chosen. Trim around the edge 1/4". Run a
line of the glue stick on the WRONG side of the seam allowance and turn
the seam to the back. Press.
16. Use the glue stick to position this shape to the center of your leaf. You are now ready to applique it down.
17.
From freezer paper, but a branch and vein design similar to the one
above. Use the same method of ironing, trimming, gluing the seam
allowance to the back, pressing as in step 15.
18. Use the glue stick to position the veins where you want them. Applique the entire piece to your block.
That's all there is to it! I think this could be really pretty as blocks in a larger quilt.
Remember to check back on Monday to see who won the giveaway!
Until next time.....


Love it , Linda! Thanks for the tutorial!
ReplyDeleteThat is beautiful, Linda.
ReplyDeleteThank you Linda for your great tutorial. I will surely test it. It is sew fun with new ways .
ReplyDeleteBritt-Inger in Sweden
Genius! Thank you so much for sharing this tutorial and your technique. i am very inspired!
ReplyDeleteIt is just wonderful. Thanks so much for sharing the idea.
ReplyDeleteGreat step by step pictures Linda! You really made this look do able.
ReplyDeleteThank you for the cute project!
:-}pokey
Echoing everyone else.. Thanks so much for sharing.. It's great!!!
ReplyDeleteThis is fabulous Linda!! Thank you!!! ~karen
ReplyDeleteLinda this is such an interesting and creative way to make a block! I am just amazed! How much fun!
ReplyDeleteSweet tutorial! Love the idea of the freezer paper for a pattern. Thanks for sharing. Judith, Texas
ReplyDeleteWonderful idea and a great tutorial. Thank you for sharing.
ReplyDeleteWow,awesome.Thank you!
ReplyDeleteWonderful tutorial! Thank you. You always make everything look so simple and easy to accomplish.
ReplyDeleteThanks so much for this great tutorial. You make it look very easy.
ReplyDeleteThanks for such an easy to follow tute!!
ReplyDeleteFabulous, thanks for the tutorial.
ReplyDeleteThank you for sharing the great tutorial. I can't wait to try making this block.
ReplyDeleteWonderful tute, Linda!! Thanks for sharing with everyone! Your ideas are always so unique and full of imagination.
ReplyDelete