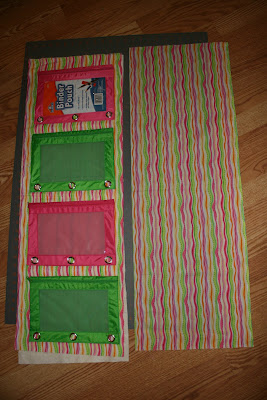
I have a great makeup bag designed for travel. It has several pouches (attached with hook and loop tape) that can be removed and replaced easily. I decided that I needed a similar bag for sewing and quilting notions. I could fill the pouches with thread, scissors, rotary cutter, fat quarters, embroidery floss, etc. I could then roll it up, place it securely in my tote bag, and take it along to workshops and retreats. Everything would be easily accessible and in one place. I could also use it on trips, filling it with socks, underwear, jewelry, or how about toothpaste, toothbrush, makeup (if you don't already have one of those makeup bags) and other toiletries.
Make one for a child and fill it with crayons, pencils, a small notebook, stencils, snacks, etc. You can use one pouch, two, three, four, or even more.
You'll need the following materials:
1.cloth for the front and back of the Roll-Up
2.batting
3.Binder pouches (these are made for pencils and crayons and have grommets to allow them to be put in a notebook binder. The ones I found were made by Elmer's and cost me 97 cents each.
4.Hook and loop tape - You will need both the adhesive type and the sew in type. You will use the adhesive type on the pouches and the sew in type on the cloth
5.ribbon, about 1 yard
6.binding for top of roll-up
Note: I didn't give amounts because this can be made any size and the width depends on the width of the binder pouches you get.
 | |||
| 1. Lay the pouches out about 1 1/2" to 2" apart and determine the length and width you want. You can use any number of binder pouches. |
 | |
| 2. Cut front, back and batting this length and width and layer with front and back right sides together and batting on the back (Not sandwiched between!) |
 |
| 4. Trim the open end after quilting to make it straight. |
 | ||||
| 8. Turn the folded edge of the binding over the raw edge and sew down by hand. You will catch the sewn end of the ribbon in the binding. |
 |
| 10.Roll it up (you are actually almost folding it over and over. Pull the ribbon around in opposite directions and tie to close. |


Excellent idea! I like your idea of making them removable.
ReplyDeleteBrilliant! I will be making one soon--it's perfect!
ReplyDeleteThanks for the great tutorial!!
ReplyDeleteWhat an excellent idea! Thank you for the tutorial :-)
ReplyDeleteOh, this is so nice! Definitely going on my list of things I want to make!
ReplyDeleteThank you for this tutorial!
Fantastic idea and great tutorial. Havecto try this soon. Great thing for Christmas! Or any time actually
ReplyDeletethis is a great idea - i'll be loking for these pencil cases next time I go shopping!
ReplyDeleteGood morning Linda, its 5am and the fire is just lit. Thank you so much for stopping by, was nice to see you. What a great pouch tutorial. That would come in handy for lots of different things. I wrote you a long message recently when blogger decided to be unkind. My daughter and her family (3 little ones) have just returned from living just outside Dallas (Plano) for 8 years. It was a sudden decision, a good one of course and so great to have them back in the land of Aus. They have a journey ahead, as we all do, but a good one of course.
ReplyDeleteYou have inspired me, thank you for that. Sweet day, Debra x
Pretty Cool. I'm going to try this.
ReplyDeleteLinda, that idea rocks! I can see so many uses for it. Thank you!!!
ReplyDeleteTina in San Diego, from Artelicious
Hey lady! This is my project tonight! I am going to do this for her to have a little grab item instead of a huge diaper bag - you know for those quick trips to the store with the baby and you don't want a huge bag? I saw this and thought this was perfect! Thank you for these- I have done almost all of them now, and love them!
ReplyDeletethe her is my neice! just got a little excited there!!! Have a GREAT DAY!
ReplyDeletesd
ReplyDelete