Buzzings from a quilter who bumbles her way through life!

Wednesday, August 28, 2013

One Hundred and Five Birthdays?( and a giveaway)

My grandmother and her twin sister.

Can you imagine having 105 birthdays? You would have seen some real changes in the world! My grandmother turned 105 last week. I am going to see her this weekend. She always makes me feel that I am special. I'm pretty sure she makes everyone feel that way, but growing up, I thought it was only me.
In honor of my grandmother, I am having a giveaway of my birthday banner pattern (PDF copy)(available here at my Craftsy shop). I will draw a winner next Tuesday, September 3.
This little banner has candles that can be applied and removed with the help of hook and loop tape. This has been a very popular pattern in the local quilt shops. It is easy to make and is perfect for making a birthday child feel special, whether at home or in a classroom. He/She can add the right number of candles on the special day.
My banner only has 10 candles, not 105. Even counting by tens, there would not be quite enough for my grandmother.
Just leave a comment for a chance to win. If you are a follower, leave another comment for another chance. 
                    Happy Birthday!

Tuesday, August 27, 2013

Giveaway Winner!

The winner of my pattern giveaway is Gill! I have sent her an email and her pattern for Sweet Thing, shown below.  (available at my Craftsy Pattern Shop)


Join me Thursday, August 29, for another giveaway! I will be seeing my grandmother this weekend. She turned 105 last Friday! My giveaway will be related to birthdays! Join me then!


Thursday, August 22, 2013

Bound Buttonholes on Bags - A Tutorial


I've been working up a new pattern for a quick and easy little ribbon trimmed bag. You can find it here. It's called Sweet Thing, and it's a quick and easy bag! (Only $1.99 for a PDF download!) 
Bound buttonholes are actually very simple to make but look complicated.


Find where you want your buttonhole and mark it lightly. I put the button behind the center and felt it through the fabric to get a good idea of the size hole I needed.

Next a cut a rectangle of the fabric you choose to use for the buttonhole. For a 1" button, I cut my rectangle 2" x 3". It is always easier to trim it down, but impossible to add more fabric!

Mark the center of the wrong side of the fabric where you want your buttonhole. Center it over the mark on the bag, right sides together.

Although hard to see, I have sewn over the pencil mark!

Sew by machine over your mark. I left a space a tiny bit less than 1/4" between the top and bottom mark. You need a little bit of space in there, but the thickness of your button will make a difference in how much space to leave. You might want to test this first on a scrap!

Using very sharp tipped scissors, cut down the middle of the rectangle, starting and stopping about 1/8" before the ends. Then cut diagonally up to each corner, being very careful to not cut through the stitches.

Put the fabric through the hole to the back.

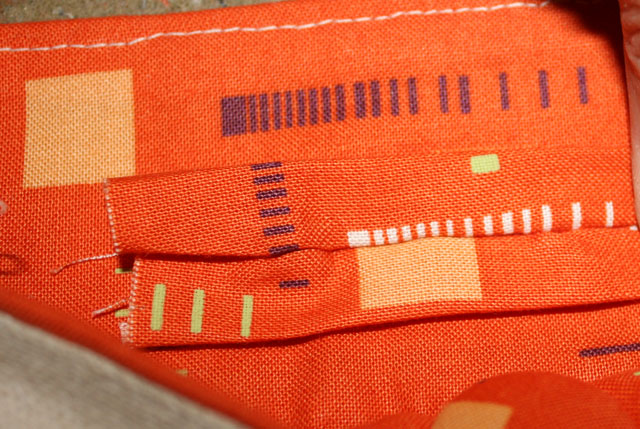
Make a little pleat on the back so that a little flap of fabric shows through on the front. Do this for the top and the bottom. Press it in place well.


Turn the raw edges under and press well. Then sew either by hand or machine. (I chose to sew it down by machine to give added strength. I also liked the added detail it gave.)


Because my button was to be sewn on cotton and I didn't want to sew through to the front of the bag, I chose to reinforce the button with a piece of canvas, which was the other fabric used in the bag. I was careful to sew only through the canvas and cotton and not through to the front of the bag.

All done! Give it a try some time! I think you'll be surprised at just how easy this is. It gives a nice tailored finish your buttonholes!


Just for the fun of it, I am having a giveaway again! I will choose by random number generator someone to win the Sweet Thing pattern (PDF will be emailed to the winner). (Sorry, no substitutions this time.) Just leave your comment. If you want to follow by GFC or on my Craftsy site, or both, leave separate comments telling me that! I will announce a winner next Tuesday, so you have a few days to send your friends by. Thank you so much for sticking around through all my computer troubles this summer.
Bee blessed! 

Monday, August 12, 2013

Giveaway Winner and Burlap Cutlery Bag Tutorial

Congratulations to Suze for winning the Goldilocks pattern, below, from my recent giveaway. The Ho Ho Ho blog hop is over, but we're left with tons of ideas for the Christmas season. Those of us who participated have some of our decorating and gift ideas already done!
               
 Some of you have asked for a tutorial for making the simple little cutlery bag. Sugarplum, my Christmas kitty, insisted on showing you all the steps, so I let her. When you see how easy this is, you'll say, "Oh, of course! How simple!!"
1. Cut a rectangle from your burlap that is 4 1/2" x 7 1/2". At one short end, zig zag across the end of each piece  (about 1 1/2" from the top) using contrasting thread.  Round off the bottom corners at 
the other end.  Sew two long sides, starting at the zig zag stitch at the top, going around the rounded bottom, and ending at the zig zag stitch on the other side\. Reinforce with a zig-zag stitch. Pull threads out at the top to leave a fringed edge.
2. Turn inside out.
3. Press well.
4. Place cutlery in the bag and tie with a gingham ribbon to hold them in. Put a candy cane in the ribbon for a little extra pop of color!
 5. All finished! 

 Here's one on the burlap place mat.
 (This little bear placemat will be a PDF pattern as soon as our computer issues are sorted out! Yes, we're on computer number 3! I have two computers to send back right now and another one coming. They arrive with issues! We're talking EXPENSIVE computers, too. This is getting frustrating, to say the least! My husband has talked to Dell support lately more than he's talked to me! Before long he'll adopt an Indian accent!  If any of you work for Dell, I'd be happy to do an honest review if you can just get me a free working computer delivered to my house! :-) We've been without a computer since June because of this.)

 Thank you for stopping by today! (Sorry about the fussing!)


Wednesday, August 7, 2013

Ho Ho Ho and Beary Christmas!!

"Beary Christmas!" and Welcome to the Ho Ho Ho Blog Hop! Today I want to show you some things I made for this hop that I think will work nicely for a cookie swap or maybe a children's Christmas party. The bear family was the first thing I made for the hop. I used the book, Sue Dolman's Book of Animal Toys.
Instead of fur, I used tan fleece for my bears.


I made a burlap and gingham bunting to put in the window area of my breakfast nook. 


 Then I made a burlap tablecloth for my 4' x 8' breakfast table. I used flat felled seams along two sides to widen it and sewed a gingham binding on the edges. (Whew! I hand sewed it after turning it to the back. Not easy on burlap! It "saws" your thread in half as you sew.)

I used a wreath and a few Christmas items to add to my setting....


...and added some wide gingham ribbon to the center of the table for extra color. My burlap had a nice Christmas pattern stamped on it, but I wanted more of the red.

Because I want to use this table as a serving table, I also made placemats and cutlery bags for my guests, who would be sitting in the dining room.
The front of the placemat is burlap with a gingham binding. I made the cutlery bags of burlap and fringed the tops. A gingham ribbon ties at the top to keep the cutlery in. (I tucked a candy cane under the ribbon.) The little stuffed bear is attached with hook and loop tape and can be removed. The cloth dinner napkin is looped through the bear's arms and is buttoned to itself to hold it on. It is large enough that a child can leave it attached and still put it in his lap. (This was my own design. We have a LOT of nieces and nephews in the family who would enjoy this and I thought they were cute with the stuffed bears!)


At the last minute I decided to hang my Who's Been Eating My Porridge? (Goldilocks) quilt over one window to give more of the Three Bears feel. (You can't see very well, but three bears peek down at her from the top of the quilt.)
So I'm set for a really fun Christmas party! For this hop I made the bunting, the tablecloth, placemats, cutlery bags, and the stuffed bear family. 
Thanks to Mdm. Samm and Carol for this inspiring blog hop. Many of us are now ready to face the holidays a little more prepared! 


Be sure to join my fellow ho ho ho'ers today to see what they've prepared for you! You're bound to come away with an idea of something you could do for the holidays!

August 8


                                             Just Sew Quilter 
I do have a giveaway! I will use the Random Number Generator to choose a winner to receive a PDF copy of the Goldilocks pattern above. (If you wish, you can choose a different pattern from my Craftsy shop and I will send it to you through email.) Leave a comment for a chance to win! I'll announce the winner after the blog hop is over. Thanks for joining me today!


Related Posts Plugin for WordPress, Blogger...