Most of you who have been quilting for a while know how to make a simple "snowball" block, but I have quite a few readers who are new to quilting or who are teaching beginners to sew. I thought this little pumpkin block might be a good project for them. This tutorial is for the block only. What you do with it when you finish is up to you! You could make several blocks and have a little quilt or wallhanging. It could be used as the front of a bag. How about a table runner or placemats? Maybe three of them in a row could be a nice banner. Just use your imagination!
 |
| 1. Cut your a square for your pumpkin. You can use any size you want, but mine is 6 1/2". Cut 4 smaller black squares (mine are 1 3/4"). You don't want your corner squares to be too large or your pumpkin will have pointed sides! |
|
 |
| 2. Place the black squares in the corners and make a chalk mark as shown diagonally across each. What is the little blue tool in the photo? Well....... |
 |
| I happened to see these at the local Walmart. They were cheap - about $1. I thought they looked like they might be 1/4" wide. They are! they are clear, so they work just like a 1/4" ruler! I have been using them for a lot of things! Measuring 1/4" seams, drawing out straight lines, etc. I have a life time supply and I can pick the color that fits my mood! :o) |
 |
| 3. Okay, back to the tutorial. Sew across each corner just to the right of your lines. (I'm talking a hair's width to the right. |
 |
| 4. Trim the corners off, leaving a 1/4" seam allowance. (You can use your new little tool if you want!) | |
|
 |
| 5. Turn the corners up and press in place. |
 |
| 6. Cut 2 strips (mine are 2 1/2" wide) the length of one side of your block.Sew to opposite sides. Press. |
 |
| 7. Cut 2 more strips the width of the block including the newly sewn strips. Sew these on the remaining opposite sides and press. |
 |
| 8. Repeat steps 6 and 7 to add another border to your block. You can make these strips the same width or wider.l Mine are 3 1/2" wide. |
|
This block as it is is called a "Snowball" block. You can stop here and you'll have a classic block that you can make into a nice quilt. You can leave off the border strips and when you sew your snowballs together, the corners will make little squares. But if you want a pumpkin........
 |
| 9. Put a scrap of batting behind the pumpkin shape. I used cotton batting, but for a little more definition you can use polyester. Make sure it is large enough to cover the edges of your pumpkin. |
 |
| 10. Turn the block over and stitch in the seam line of the pumpkin. |
 |
| 11. With chalk, mark curved lines from the center of the top to the center of the bottom to give your pumpkin it's "ridges". Sew along these lines. |
 |
| 12. Trim the batting that sticks out beyond the pumpkin shape. |
 |
| 13.To make a leaf, draw out a simple leaf shape (you can trace a real leaf if you want) onto the dull side of freezer paper. Place the SHINY side down against the RIGHT side of a scrap of green fabric. (You don't want to touch the shiny side with your hot iron!) Press the dull side of the freezer paper and the shiny side will stick to your fabric. Don't worry. It will peel off and can be ironed on again several times. It will not hurt your fabric! Cut it out leaving a narrow seam allowance. |
 |
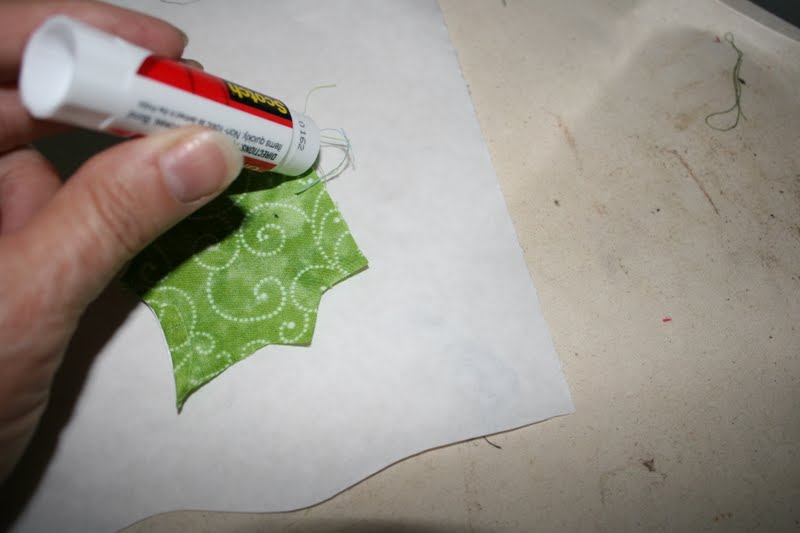
| 14.Turn the shape over to the WRONG side and run a line of glue stick along the seam allowance. (Clip any curves.) Using a pinching motion, turn the edges in leaving the fold even with the edge of the freezer paper. |
 |
| 15. Peel off the paper. Use chalk to draw in a tendril that you will embroider with green floss. Add a little stem, if desired. I used a little tab of fabric with the edges folded in. |
 |
| 16. Back the leaf with a scrap of batting. |
 |
| 17. Sew in veins for the leaves and then sew around the edges, keeping your stitches as close to the edge as possible. |
 |
| 18. Sew the stem on the same way. Embroider your tendril. |
That's all there is to it! Easy, right?


love your tutorials Linda they are easy to understand,thankyou
ReplyDeleteWhat a cute pumpkin! Thanks for another great tutorial :)
ReplyDeleteThat is wonderful! I hope you are doing well!
ReplyDeleteHugs to you!
CUTE!
ReplyDeleteThank you Linda, I'm going to try this today...I love it! Your tutorials are so easy to follow!!!Hugs...
ReplyDeleteI love your block! I love pumpkins! Thank you for the tutorial!
ReplyDeleteGreat job!!
ReplyDeleteHow very clever! Thank you for sharing. Fun tip on the bev stirrers too! !
ReplyDeleteWhat a cute pumpkin, great tutorial!
ReplyDeleteOh Linda that is too cute - thank you so much for the tutorial!!!
ReplyDeleteThat's a right smart little pumpkin,all the way to the clever vine and leaf! Thanks ~
ReplyDelete:-}pokey
Wonderful "tute"! Even for "old-hat" quilters (like me!)...it is a great refresher course. Thanks for taking the time to share!
ReplyDeletehugZ,
annie
rubyslipperz106.blogspot.
Thanks for the great tutorial! What a fun, fast project to make for fall!
ReplyDelete