I'm back! I've been having major internet issues this week, but hopefully, they are fixed.
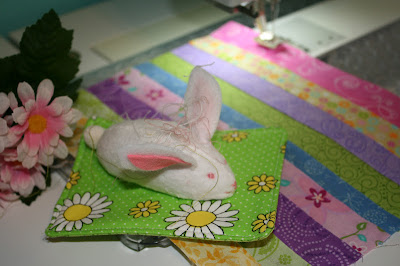
Easter is not far away. That made me think of bunnies - soft, furry Easter bunnies. Then I realized that although I wasn't likely to see one of those this year, I did have an entire family of dust bunnies living under my bed. Then I walked into my sewing room and saw the threads all over the floor. (I have a bad habit of throwing the cut threads over my shoulder onto the floor so I can sweep them up afterwards. It works fine unless I'm called away before I sweep up!) I decided that I needed a "thread catcher bunny" so I made this little gal out of batting since it seems to catch every stray thread around. She was super easy to make.
 |
| Cut 2 layers of batting (see the threads they picked up from the ironing board?) into a shape similar to that above. It is not quite a half circle. Also cut two little ears from white felt (or you could use the batting, but you might have a flop earred rabbit) and some ear "insides" from pink felt. | |
 |
| Sew the 2 pieces of batting together along the arc. Open it at the flat end and lay it on another piece of batting to make a bottom. Pin and then sew to the bottom, leaving a 1" opening for turning. |
|
 |
| Trim the extra batting off the bottom. Turn right side out through the turning hole. |
 |
| Stuff the bunny body firmly and sew the opening closed. |
 |
| Glue the pink lining to the ears and pinch the bottoms together. (I did not glue the pinch closed, but the felt holds the pinch long enough for you to sew it to the bunny that way.) |
 |
| Sew the ears on and embroider a little face. If I had found little pink beads, I might have used them for eyes. You might even prefer a different color for the eyes. |
 |
| Sew a little white pom pom on the back for a tail. |
 |
| Make a little grassy patch for your bunny by layering batting, your top fabric, and then your bottom fabric (all cut in a square a little larger than your bunny). Sew around the edges leaving an opening space. Turn right sides out and top stitch all the way around. Slip stitch your bunny to the top and you're finished. |
So here's Flossy. She'll hold your clipped threads while you sew. I found that she's pretty good at holding my embroidery floss strands, too, while I'm embroidering. She can sit by your machine, on the arm of a chair, or you can even pin her to your shirt while you sew. If you want, she'll even hold your pins and needles.
Until next time....


Linda, you are a genius!! How cute, clever, and necessary!! "Necessity is the mother of invention"!
ReplyDeleteAgreeing with Karen, you're a genius! This is the cutest ever!
ReplyDeleteMy girlfriend throws her thread and fabric snips over her shoulder too, she learned that from Eleanor Burns!
Honestly, Linda - you are so clever! Thank you for the tutorial, too :-)
ReplyDeleteSo So Cute!!! You know I love the Bunny!!!!
ReplyDeleteFlossy is so cute, thanks for sharing!
ReplyDeleteThat is so cute and fun!!
ReplyDeleteOh, how cute - it is truly a needful thing. Thank you for sharing - just inspiring. Judy C
ReplyDeleteI don't throw my snips over my shoulder, I throw them on the floor. And it looks like it too! Oh my, does it look like it. My studio is in sad need of a good cleaning and pick up. This little girl looks like a fun project, and I think I foresee one in my near future.
ReplyDeleteThat is such a great idea! I might try making them for my guild's retreat gift!
ReplyDelete