Index to Pages

Monday, October 31, 2011

, Ghastlie Blog Hop - Day 6

Day 6 already! Be sure to visit the following blogs today for some great project ideas. Leave comments on their blogs for a chance to win. (And be sure you come back and visit me on Thursday to see what I have to show you!)

 ON Monday October 31st
Day 6

Mrs Barb Ghastlie  * lost her power during snow storm
(keep trying - she should be up soon)

DAY 6 Giveaway 
Halloween...


2 sets of these candy lovely lights
( not edible, they do light up)
from one of our very own Mrs Nancy Ghastlie
 
 
Until next time, 
Mrs. Linda Ghastlie

Saturday, October 29, 2011

It's Behind You!

A picture of an unfinished Little Red Riding Hood quilt. It still needs borders, etc. Do you see the wolf behind her? The borders will have the story embroidered around it along with other hidden goodies! I put this away a year ago. I need to get it out and finish it!!!!!!

 The Wanabe Quilters Contest is behind us. What a great contest! And.....
 Week One of the Ghastlie Blog Hop is over. We'll be back on Monday, October 31 to begin the new week! Be sure you come back to see where to go each day. I will be posting on Thursday and have some "UN-Halloweeny" projects for you.


I should be back in full swing after this week. I am much better (from my shingles) and have so far avoided the awful tummy bug that everyone around me has been getting! I have house guests and I certainly don't want to pass along anything as "ghastlie" as a virus!!! My sister and I were decorating for a big banquet at church tonight and she is sick this morning. So.....I will be busy today!


So until Monday, have a great weekend!


post signature

Friday, October 28, 2011

Ghastlie Blog Hop, Day 5

Day 5 already! I hope you're visiting these blogs each day for great ideas! Here are today's blogs:

 ON Friday October 28th 
Day 5


And today's giveaway!

                                       DAY 5 Giveaway...
                                                         
                                                           2 more WINNERS for 
                                                                 Ghastlie Fabric...


4 Yards EACH of this GHASTLIE 
Collection from our sponsor
They are sporting a BRAND NEW look too.!
YOU can VIEW these from samples they have posted!


Thursday, October 27, 2011

Ghastlie Blog Hop, Day 4

 It's Day Four of the Ghastlie Blog Hop! Be sure and see what these bloggers have to show you today!
 

 ON Thursday October 27th 
Day 4

           Mrs. Katherine Ghastlie              
 
                                          Day 4 Giveaway
                                                                 These rulers always 
                                                                  MEASURE up
                                                          to the Ghastlie Standards
                                                       Creative Grid top 3 rulers....
                                                     it is time for some serious non slip
                                                              rulers...just saying...

Wednesday, October 26, 2011

Day 3 - Ghastlie blog Hop!

 It's day 3 of the Ghastlies Blog Hop and you have another chance at winning something.
DAY 3 GIVEAWAY


But today we will have 2 winners...YES 
and each will get..

4 Yards of this GHASTLIE 
Collection from our sponsor
They are sporting a BRAND NEW look too.!
YOU can VIEW these from samples they have posted!

So visit these blogs today and be sure and leave a comment!


 ON Wednesday October 26th     


Tuesday, October 25, 2011

Day 2 - Ghastlie Blog Hop

Day 2 of the Ghastlies Blog Hop has arrived and with it another chance to win a great prize and maybe some giveaways on the blogs. Here are today's blogs:
 ON Tuesday October 25th 

 Mrs Brandie Ghastlie MIA TODAY...KEEP TRYING ...


DAY  2 Giveaway! 

 so visit the blogs above and be sure and comment for chances to win this great prize!
(I will be featured on Thursday, November 3. ) 

Mrs. Linda Ghastlie 

Sunday, October 23, 2011

It's a Ghastlie Blog Hop!


Are you ready for another "fun" event? Have you seen the "Ghastlie" line of fabric by Alexander Henry? Perhaps you like it, but wonder what you could possibly do with it?


Although they do have a couple of designs in the line that look more suited for Halloween, I don't see the ones I've chosen as a Halloween fabric at all! I come from an art background, so I see these as almost a surrealist expression of stern, Victorian or Edwardian life. This is "illustration" in the style of Edward Gorey. It would be at home in a Tim Burton movie, an illustration for a poem by Poe, or even a page out of H. G. Wells. I don't see these as scary or spooky. 
I hope you will join us for a blog hop of ideas of things to do with this line of fabric! I will be featured on November 3 and my ideas have NOTHING to do with Halloween! I think you'll see that this is something YOU could use! There will be prizes, both small and large, so be sure to join us! 
Here is a poem by non other than Madame Samm at Sew I Quilt, the instigator of this hop!


Welcome GHASTLIE FANS

Behind the scenes we ( 54 ) Ghastlie obsessed
Stitchers have been rather busy, you could say.

I will be as surprised as all of YOU. 
I cannot wait to see what my Sistahs
have created.

If you have this thing for Ghastlies
and they have tied you in a knot
and you wish you could get them out of your mind
than this may be a thought.

We heard her plea for a cure
Mdm Samm was pos/it/ively sure
that we could stitch the nights away
in hopes that we MAY----???
( all 54 of us)  

BUT....

The side effects are Ghastlie
there is no mistaking too.
if you don't run this very minute
YOU too will catch the FLU...

We suspected all along 
this was her master plan
she did not want to be alone,
 with all  YOU Ghastlie FANS...

(I suspect there will be a CURE somewhere
in one of these blogs...) 

 ON Monday, October 24th 


 ON Tuesday October 25th 

                                     
 ON Wednesday October 26th     
                   
 
 ON Thursday October 27th 

           Mrs. Katherine Ghastlie              

 ON Friday October 28th 


 ON Monday October 31st


 ON Tuesday November 1st 


 ON Wednesday November 2nd

 ON Thursday November 3rd


 ON Friday November 4th
As you can see above, I'm highlighted in yellow! Be sure to come back and visit me then, along with all my "ghastlie sisters"!  The button on my sidebar will take you to Sew We Stitch, which is the home of the hop!
post signature


Sunday, October 16, 2011

Jack O Lantern Gift Container Tutorial

Do you need a little gift for a teacher, a neighbor, a grandchild? 
This little Jack O Lantern  is quickly and easily made and can be filled with any small gifts or candy.
1. You need a plastic container. Mine held 7 oz. of marshmallow creme.
2. Punch holes in the bottom around the edge.
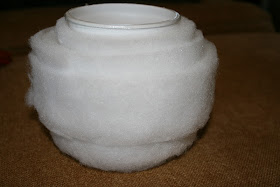
3. Wrap polyester batting around the middle, using narrower and narrower strips so that the middle will be thicker than the ends. You are building up a "pumpkin" shape.
4. Cut a strip of orange fabric 2" longer than the HEIGHT of the container, and long enough to wrap around it, leaving enough to sew a seam. Sew it into a tube by sewing the ends together.
5. Put the tube over the batting covered container. Leave an inch at the top and an inch at the bottom.
6. Gather the top and bottom edges. (Do not cover the holds at the bottom. If they will be covered, wait and gather the bottom later.)
7. Run a line of glue at the top of the inside of the container. Turn the gathered edge over the rim and clip it in place over the glue. Let it dry. I used a "tacky" glue. When dry, remove the clothespins.
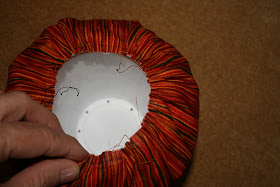
8. Using a strong thread or yarn, make a few anchoring stitches into the fabric and through the batting, then go through the hole, grab the needle inside the container, and pull it up and over the top, around the outside and into the hole again. repeat this a couple of times in the same place and pull tightly to leave an indention on the outside. This forms the "pumpkin ridges". If your thread is long enough, you can move on to the next hole. When your thread is too short to go around again, anchor it at the bottom. Do this all the way around.
9. Here is a view of the thread coming through the holes and up the sides of the inside of the container.
10. Cut a circle of felt to fit the bottom of your container and large enough to hide the raw edges of the gathered tube. Sew the felt in place by hand.
11. Line the inside with felt. (I cut a strip to go around the edge and a separate circle to fit in the bottom. Use the tacky glue to glue in place.
12. Cut little black felt Jack O Lantern features and glue in place. (You could sew them if you wanted.)
Fill with goodies and present your gift! You could add a little handle if you wanted to. You could also place another plastic container just like the one you used inside the top of this one and fill it with flowers. 
Use your imagination, but have fun!  


post signature

Monday, October 10, 2011

Insulated Gift Bag or Sandwich Bag Tutorial


 Do you need a cute little gift idea for a friend? How about a sweet way to present a sweet gift like cookies or candy? This little bag can be reused as a sandwich bag when the gift is long gone. AND....it's a good way to use up scraps!


1. You need some type of insulation for your bag. You can buy an insulated batting, but I chose to use a mylar chip bag. If they can keep chips fresh, they should work for other foods!
2. Here you see the shiny side. This will be your RIGHT side. Clean off your bag well with a damp paper towel to clean off any residual oil or chips!
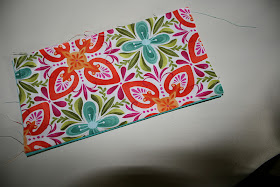
3. Cut 2 rectangles for the outside of your bag (mine are 7 1/2" x 8"), 2 rectangles of the Mylar and the batting (also 7 1/2" x 8" ), and 2 flaps (7 1/2" x 4").
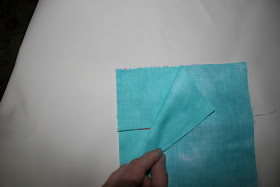
4. Put the flap pieces right sides together and sew across one long end. (You can see where I had to "unsew" the two side pieces. Oops!)

5. Turn right sides out and press.

6. Place the flap at the top of one of the outer bag rectangles, on the right side, and place the other rectangle right side down on top of it. Sew the sides and the bottom, leaving a 2" opening in the bottom that you will later turn the piece through. Do not turn right side out.
7. Put the batting pieces on top of the Mylar pieces and leave the shiny side as your right side. I used a little spray basting to hold the batting on while I sewed. You might also try a glue stick to help it stay in place. Place the shiny sides together and sew the sides and bottom. Do not leave an opening in the bottom. Do not turn.
8. Place the outer bag inside the lining, putting the right side against the shiny side. Pin in place around the top.
9. Sew around the top edge, all the way around.

10. Put the outer bag out and turn over the lining through the opening in the bottom.
11. Sew the opening in the bottom closed by hand.
12. To close the bag, simply pull the flap from one side of the open bag over the top. It will close just like an old style plastic sandwich bag. 
 You can make these any size you want, actually. They don't have to be a sandwich size. How about large enough to hold a loaf of homemade bread? Or maybe just cupcake size? Maybe just the right size for a gingerbread cookie! You can use holiday fabrics for the holidays if you want. You don't have to insulate them, by the way, you can just use two fabrics and make little lined gift bags that can hold little gifts. Have fun! By the way, I added the flower and leaf in the first photo as a gift tag. You know how I love adding flowers and ribbons!


Update on my shingles:  Thank you SO MUCH to everyone who left such sweet comments and sent such uplifting emails! It's so nice to have friends out there! My rash is better, although the burning pain is still there. I still have a little recovering to do, but hopefully, I will be over this soon! My heart goes out to those of you who have painful diseases that you live with every day of your lives! I don't know how you do it! I know of several of you out there who do just that! My prayers are with you!


post signature 


Monday, October 3, 2011

Hot/Cold Pack Tutorial


 I'm a little "under the weather" this week. I have Shingles. Many of you have had them and many more will get them (I'm sorry!). If you had chicken pox as a child, the virus is laying dormant in your body just waiting for a time when your immunity is low because of illness or stress. Then it attacks. The first couple of days, I thought I had a kidney stone! I had such a horrible pain in the kidney area, I couldn't sleep. It wasn't until the skin around my waist started to feel tender to the touch that I started thinking something else could be going on. Fortunately, I got to the doctor when I only had a very small rash starting. I was started on an anti-viral medication that will, hopefully, keep me from getting as sick as I might have otherwise. My rash runs from my spine around my torso to my belly button. . Mine have not blistered yet, so I'm still in the early stages.Unfortunately, my response to pain is nausea and that coupled with some typical other symptoms - chills, abdominal pain, headache, and joint pain -  I have been laying on the couch doing nothing for the last week! Today, I am much better.
One way to relieve some of the pain and itching (mine don't itch yet!) is a cold pack. Here is a feeble attempt at showing you a quick and easy one to make. This one can also be heated in the microwave and used as a heat pack - just don't get it too hot! Warm is all you need!!! I made a removable cover so it can be laundered and disinfected!

1. Cut a strip of fabric that will fit around your waist and overlap some. It should be twice as wide as you will want because you will be folding it in half lengthwise. Sew across one end and down the long open side.
2. Turn right side out and sew across several inches from the closed end. This will leave an area with no filling that can be overlapped.
3. Fill the tube with rice. Do not pack it in. Leave it loosely filled. You want to be able to wrap it around your body.

4. Cut a strip of fabric wide enough to wrap around the inner tube. Turn all the raw edges under and sew them down.
5,. Sew hook and loop tape on the inside of one long side of the outer covering and the outside of the other long side, as shown. I used scraps that I had saved from a different project. This allows you to remove the outer covering and launder it.


 I hope you never need to use one of these, but if you do, it's nice to have one around. Mine is in the freezer now. I have another one that can be popped in the microwave for about 45 seconds or just until warm (Don't get it hot! It can burn you!). Be sure you know when you need a heat pack and when you need a cold pack - they are for different purposes!


 Now on a happy note, Staci at The Confused Quilter has honored me with a mention in her blog and has "awarded" me as a Versatile Blogger! Thank you, Staci! Staci always has wonderful posts! Please check her out.
Okay, you need for me to tell you 7 things about myself. Here goes:
1. I am fairly shy until I get to know you better. Then I'm a little silly! I am terrified of approaching shop owners and of "tooting my own horn" about my patterns. (Not particularly helpful when you own a business!)
2. I absolutely adore my husband of 41 years! I have never even one day regretted marrying him. He keeps my feet on the ground when I tend to get off into "the clouds" with my plans.
3. I like to bake when I'm stressed. I have bread in the oven as I write. I got off my sick bed to make bread. (My heavy duty mixer does the kneading for me, so it wasn't very hard to do!)
4. I enjoy watching old movies! Especially old Christmas movies!!!
5. I love to read. I have a Kindle and I keep it stocked with books! One of my wonderful memories is of a trip to a resort in Montego Bay, Jamaica where my husband and I relaxed on the beach in hammocks under the palms, sipped virgin Pina Coladas (we're not alcohol drinkers) and read our books. I was reading Amy Tan's The Bonesetter's Daughter at the time and I'm sure he had a either a science fiction, James Patterson, or John Grisham book.
6.I enjoy working jigsaw puzzles, but I like the ones that are based on folk art. My family works at least one every holiday season! I will take old ones out and rework them sometimes. I keep a few in the RV in case of rain!
7. I love flowers and trees! I miss living in a forest, but it was worth the sacrifice to be near family. I have baby trees in my yard and lots of flowers. Now I have to live long enough to see them grow up!

You can see pictures and learn a little more about me in Ten Things You May Not Know About Me.


I invite you to check out my sister's blog, Doodling in My Mind. 
(For my British friends, in the U.S. doodle is a verb meaning a type of drawing and it is not a naughty verb! My sister was horrified when she found out there was another meaning to her title!) She is an artist and a high school art teacher. She is the one who pushed me to put my designs in pattern form and then helped me to do it! I would like to pass this award on to her! 
post signature