 |
| Auditioning fabrics for pillow case combinations. (The green pillowcase and the yellow doll pillowcase are finished projects.) |
 |
| (The pillow on the left is not made yet, but I thought you should see how cute it would be for a little boy!) |
French
Seam Pillowcase
(One
Standard Size)
Main body of pillowcase – fabric cut 27”(length) x
42” (width). (The 27” can be adjusted if you adjust the width of the wide band.
The total length of both pieces should
be 40”. )
Contrasting fabric for wide band – piece 13”(length)
x 42” (width)(again, you can adjust this as long as the total length of the main
body and the wide band is 40” before folding and sewing.)
Trim – This can actually be as narrow as you want.
Instructions are for a piece that is 2” x 42”.
Instructions:
1. Lay
your main body fabric right side up. Press the trim piece in half lengthwise, wrong
sides together and right sides out. Place along the top edge of the pillowcase,
raw edges together. Baste in place using a scant ¼”.
2. Lay
the wide band piece right side up and place the pillowcase body and trim right
side down on top, matching up the top edges. Pin in place.
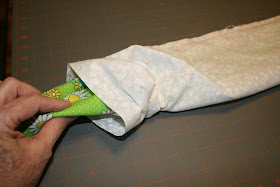
3. Roll
the width of the pillowcase body up toward the top of the wide band.
4. Pull
the wide band up and over the roll and match the raw edges.
5. Pin
in place and sew together using a ½”
seam allowance. Backstitch at each end to secure your seams.
Pull the rolled pillowcase body
through the “tube” opening.
6. Press
well and fold in half widthwise with right
sides out! Sew along the side
and bottom, using a ¼” seam.
7. Now,
turn pillowcase wrong sides out. Press. Sew the side and bottom again using a ½” seam. (You are making a French seam
which encloses the raw edges inside.)
8. Turn
right sides out and press well.
You’re
finished!
You
may want to try lace, tatting, cording, or rick rack as trim in place of the
fabric strip.
You
can use pieced or embroidered fabric for your wide band.
Use
your imagination and have fun!


Great tutorial. I was think about making some pillowcases but couldn't remember how I did it so there were no raw seams. You must have picked up my mental musing.
ReplyDeleteFun pillowcase. I need some new ones myself. Perhaps this summer.....
ReplyDeleteOh, I made my niece and nephew a year of pillowcases using this pattern. One for each holiday. I machine embroidered their names on the wide band. It's a great pattern and works up really nice.
ReplyDeleteWith a drawstring casing these would also make really fun laundry bags or toy bags or sleepover bags. Sew Cute! Thank you for sharing your easy tutorial.
ReplyDeleteGreat tutorial. Thanks. Lovely fabrics.
ReplyDeleteI love making this 'hot dog' method. I use both the serger and sewing machine. Thanks for tutorial.
ReplyDeleteGreat tutorial, Linda!
ReplyDelete