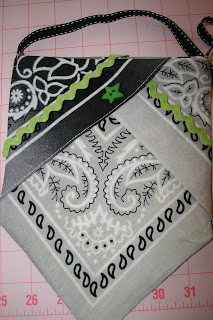
1.First choose a piece for each side. I chose to make one side lime green and the other gray/black. Although there are three peices in the photo, you only need two. Fold the points along the long side in and overlap so that the intersection lines up with the point at the bottom. Since the print on
a bandana goes all the way through the fabric, you can fold either right or wrong side over. (If you're doing this with regular fabric, you will have to pay closer attention to what both sides look like!) Sew across the top with a 1/4" seam. Turn right side out. Press.
 |
| 2.Place
the fronts together and sew along both sides and the pointed bottom,
using a 1/4" seam. Turn and press. (If adding fringe or a tassel to the
tip, you need to do this now. Of course, you can do like I did and just
pick out enough of the seam to insert it and resew it. |
|
|
|


What a wonderful use for leftovers you've found! Very inventive! :)
ReplyDeletehow fun! love that citron colored one.
ReplyDeleteOh how sweet is this - I LOVE IT! Linda, you just come up with the best stuff! Thank you so much for the tutorial!!!!
ReplyDeleteHow cute are those! You come up with the best ideas for leftovers - stuff I would normally throw away.
ReplyDeleteVery cute! I'd love an "evening" type bag made like this in a pretty fabric! blessings, marlene
ReplyDeleteConfused are there RAW edges at the opening of the purse? And I have never seen the SNAP tape measure use before where can I see the HOW TO of that... Cute Idea and should it be lined with a heavy interface or the bandana itself is fine. Thanks
ReplyDeletewhat a creative idea! thanks for sharing!
ReplyDeleteI just thought I would jump in here and let everyone know that many instructions for these bags have you put the tape number side out. Mine wouldn't open when I did that. It might be that the tape makes a difference. You might want to try your tape both ways and see which works best for you! Mine worked great with numbers facing in.
ReplyDeleteThis is a fun twist on the origami bag with drawstring closure I was making. Thank you so much for this style and technique. I really like all your ideas. Blissful sewing...
ReplyDeleteYour killing me with cuteness!!! One more thing to add to my must make list, thanks for sharing
ReplyDeleteyou are so clever Linda,what a great idea.xx
ReplyDeleteWow!! That a great idea!
ReplyDeleteHi, this is so cute! Not sure when I will get around to making them (for granddaughters of course) but wanted to be sure to find it again so .. YES I did pin it to my Pinterest craft board.
ReplyDeletethanks so much
warm quilt hugs, sue in CA
from 25 wks group
I love this purse idea and want to go sew one right now if I didn't have dinner to make! One thing, and I feel it's probably obvious to everyone but me. . . I can't see where you've stitched under the metal tape to form a casing. Did you do it by hand on the inside of the purse because I can't see a machine stitch line on any of your examples.
ReplyDeleteit is lovely. Thanks for the tutorial.
ReplyDeleteGift containers - that's what I'll be using it for and of course including some chocs!
GREAT idea!...wonderuful "tute"! I see bandanas quite often when I go to Walmart...I'm gonna have to try this. thanks!!
ReplyDeletehugZ,
annie
anniesrubyslipperz.com
Oh, you have done it AGAIN! I love these, and I am so glad that I follow your blog. I sure would hate to miss something! Thanks for another super idea!
ReplyDeleteHi LInda! Looks like I have missed a bunch by missing your blog!! You are so clever and inspiring. I love that. Hugs! Vickie
ReplyDeleteHow darling are these! Thank you for sharing and thank you for visiting me the other day...green tea ice cream sounds yummy. xoxo
ReplyDeleteThis is such a cute idea! I'm almost done making a quilt out of bandanas! (it's my first) They are so cheap and you can do so many things with them!!! Thanks for the inspiration!!!
ReplyDeleteCool use for an old bandana! I've got a Craft Gossip post that links to your tutorial here: http://sewing.craftgossip.com/tutorial-bandana-pinch-or-snap-bag/2015/07/19/ --Anne
ReplyDelete