Index to Pages

Monday, April 30, 2012

My Latest Projects


My husband and I are trying to paint our house. Here he is up on a ladder painting trim. (I am taking the picture, so unfortunately there is no proof that I have been working! I have!) We've pulled plants, the grill, the smoker, the pressure washer, the paint sprayer, etc. etc. out and that really makes for a messy photo, but I'll be sure and show an after when we're finished. This is a view from the back and although it is hard to tell, I have painted the area under the patio roof with a brush. It is unfinished at this point. The wind is so strong, it was blowing the paint off my brush! NOT JOKING!
 

 My latest pattern is for a little handbag pin cushion that is so easy you can whip one out in no time at all!

 Although it is very similar to the tutorial I posted a while back, it has been improved and designed to be made of fabric instead of felt. My mom made the one you see in turquoise to test how easy it is to make. They are filled with crushed walnut shells and the items poking out of the flap can be varied -  patterns for a felt glove and felt sunglasses are included, but a little scarf made from a scrap of satin or lace and a little pearl necklace made from bead trim look pretty sweet.
We have a pin cushion swap in our quilt guild on Wednesday. Can you guess what the person who draws my name will receive? 
I think these would be darling as place holders for a quilt or sewing related luncheon. The names could be put on the pin cushion and set in front of each plate.  
Well, it's dark now and almost 9:00pm and we haven't stopped to eat dinner yet. I'll post more later! Until then......


post signature 


Thursday, April 26, 2012

Bandana Snap Bag Tutorial


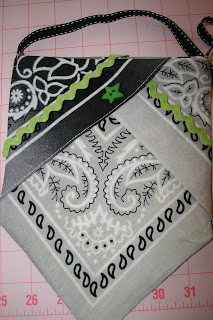
 I had a few pieces of bandana left after making the apron in my Bandana Apron tutorial. (See it here.) I was intrigued with finding a good use for those points. You could also start with a whole bandana and cut it in half twice from point to point and do the same thing.(My points are just a little smaller than a bandana cut into 4 triangles.) You could make two small purses from one bandana. The larger purse is made from one bandana cut in half from point to point. Both are closed with a "snap closed "opening made with an old metal measuring tape. (This has been around the internet for a while now, but we just had a tape bite the dust and I couldn't wait to get my hands on it!) The tutorial below is for the small bag. The larger one is made the same way. I chose to line mine with fleece and a cotton fabric, but the small one is unlined.
1.First choose a piece for each side. I chose to make one side lime green and the other gray/black. Although there are three peices in the photo, you only need two.  Fold the points along the long side in and overlap so that the intersection lines up with the point at the bottom. Since the print on
a bandana goes all the way through the fabric, you can fold either right or wrong side over. (If you're doing this with regular fabric, you will have to pay closer attention to what both sides look like!) Sew across the top with a 1/4" seam. Turn right side out. Press.

2.Place the fronts together and sew along both sides and the pointed bottom, using a 1/4" seam. Turn and press. (If adding fringe or a tassel to the tip, you need to do this now. Of course, you can do like I did and just pick out enough of the seam to insert it and resew it.

You now have the body of your bag. 
3.Sew a cord or grosgrain ribbon at the side seams to serve as a handle or strap.
4. If you want a snap closure, round the ends of two pieces of old metal tape measure using tin snips or scissors that you can throw away afterward!  These should each be the width of the top of your purse.
5. Slip each piece under the flap and push it up to where it is aligned with the top of the purse. Sew under the tape to form a casing to enclose it. the tape should be put in where the rounded sides face outward. When you've done this, you should be able to "snap" the opening open and closed.
 All of the above steps took about 5 to 10 minutes. Simple, right? Now the fun begins! Add some trim:
feather boa....
jewels and sequins...


rick-rack....
fabric bow and fringe....


                                                                  OR....


buttons.


This little project is so fast and easy, I would consider making them as party favors or gift containers. Fill one with goodies and present it to a friend. . It might be just the right size for a phone, credit card, and set of keys. (You might feel more secure with a zipper opening if you keep something valuable in it! (What more could you want? Oh....chocolate! It would fit too!) The large purse is big enough for anything you would normally fit in a purse. I glued fake jewels on with fabric glue to give it some bling.

Until next time.....
post signature


Monday, April 23, 2012

Bandana Apron Tutorial


 This little apron is made from bandanas. It is intended to be worn by a human and not a chair or stool, but this was the best I could do today! You can see my attempt at photographing it on myself through a mirror! Despite my photography problems, this was a very fast project and required very little sewing.

 I love the idea of re-purposing. I don't know why except that it makes me feel creative. For that reason, I can't seem to pass by the $1 rack of bandanas in Walmart without stopping and wondering what I can do with them. They are different every season and come in pretty colors and styles.
Below are a few others:


You need 3 bandanas for the little apron and a 5" x whatever length you need for a sash. (The bigger around the waist you are, the longer you need the sash.) You could alternatively buy a very wide ribbon to use. Press and starch each one before you begin.
1. Lay out three bandanas of your choice and place them point to point. If you turn back the points, you can check how the pockets will look. 
2. Put the corners of two bandanas right sides together. Measure down 7 1/2" from the point on each of the two sides and place a pin at the mark. Now draw a line between the 2 pins.
3. Sew on the line across the corner. Now sew again outside the line about 1/2".
4. Cut between the lines.
5. You now have a pocket ready to be pressed. It is already hemmed around the edges! Repeat all this on the other side of your center bandana with the leftover bandana. You will have a second pocket ready to go!
6. You now need to cut the points off the top. Measure 7 1/2" up from the side point and mark. Cut across from the top of the side seam to the mark. Do this also on the bandana on the opposite end.
7. Cut across the middle from the top of each side seam. The pieces you have cut off can be used to make a bib for your apron if you want. They might also be used to make potholders. OR, how about a little matching apron for a little girl? (You would have to modify it just a little, but the concept is the same.)
8. Here is the piece with the points cut off. Now sew a basting/gathering stitch across the top.
9. Pin the pocket pieces at the seams. I chose to switch the colors. Sew them on with the opening at an angle at the top center.
10. Pull the bobbin thread of your gathering stitch and gather it to about a 15" or 16" length. (Again, if you are large, you might want a wider apron front. Hold it up to yourself and check it out.)
11. Cut your sash 5" wide and as long as you need to go around your waist with room to tie. Place the middle of the sash to the middle of the top of the gathered apron, right sides together. Pin along each side. Sew it on along the gathering stitch.
12. Turn the sash right sides together and sew together along the end and up to the apron on each side. Press a 1/4" seam allowance up along the unsewn edge and press. Turn the sash inside out on each side. Press. Sew the turned edge down either by hand or machine along the gathering edge at the back. It should hide the gathering. Press well, and you're finished!


post signature 


Friday, April 20, 2012

Garden Inspiration


What inspires your color choices? One thing that inspires me is my garden. (Yes, I need to clean and mulch it, but one thing at a time! The Shop Hop was only a week ago. I'm still cleaning house!) I have tried to stick to only a couple of colors, but I just can't. I go to the store and see all those beautiful colors and my will power collapses. I have all the colors I love, which is EVERY color! Color inspires me. Pink and orange? That's okay with me! Red with purple?Wonderful!  But there is a little color "trick" that your brain plays on you and it can make a difference in your color choices for quilting.

Look at the roses above. What color would you say these roses are. If you said red, you are correct. If you said pink, you are still correct. They grow on the same bush. There are two colors, right? The older rose has faded to a pink and the fresher one is more red. Aren't they beautiful together? You might notice that you see a little pink in the highlights of the red rose and a little red in the shadows of the pink rose. That ties them together visually. You can do the same with fabric, but you have to learn to see the actual colors that are there.

I have this gorgeous Alexander Henry fabric, "Charras" in my stash. I want to make something for Cinco de Mayo with it. You notice the girl on the horse has a red dress. But look closer. Most of it is actually pink. I found a Michael Miller fabric, "Petals", that is red with pink along the edges of the petals. It reminds me of the ruffles around the girl's dress and matches beautifully (in the photo, the pink doesn't show up as much as in real life!). I also found this fabric from Timeless Treasures Fabrics that also has many of the colors from the "Charras" fabric and is reminiscent of the sarape in the main fabric illustration. A solid pink or solid red fabric would not have looked right. 
It's hard to train ourselves to see actual colors because our brains tend to take over and tell us what color we see. (Ask any art teacher if this is not true!) How many of you would automatically say tree bark is brown? Most tree bark is actually gray. (There are exceptions.)
All this to say, when you try to match a color in a fabric, be sure you are actually seeing the color that is there and not what you THINK is there. It's easier said than done, but can make a huge difference in your color matching. 
Until next time....

                                                                    post signature


Monday, April 16, 2012

Plate Mat Tutorial


Do you have a luncheon coming up? Or maybe you're planning a brunch for your quilting bee? I have a very fast, easy way to give a little bit of color and interest to your place settings. They're "Plate Mats"! No, you're not reading with a lisp. These are little mats to put under your clear plates to give them a different look. I found my plates at Walmart and they are very inexpensive. You can make them double duty by putting a contrasting fabric on the back. You can whip one out in about 5 minutes.

1. Measure the bottom of your plate and add 1/4" seam allowance. If your plate is round, do the same. Do not measure the rim of the plate, only the very bottom. Cut a front, back, and batting piece all this size.
2. Layer the two fabric pieces right sides together, and put the batting on the bottom.


3. Sew around the edge (1/4" seam), leaving about 2" for turning.

4. Turn right sides out and press. I find that using a glue stick to turn the opening seams in 1/4" and then gluing the opening closed, makes your work easier. Slip stitch the opening closed.
5. Top stitch 1/4" around the edge. You can quilt it at this point if you want. If not, you're finished!
You can be wild.....


or festive......
or colorful.


You can carry out a theme....
or assign seats!  (this is just a "mock up" of what you could do if you embroidered names on each.)

By the way, the Shop Hop went well! I LOVED meeting so many of you! Thank you for your kind, supportive words! 
Until next time....
post signature