 |
| 1. Cut the front piece 21" x 14". |
 |
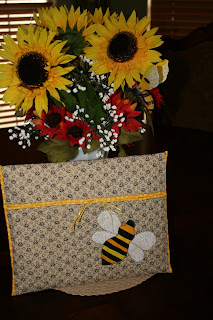
| 2. To determine placement of applique or embroidery, turn up the bottom to within 6" below the top of the fabric. |
 | |
| 3. Add any trim you wish to use to decorate with - applique, embroidery, rick-rack, buttons, etc. |
 |
| 4. Cut the lining piece 22" x 14" (1" longer than the front piece). |
 | |
| 5. Cut a piece of batting the same size as your front - 21" x 14". |
 |
| 6. Layer your pieces with right sides together and batting on top. Center the batting 1/4" from each end. |
 |
| 8. Press so the 1/4" of lining shows at each end. |
 |
| 9. Stitch in the seam line on each side. Quilt the piece at this point. |
 | |
| 10. Turn the bottom up to within 6" of the top, then turn the top down to meet it. Pin in place. |
 | |
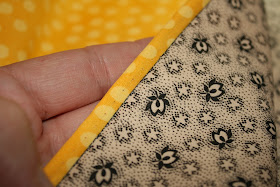
| 11. Cut 2 strips of lining fabric each 11" x 1 1/2" (for a wider binding, but them 2" wide.) Turn the raw edges at the ends in about 1/4". Fold in half lengthwise and press well. |
 | |
| 12. Pin raw edges of binding to each side. Folded edge should be to the inside. Sew 1/4" from edge on each side. |


Linda, What a delightful bag. I think I'm going to need one. Wouldn't it be perfect to carry a stitchery project with you 'on the go'? Thanks so much for the tutorial. I think I'll be sewing again very soon and this would be such a fun project to make up quickly and then enjoy the hand stitching in the evening by the fire...yes, it is still cold here in Northern Utah. *sigh* But Spring is coming I just know it. Almost time to put my hummingbird feeders out. I love to sit out by them in the evening and stitch while the little lovely's zip around, studying me and stopping to sip some sugar water. Hugs...
ReplyDeleteI guess I need to open up my sewing machine again and make one of these. There is something very appealing to me about bags, purses, and pouches!
ReplyDeleteThis is a great gift idea.
This is such a cute pouch! The possibilities are endless really! Thanks for the tut... I WILL use it for something I know it! :)
ReplyDeleteVery nice! Of course I love the fabric! Black and yellow are my new favorites! What a neat little gift to send off items in for birthdays and or friendship gifts...I LOVE IT!
ReplyDeleteThis is a great tutorial and I appreciate the pictures for binding. I'm such a see and sew kind of person! I love your "bumble" bee - great idea!
ReplyDeleteLove it!!!! And that bee is darling. Thanks for the tutorial.
ReplyDeleteI have just started doing some stitchery for a quilt and they are just lying around.... this would be lovely for keeping them altogether and keeping them clean too. Thanks you for the tut.
ReplyDeleteI am so glad I found your blog - Great tutorial - Thank you ;)
ReplyDeleteI'm in charge of a local senior quilting group and we call ourselves "The Busy Bee Quilters". This pattern is perfect for our group and I will be sure to share it with all them! If you have any other "bee" projects, please let me know!
ReplyDelete